Table of Contents
Advertisement
Serial number | Número de serie
See rating Label on grill for serial number.
El número de serie se encuentra en la etiqueta de
especificaciones de la parrilla.
Date purchased | Fecha de compra
If you have questions or need assistance
during assembly, please call 1-800-241-7548.
Si tiene alguna pregunta o si Necesita
ayuda durante el Ensamblado, llámenos Al
1-800-241-7548.
Tools Needed for Assembly:
2 Adjustable Wrenches
Phillips Screwdriver
10/13/14 • 42805247
15202029
Herramientas necesarias para el armado:
2 Llaves regulables
Destornillador Phillips
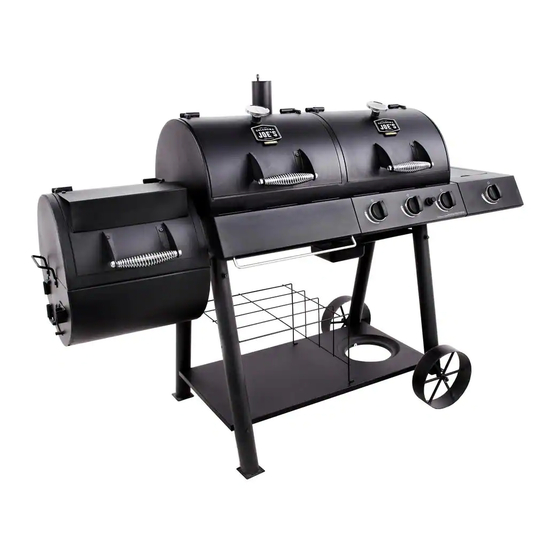
Longhorn
Charcoal/Gas
Smoker and Grill
Advertisement
Table of Contents
Troubleshooting

Related Manuals for oklahoma joes 15202029


Summary of Contents for oklahoma joes 15202029
-
Page 1: Product Record Information
Longhorn Charcoal/Gas 15202029 Smoker and Grill Serial number | Número de serie See rating Label on grill for serial number. El número de serie se encuentra en la etiqueta de especificaciones de la parrilla. Date purchased | Fecha de compra If you have questions or need assistance during assembly, please call 1-800-241-7548. -
Page 2: Table Of Contents
THIS GRILL IS FOR OUTDOOR USE TABLE OF CONTENTS ONLY. Product Record Information ....... .1 DANGER Safety Symbols . - Page 3 WARNING CAUTION Using pots larger than 6 quarts in capacity could exceed After a charcoal fire appears extinguished, unconsumed weight limit of the side burner shelf or side shelf, resulting embers can retain heat for up to 24 hours, and if exposed to in failure of grill cart components.
- Page 4 Connecting Regulator to the LP Cylinder LP Cylinder Exchange •Many retailers that sell grills offer you the option of replacing 1.LP cylinder must be properly secured onto grill. (Refer to assembly section.) your empty LP cylinder through an exchange service. Use only those reputable exchange companies that inspect, precision fill, 2.Turn all control knobs to the OFF position.
-
Page 5: Safety Tips
WARNING WARNING • Outdoor gas appliance is not intended to be installed in or • Do not use grill until leak-tested. on a boat. • If a leak is detected at any time, STOP! Turn off gas at source and correct leak. •... - Page 6 Ignitor Lighting WARNING • Do not lean over grill while lighting. 1. Turn gas burner control valves to (off). For Safe Use of Your Grill and to Avoid Serious Injury: 2. Open lid during lighting or re-lighting. • Do not let children operate or play near grill. 3.
- Page 7 Burner Flame Check NOTE: Your grill may NOT be equipped with a Sideburner! • Remove cooking grates and heat tents. Light burners, rotate knobs from HIGH to LOW. You should see a smaller flame in Sideburner Ignitor Lighting LOW position than seen on HIGH. Perform burner flame check •...
-
Page 8: Spider Alert
Cleaning the Burner Assembly Follow these instructions to clean and/or replace parts of burner CAUTION assembly or if you have trouble igniting grill. 1. Turn gas off at control knobs and LP cylinder. SPIDER ALERT! 2. Remove cooking grates and heat tents. 3. -
Page 9: Preparing To Use Your Smoker
PREPARING TO USE YOUR SMOKER COOKING TIPS Building Your Fire Before cooking with your smoker, the following steps should be 1. Stack charcoal briquettes or wood into a pyramid-shaped pile closely followed to both cure the finish and season the interior on top of the charcoal grate or ash pan. -
Page 10: Smoking
Food Safety SMOKING AND SLOW COOKING Food safety is a very important part of enjoying the outdoor Remove the cooking grill from the firebox and build your fire on cooking experience. To keep food safe from harmful bacteria, top of the fire grate in the firebox. Either charcoal or wood may follow these four basic steps: be used, but wood is the recommended fuel for it’s rate of burn and the flavor it imparts to the food being cooked. -
Page 11: Limited Warranty
LIMITED WARRANTY This warranty only applies to units purchased from an authorized retailer. Manufacturer warrants to the original consumer-purchaser only that this product shall be free from defects in workmanship and materials after correct assembly and under normal and reasonable home use for the periods indicated below beginning on the date of purchase*. - Page 12 ÍNDICE DE MATERIAS ESTA PARRILLA SOLO SE PUEDE USAR EN EXTERIORES. Producción de información de los registros......1 Simbolos de seguridad.
- Page 13 PELIGRO ADVERTENCIA ADVERTENCIA El uso de macetas de más de 6 cuartos de la capacidad Después de un fuego de carbón parece extinguirse, brasas podría superar límite de peso de lado el quemador consumidas pueden retener el calor durante un máximo de plataforma o lado plataforma lo que resulta en el fracaso 24 horas, y si se expone al aire libre, pueden estallar en de la parrilla carrito componentes.
- Page 14 Medidas de seguridad para la instalación Tanque de gas propano • El tanque de gas que use con su parrilla debe cumplir los • Utilice la parrilla, tal como se compró, sólo con LP siguientes requisitos: (propano), el gas y el regulador / válvula de montaje suministrado.
- Page 15 Cambio del tanque de gas Como conectar el regulador al tanque de gas propano • Muchos comerciantes minoristas que venden parrillas, le ofrecen la opción de cambiar su tanque de gas vacío mediante 1. El tanque de gas debe quedar bien fijado a la parrilla. un servicio de recambio.
-
Page 16: Consejos De Seguridad
ADVERTENCIA ADVERTENCIA • El aparato a gas para uso al aire libre no ha sido diseñado • No use la parrilla sin antes haber verificado que no tenga para ser instalado en embarcaciones. fugas. • El aparato a gas para uso al aire libre no ha sido •... - Page 17 Cómo usar el encendedor ADVERTENCIA • No se incline sobre la parrilla al encenderla. 1. Gire las válvulas de control de gas del quemador a (apagado). Para usar su parrilla en forma segura y para evitar 2. Abra la tapa durante el encendido o al volver al encender. lesiones graves: 3.
- Page 18 Control de la llama del quemador Nota: Es posible que su parrilla NO venga equipada • Retire las parrillas de cocción y los reguladores de llama. con un quemador lateral. Encienda los quemadores y gire las perillas, de la graduación ALTA a la graduación BAJA.
- Page 19 Cómo limpiar la unidad del quemador PELIGRO Siga estas instrucciones para limpiar o cambiar piezas de la ADVERTENCIA unidad del quemador, o si tiene problemas para encender la parrilla. 1. Cierre el paso de gas en las perillas de control y desde ¡ALERTA CONTRA el tanque de gas.
-
Page 20: Consejos Para Cocinar
PREPARATIVOS PARA USAR SU AHUMADOR CONSEJOS PARA COCINAR Cómo encender el fuego Antes de cocinar con su ahumador, debe seguir al pie de la letra 1. Apile en forma de pirámide las briquetas de carbón o los os siguientes pasos para curar el acabado y el acero del interior. trocitos de madera sobre la rejilla o la bandeja colectora de Si no cumple con estos requisitos al pie de la letra, se puede cenizas. - Page 21 Seguridad con los alimentos AHUMAR Y COCINAR LENTO Si se utiliza el ahumador como un ahumado o olla de cocción La seguridad con los alimentos es una parte muy importante del lenta, quite la rejilla de la caja de fuego y construya el fuego en la disfrute de su parrillada al aire libre.
- Page 22 GARANTÍA LIMITADA Esta garantía es válida únicamente para las unidades adquiridas de los distribuidores autorizados. El fabricante le garantiza únicamente al consumidor- comprador original, que este producto no presentará defectos de mano de obra ni de materiales por el período indicado a continuación, contado desde la fecha de compra*, si se arma correctamente y se usa en el hogar, en condiciones normales y razonables.
-
Page 24: Parts List & View
PARTS DIAGRAM / DIAGRAMA DE PIEZAS... -
Page 25: Parts List
PARTS LIST Key Qty Description Key Qty Description Smoker Chamber Assembly Butterfly Damper Cool Touch Handle Charcoal Door Latch 3" Professional Temperature Gauge Warming Plate f/ Firebox Main Burner Side Handle Electrode, Short Wire Side Burner Shelf Electrode, Long Wire Side Burner Lid Wire, SB Ignitor Side Burner Pan... - Page 26 LISTA DE PIEZAS Clave Cant. Descripción Clave Cant. Descripción Parte inferior del fogón Conjunto de la cámara del ahumador Regulador de mariposa Asa con aislamiento térmico Cerrojo para la puerta del carbón Termómetro profesional de 7.5 cm Placa calentadora para el fogón Quemador principal Asa lateral Electrodo, alambre corto...
-
Page 27: Assembly Steps
PARTS LIST ASSEMBLY / MONTAJE On each short leg, slide (1) 12mm flat washer onto axle, followed by a wheel, then another 12mm flat washer. Slide a hitch pin clip into the hole at the end of the axle. En cada pierna corta, introduzca una (1) roldana plana de 12 mm sobre el eje, seguida de una rueda, y luego otra roldana plana de 12 mm. Introduzca una sujetador del pasador de enganche en el orificio en el extremo del eje. - Page 28 With the aid of a helper, attach the bottom shelf to legs using (4) 1/4-20 x 3” screws and (4) 1/4-20 flange nuts. DO NOT FULLY TIGHTEN THE SCREWS AT THIS TIME! Con ayuda de una persona, fije el anaquel inferior a las piernas con cuatro (4) tornillos de 1/4-20 x 3" y cuatro (4) tuercas de reborde de 1/4-20. ¡NO APRIETE LOS TORNILLOS COMPLETAMENTE EN ESTE MOMENTO! Bottom Shelf Anaquel inferior...
- Page 29 Make sure that legs bolts are tight enough so that legs will not slip off the posts. With the assistance of a helper, place the grill onto it’s legs. Once upright, fully tighten the (4) leg bolts. Insert the tank exclusion right end into holes on the bottom shelf. Then align the left end of the tank exclusion with holes on the long legs and slide into place.
- Page 30 Connect firebox lid and firebox bottom using (4) 1/4-20 x 1/2” bolts and (4) 1/4-20 flange nuts. Una la tapa del fogón y la parte inferior del fogón con cuatro (4) pernos de 1/4-20 x 1/2” y cuatro (4) tuercas de reborde de 1/4-20. Firebox Bottom Parte inferior del fogón Firebox lid...
- Page 31 With the aid of a helper, connect firebox and smoker chamber using (8) 5/16-18 x 3/4” Bolts, 5/16” lock washers, 5/16” flat washers and 5/16-18 nuts. Tighten securely. Con ayuda de una persona, una el fogón y la cámara del ahumador con ocho (8) pernos de 5/16-18 x 3/4”, una roldana de seguridad de 5/16”, una roldana plana de 5/16”...
- Page 32 A. Attach the right side fascia to side shelf with (4) #10 x 3/8” self-tap screws. B. Pre-assemble (4) 1/4-20 x 1/2” bolts and (4) 1/4-20 flange nuts loosely to the right side panel of the smoker, then hang the side shelf onto the screws.
- Page 33 Insert side burner valve into fascia, place bezel on fascia, then install (2) #8-32 x 3/8” screws through bezel, fascia and into valve. B. Press control knob onto side burner valve stem as shown below. A. Inserte la válvula en la protección, coloque el montaje sobre la protección y luego coloque dos (2) tornillos de N° 8-32 x 3/8" a través del montaje y la protección hacia la válvula y apriete.
- Page 34 Place (3) heat tents onto the brackets in the firebox over the burners. Coloque tres (3) difusores en los soportes en el fogón sobre los quemadores. Heat Tents Difusores Place charcoal grate assembly into charcoal grill bottom and charcoal grate into firebox bottom. Coloque una montaje de bandeja para carbón en la parte inferior del asador de carbón y una parrilla para carbón en la parte inferior del fogón.
- Page 35 Place (2) smaller cooking grates into firebox. Then place (4) large cooking grates into smoker chamber. Coloque dos (2) parrillas para cocinar más pequeñas en el fogón. Luego coloque cuatro (4) parillas para cocinar grandes en la cámara del ahumador. Smoker Chamber Cooking Grates Parrillas para cocinar en la cámara del ahumador Firebox Cooking Grates...
- Page 36 Remove electronic ignition module cap, install battery positive out, reinstall cap. Retire módulo de encendido tapa, instale la batería con el positivo hacia fuera, vuelva a instalar la tapa. ONE AA Battery (included) UNO AA Batería (incluido) DO NOT DISPOSE OF BATTERIES IN FIRE. BATTERIES MAY EXPLODE OR LEAK. NO TIRE LAS PILAS DE FUEGO.
- Page 37 LP CYLINDER IS SOLD SEPARATELY. Fill and leak check the cylinder before attaching to grill and regulator (see Use & Care section). Once cylinder has been filled and leak checked, place cylinder into hole in bottom shelf. Make sure cylinder valve is facing as shown. Secure cylinder with tank secure screw under bottom shelf.
-
Page 38: Troubleshooting
EMERGENCIES: If a gas leak cannot be stopped, or a fire occurs due to gas leakage, call the fire department. Emergencies Possible Cause Prevention/Solution Gas leaking from • Damaged hose. •Turn off gas at LP cylinder or at source on natural gas systems. Discontinue use of cracked/cut/burned hose. -
Page 39: Troubleshooting
Troubleshooting (continued) Problem Possible Cause Prevention/Solution Sudden drop in gas flow or • Check for gas in LP cylinder. • Out of gas. low flame. • Excess flow valve tripped. • Turn off knobs, wait 30 seconds and light grill. If flames are still low, turn off knobs and LP cylinder valve. - Page 40 CASOS DE EMERGENCIA: Si no se puede detener una fuga de gas, o si ocurre un incendio debido a una fuga de gas, llame a los bomberos. Emergencias Causas probables Medidas de prevención / solución Fugas de gas de mangueras •...
- Page 41 Resolución de problemas continuación) Causas probables Medidas de prevención / solución Problema Causas probables Medidas de prevención / solución Caída repentina del flujo de • Se acabó el gas. • Verifique que el tanque de gas esté cargado. gas o llama reducida. •...
-
Page 43: Registration Card
FOR US ONLY Text “Register” to “GRILLS” (474557) Envíe un mensaje de texto con la palabra “Register” a “GRILLS” (474557) - Page 44 ©2014 Char-Broil, LLC. Columbus, GA, 31902. Printed in China. Impreso en China. ©2014 Assembly instructions. ©2014 Instrucciones de ensamblado.
Need help?
Do you have a question about the 15202029 and is the answer not in the manual?
Questions and answers
How to replace battery in gas starter
To replace the battery in the Oklahoma Joe's gas starter (part number 15202029):
1. Remove the electronic ignition module cap.
2. Install one AA battery with the positive end facing out.
3. Reinstall the cap.
Do not dispose of the battery in fire, as it may explode or leak.
This answer is automatically generated
Why won't my middle burner lite. It is not allowing any propane to get t0o the burner