HIKVISION DS-7200 Series User Manual
Network digital video recorder
Hide thumbs
Also See for DS-7200 Series:
- User manual (227 pages) ,
- Quick start manual (13 pages) ,
- User manual (218 pages)
Table of Contents
Advertisement
Advertisement
Table of Contents

Related Manuals for HIKVISION DS-7200 Series


Summary of Contents for HIKVISION DS-7200 Series
- Page 1 DS-7200/DS-7300/DS-8100 Series DVR USER’S MANUAL Version 3.1...
- Page 2 The content of this manual is furnished for informational use only, is subject to change without notice, and should not be construed as a commitment by Hikvision Digital Technology Co., Ltd. (Hikvision). Hikvision assumes no responsibility or liability for any errors or inaccuracies that may appear in the book.
-
Page 3: Preventive And Cautionary Tips
Preventive and Cautionary Tips Before connecting and operating your DVR, please be advised of the following tips: • Ensure unit is installed in a well-ventilated, dust-free environment. • Unit is designed for indoor use only. • Keep all liquids away from the DVR. •... -
Page 4: Table Of Contents
TABLE OF CONTENTS CHAPTER1 Introduction ....................... 6 Product Key Features ......................7 Using the Front Panel Controls ..................... 9 Using the IR Remote Control ....................12 Using a USB Mouse ......................13 Using the Soft Keyboard ...................... 13 Rear Panel Diagram ......................14 CHAPTER2 Getting Started ...................... - Page 5 Managing Disks ........................59 Checking Disk Status ......................59 Formatting Disk ........................59 Enabling Disk Overwrite ..................... 60 Managing Files ........................61 Searching for Recorded Files ....................61 Locking and Unlocking Recorded Files ................61 CHAPTER10 DVR Management ....................63 Managing System .........................
-
Page 6: Chapter1 Introduction
CHAPTER1 Introduction DS-7200/DS-7300/DS-8100 Series DVR USER’S MANUAL... -
Page 7: Product Key Features
• Support local multi-user management. The administrator can set every guest user’s access right. Users can log off and switch. • Supports mouse, front panel, IR control and Hikvision DS-1003KI keyboard • Local Functions (HDD Management): • Supports up to 8 SATA HDD, each HDD can support max 2TB capacity. -
Page 8: Connecting Your Dvr
Connecting Your DVR You may follow the diagram below (Figure 2) in connecting your DVR to its peripherals. Fig 2: DVR Connection Diagram DS-7200/DS-7300/DS-8100 Series DVR USER’S MANUAL... -
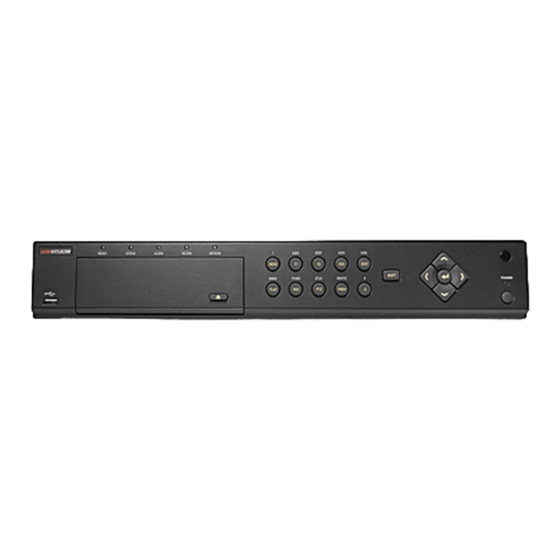
Page 9: Using The Front Panel Controls
Operating Your DVR There are numerous ways to navigate and operate your DVR. You may use the Front Panel Controls, the included IR (Infra-Red) Remote, a Mouse and the Soft-Keyboard. Using the Front Panel Controls Figure 3-1: DS-7208HVI-S Figure 3-2: DS-7216HVI-S Fig 3-3: DS-7300H(F)I-S Series Fig 3-4: DS-7300H(F)I-SE Series The controls on the front panel include:... - Page 10 HDD: HDD indicator blinks red when data is being read from or written to HDD. Tx/Rx: Tx/Rx indictor blinks blue when network connection is functioning properly. Control Buttons: MENU/WIPER Button: Pressing the MENU/WIPER button will return the user to the Main menu (after successful login).
- Page 11 The controls on the front panel include: Power Button: Powers DVR on/off. IR Receiver: Receiver for IR remote. USB Ports: Universal Serial Bus (USB) ports for additional devices such as USB mouse and USB Hard Disk Drive (HDD). Status Indicators: Status indicators for different features of the DVR. ...
-
Page 12: Using The Ir Remote Control
Using the IR Remote Control Your DVR may also be controlled with the included IR remote control, shown in Figure 4. Batteries (2x AAA) must be installed before operating. Figure 4. IR Remote Control The keys on the remote control closely resemble the ones found on the front panel. Referring to Figure 4, they include: 1. -
Page 13: Using A Usb Mouse
3. Press the DEV button on the remote. 4. Enter the DVR ID# from step 2. 5. Press the ENTER button on the remote. If the Status indicator on the front panel turns blue, the remote control is operating properly. If the Status indicator does not turn blue and there is still no response from the remote, please check the following: 1. -
Page 14: Rear Panel Diagram
Rear Panel Diagram Figure 6-1: DS-7208HVI-S Figure 6-2: DS-7216HVI-S Item Description VIDEO OUT BNC connector for video output. If VGA is connected, the interface will not function. If VGA is not connected, the interface is used as the main video output with local video display and menu operations. - Page 15 Figure 6-3: DS-7300H(F)I-S(E) Item Description BNC connector for video output. If VGA is connected, the interface will not function. If VGA VIDEO OUT is not connected, the interface is used as the main video output with local video display and menu operations.
- Page 16 Figure 6-4: DS-8100-S(E) series Item Description VIDEO IN BNC connectors for analog video input. AUDIO IN BNC connectors for analog audio input. VIDEO SPOT BNC connector for monitor. Single window view. BNC connector for video output. If VGA is connected, the interface will not function. VIDEO OUT If VGA is not connected, the interface is used as the main video output with local video display and menu operations...
-
Page 17: Chapter2 Getting Started
CHAPTER2 Getting Started DS-7200/DS-7300/DS-8100 Series DVR USER’S MANUAL... -
Page 18: Starting And Shutting Down Your Dvr
Starting and Shutting Down Your DVR Proper startup and shutdown procedures are crucial to expanding the life of your DVR. To startup your DVR: 1. Ensure the power supply is plugged into an electrical outlet. It is HIGHLY recommended that an Uninterruptible Power Supply (UPS) be used in conjunction with the unit. -
Page 19: Rebooting And Locking Your Dvr
Note: Do not press the POWER button again when the system is shutting down. Rebooting and Locking Your DVR While in the Shutdown menu (Figure 8), you may also reboot or lock your DVR. Locking your DVR will return you to the Live Feed mode, which will require the correct administrator password to exit out of it. The Reboot button will reboot your DVR. - Page 20 5. To acquire the time and date over an NTP (Network Time Protocol) Server, check the Synchronize via NTP server checkbox. You may enter your own NTP server or select from one of the default locations from the list of servers, as shown in Figure 11.
-
Page 21: Checking The Status Of Your Dvr
Checking the Status of Your DVR The current status of your DVR can be checked at anytime by going to the Status menu. The status menu, shown in Figure 12 can be accessed by going to Main Menu > Status. Figure 12. -
Page 22: Chapter3 Live Feed
CHAPTER3 Live Feed DS-7200/DS-7300/DS-8100 Series DVR USER’S MANUAL... -
Page 23: Watching A Live Feed
Watching a Live Feed The Live Feed mode is automatically started after the DVR boots up. It is also at the very top of the menu hierarchy, thus hitting the ESC button multiple times (depending on which menu you’re on) will bring you to the Live Feed mode. - Page 24 The settings you may adjust with each display includes: • Picture Settings: Settings for the brightness, contrast, saturation and hue of selected display. To adjust the picture settings of a display: 1. Select display. 2. Click the Picture Settings icon. This will bring up the Picture Settings menu, as shown in .Figure 15. Figure 15.
- Page 25 Figure 17. Enable Audio Error Window • Digital Zoom Mode: Enable digital zoom on the selected channel. Once enabled, the regular feed will be shown in the lower right corner while the zoomed in view will be shown on the full screen. The zoomed in region may be changed by moving the red rectangle in the regular feed window.
-
Page 26: Using The Display Menu
Using the Display Menu The Display Menu can be accessed by right-clicking the mouse on any of the display in Live Feed mode. The Display menu, shown in Figure 18 allows you to quickly change into different display modes and to start/stop auto-switching of the display modes. - Page 27 Note: After 20 seconds of inactivity, the DVR will automatically exit out of the Display menu and go back into the Live Feed mode. Note: The Lock Main Menu setting is selected by default, meaning the Admin password must be enter to exit out of the Live Feed into the Main Menu.
-
Page 28: Configuring Live Feed Displays
Configuring Live Feed Displays Live Feed displays can be customized to your own needs. These settings can be accessed by entering the Display Configuration menu, shown in Figure 19. Figure 19. Display Configuration Menu To customize display settings: 1. Enter the Display Configuration menu by going to Main Menu > System Configuration > Display Configuration. 2. -
Page 29: Setting Camera Order
Setting Camera Order Setting the camera order allows you to logically position cameras for more efficient monitoring of your own individual location. Figure 20. Camera Order Setting To set the camera order: 1. Enter the Display Configuration menu, shown in Figure 19 by going to Main Menu > System Configuration > Display Configuration. -
Page 30: Chapter4 Record Settings
CHAPTER4 Record Settings DS-7200/DS-7300/DS-8100 Series DVR USER’S MANUAL... -
Page 31: Configuring Settings For Recording
Configuring Settings for Recording There are multiple ways to setup your DVR for recording. They include setting up a recording schedule, triggering a recording by motion detection and/or a sensor alarm, and manually starting the recording. Configuring Recording Settings Before setting your DVR up for recording, certain settings should be configured first. These settings can be found in the Recording Configuration menu, shown in Figure 21. -
Page 32: Configuring A Quick Recording Schedule
ended. 9. Enter the erase video after time. The Erase Video After time denotes the amount of days that files will be deleted after its initial recording. Setting the time to 0 will allow the DVR to only delete and overwrite files when the HDD is full. - Page 33 Figure 24. Advanced Schedule Configuration Menu 2. Select the camera to configure from the camera drop down menu. If all the cameras are to be configured with the same settings, select All Cameras from the list. 3. Check the Enable checkbox to enable the recording schedule. If the checkbox is unchecked, the recording schedule will be disabled.
- Page 34 10. Repeat steps 4-10 to setup additional time periods for the selected day. 11. Select the Save button to save the schedule settings and select Exit to return to the previous menu. Selecting the Exit button without clicking Save will quit out of the menu without saving settings. Note: Creating a schedule in the Quick Schedule Configuration menu will also create a schedule in Advanced Schedule Configuration.
-
Page 35: Chapter5 Playback
CHAPTER5 Playback DS-7200/DS-7300/DS-8100 Series DVR USER’S MANUAL... -
Page 36: Playing Back A Recording
Playing Back a Recording Previously recorded files can be played back using the Playback Interface. You must first search for recordings to play them back. Understanding the Playback Interface It’s important to understand how to use the Playback Interface to efficiently navigate through recorded files. To access the Playback Interface, shown in Figure 27, go to Main Menu >... -
Page 37: Playing Back Recorded Files
Figure 28. Playback Menu Example 4. Click on the desired date that is highlighted in light blue to search for recordings. If recordings exist, the timeline will be filled with blue bars to designate recorded files. The playback marker, indicated by a green vertical line will automatically jump to the beginning of the earliest recordings for the selected date. - Page 38 Figure 30. Full-Screen Playback Mode 5. In full-screen mode, you may hide the toolbars by clicking the Hide Toolbar button. Clicking the Exit Full-Screen button will return you to the original playback mode. 6. Click the Enable/Disable Audio button to turn on and off audio during playback. 7.
-
Page 39: Chapter6 Backup
CHAPTER6 Backup DS-7200/DS-7300/DS-8100 Series DVR USER’S MANUAL... -
Page 40: Backing Up Video Clips
Backing Up Video Clips Video clips can be backed up to various devices, such as USB flash drives, USB HDDs or a DVD writer. Selecting Video Clips Video clips can be selected for backup in the Playback Interface using the controls found in the Mark Clip For Backup panel, shown in Figure 31. -
Page 41: Backing Up Video Clips
Backup button. Note: The Play Clip, Save Clip and Clear Clip buttons are not available unless a completed video clip is selected. A completed video clip has a start and end point marked by using the Start Clip and End Clip button. Note: The Start Clip button is not available when there is still a video clip that has not been saved or cleared. - Page 42 Figure 35. Files Backup Menu 4. In the Files Backup menu, connect a USB storage device and click the Refresh button. If the device is detected, a list of its file contents as well as the available free space will be shown. 5.
-
Page 43: Chapter7 System Configuration
CHAPTER7 System Configuration DS-7200/DS-7300/DS-8100 Series DVR USER’S MANUAL... -
Page 44: Configuring Network Settings
Configuring Network Settings Network settings must be configured before you’re able to use your DVR over the network. To configure network settings: 1. Enter the Network Configuration menu, shown in Figure 36 by going to Main Menu > System Configuration > Network Configuration. Figure 36. -
Page 45: Adding A New User
Adding a New User You may add up to 31 new users to your DVR. To add new users: 1. Enter the User Settings menu, shown in Figure 38 by going to Main Menu > System Configuration > User Settings. Figure 38. -
Page 46: Editing A User
Editing a User To edit a user: 1. Enter the User Settings menu, shown in Figure 38 by going to Main Menu > System Configuration > User Settings 2. Select a user to edit in the Users List panel. 3. Edit user information in the Users and Remote Permissions panel. 4. -
Page 47: Configuring Ptz Cameras
Configuring PTZ Cameras Configuring Basic PTZ Settings Settings for a PTZ camera must be configured before it can be used. Before proceeding verify that the PTZ and RS-485 of the DVR are connected properly. To configure PTZ settings: 1. Enter the PTZ Configuration menu, shown in Figure 42 by going to Main Menu > System Configuration > PTZ Configuration. -
Page 48: Customizing Ptz Presets, Patterns And Patrols
Figure 41. PTZ Controls Button 5. If PTZ camera is not working properly, make sure PTZ is connected and configured with the correct settings under the Serial Settings tab. 6. Click Done to exit and return to the previous menu. Customizing PTZ Presets, Patterns and Patrols Your DVR allows you to customize presets, patterns and patrols for a connected PTZ camera. -
Page 49: Configuring Alarms And Exceptions
Configuring Alarms and Exceptions Setting Up Motion Detection Set up properly, using motion detected recording will increase the number of days your DVR is able to record. It will only record relevant events rather than everything, which will also make searching for events easier. To set up motion detection: 1. -
Page 50: Configuring Alarm Inputs
Configuring Alarm Inputs Recordings can also be triggered from an external sensor alarm device. To setup recording triggers from alarm inputs: 1. Enter the Trigger Settings menu, shown in Figure 43 by going to Main Menu > Recording Configuration > Trigger Settings. -
Page 51: Configuring Exceptions
input. • Notify Surveillance Center: DVR will notify surveillance center when alarm is triggered. • Send Email: DVR will send an email out to the designated recipients when alarm is triggered. • Trigger Alarm Output: DVR will trigger alarm output when input is triggered. Selecting this option will enable the Alarm Output list, where the output to trigger can be selected. - Page 52 Figure 46. Email Configuration Menu Under Server Information, enter all pertinent email information, including: • Server Authentication: Enable if email server requires authentication. Enabling Server Authenticating will enable the User Name and Password fields. • User Name: User name to use for server authentication. •...
-
Page 53: Chapter8 Camera Management
CHAPTER8 Camera Management DS-7200/DS-7300/DS-8100 Series DVR USER’S MANUAL... -
Page 54: Configuring Cameras
Configuring Cameras To setup privacy zones 1. Enter the Privacy Zones menu, shown in Figure 47 by going to Main Menu > Camera Setup > Privacy Zones. Figure 47. Privacy Zones Privacy Zones Menu 2. Select the camera to setup privacy zones in using the camera drop down menu on the upper left of the menu. If all cameras are to be configured with the same settings, select All Cameras from the list. -
Page 55: Configuring Video Tampering Detection
Configuring Video Tampering Detection Video tampering detection can be used to recognize if an area of a camera is purposely covered and to respond accordingly. To configure video tampering detection: 1. Enter the Video Tampering Detection menu, shown in Figure 48 by going to Main Menu > Camera Setup > Video Tampering Detection. -
Page 56: Configuring Video Loss Detection
Configuring Video Loss Detection Video loss detection can be enabled on any of the channels on your DVR to detect the loss of video. To configure video loss detection: 1. Enter the Video Loss Detection menu, shown in Figure 49 by going to Main Menu > Camera Setup > Video Loss Detection. -
Page 57: Configuring Osd Settings
Configuring OSD Settings On Screen Display (OSD) settings can be configured in the OSD Configuration menu. The OSD is shown in each display in Live Feed and Playback mode. To configure OSD settings: 1. Enter the OSD Configuration menu, shown in Figure 50 by going to Main Menu > Cameras Setup > OSD Configuration. -
Page 58: Chapter9 Disk Management
CHAPTER9 Disk Management DS-7200/DS-7300/DS-8100 Series DVR USER’S MANUAL... -
Page 59: Managing Disks
Managing Disks Checking Disk Status The status of all installed hard disk drives (HDD) can be checked under the Disk Management menu. To check the status of installed disks: 1. Enter the Disk Management menu, shown in Figure 51 by going to Main Menu > System Configuration > Disk Management. -
Page 60: Enabling Disk Overwrite
Figure 53. Disk Format Progress Bar 6. Click the Done button to exit out of Disk Management. Enabling Disk Overwrite Enabling disk overwrite will allow the DVR to overwrite the installed disks once the disks are full. To enable disk overwrite: 1. -
Page 61: Managing Files
Managing Files Searching for Recorded Files Previously recorded files can be searched by criteria in the File Management menu. To search for recorded files: 1. Enter the File Management menu, shown in Figure 54 by going to Main Menu > System Configuration > File Management. - Page 62 Note: Locked files will never be overwritten until they are unlocked. DS-7200/DS-7300/DS-8100 Series DVR USER’S MANUAL...
-
Page 63: Chapter10 Dvr Management
CHAPTER10 DVR Management DS-7200/DS-7300/DS-8100 Series DVR USER’S MANUAL... -
Page 64: Managing System
Managing System Upgrading the System Firmware The system firmware for your DVR can be updated from a USB storage device. To update the system firmware: 1. Enter the Firmware Upgrade menu, shown in Figure 56 by going to Main Menu > Maintenance > Firmware Upgrade. -
Page 65: Exporting & Importing Configuration
Exporting & Importing Configuration Configuration information from your DVR can be exported to a USB storage device and imported into another DVR. This will allow you to efficiently setup the same configuration on numerous DVRs. To export DVR configuration: 1. Enter the Export/Import Configuration menu, shown in Figure 58 by going to Main Menu > Maintenance > Export/Import Configuration. -
Page 66: Viewing System Logs
Viewing System Logs Many events of your DVR are logged into the system logs. To access the system logs and search for these events: 1. Enter the System Logs menu, shown in Figure 59 by going to Main Menu > Maintenance > System Logs. Figure 59. - Page 67 2. User is admin by default. Main menu can be lock/unlock by clicking the icon beside it. 3. Once a system menu is locked, access to that menu will only be granted after the correct Admin password is entered. Figure 61. Lock Menus Menu 4.
Need help?
Do you have a question about the DS-7200 Series and is the answer not in the manual?
Questions and answers