Table of Contents
Advertisement
Advertisement
Table of Contents

Related Manuals for Izzo Alex-2


Summary of Contents for Izzo Alex-2
- Page 1 Made In Italy Owner’s Manual...
-
Page 2: Table Of Contents
Alex Espresso Machine Diagrams ...................................2 Introduction ................................3 First Time Set Up – Reservoir Mode ........................3 First Time Set Up – Plumbed In Mode ........................5 Before Each Use ...............................6 Normal Operation ..............................7 Reservoir ..................................7 Audible Alert ................................7 Pressure Gauges ................................8 Pump ..................................8 Switches ..................................8 Drain Kit ..................................9 PID Controller ................................. -
Page 3: Diagrams
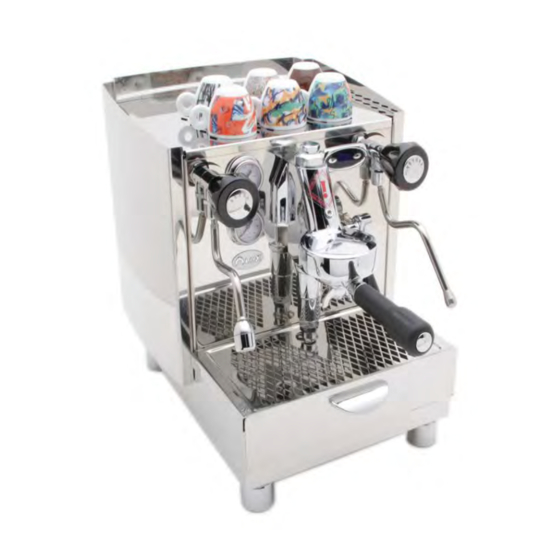
Alex Espresso Machine Diagrams 1. Hot Water Knob 2. Steam Pressure Gauge 3. Cup Warming Tray 4. PID Controller 5. Steam Knob 6. Pump Pressure Gauge 7. E61 Group Head 8. Hot Water Wand 9. Portafilter 10. Drip Tray 11. Drip Tray Cover 12. -
Page 4: Introduction
Alex Espresso Machine Introduction First of all, thank you for your business! You are going to love your new Alex espresso machine. It combines classic beauty, value, and great performance for making the best espressos, cappuccinos, and lattes you‟ve ever tasted! These instructions include tips that will help bring out the Barista that‟s hidden within! Enjoy your new machine! First Time Set Up –... - Page 5 Alex Espresso Machine First Time Set Up – Reservoir Mode – Continued Pull the drip tray out to expose the 2 switches shown in the picture below. Make sure the lever on the right is in the RESERVOIR position and the Alarm switch is also ON. ...
-
Page 6: First Time Set Up - Plumbed In Mode
Alex Espresso Machine First Time Set Up – Plumbed In Mode Before hooking the machine up to a water line test your water for hardness using the provided test strips. If your water is above 3 grains of hardness then a softening system should be installed to prolong the life of the machine. -
Page 7: Before Each Use
Alex Espresso Machine First Time Set Up - Plumbed In Mode – Continued Whenever the pump comes on to refill the boiler the PID display will turn off to protect the heater during the fill process. Place whichever portafilter you intend to use into the grouphead so that it will heat up with the machine. -
Page 8: Normal Operation
Alex Espresso Machine Normal Operation Reservoir The reservoir is located in the back of the machine under the cup warming tray. The reservoir should be filled with cold softened water only. The reservoir can be cleaned with mild dish detergent and should NOT be used in a dishwasher. ... -
Page 9: Pressure Gauges
Alex Espresso Machine Normal Operation - Continued Pressure Gauges The top gauge is your boiler steam pressure. When the heating light turns off the boiler is up to pressure and should be around 1.2 – 1.5 bar. If the steam boiler power switch is turned off then the steam gauge will not show any pressure. -
Page 10: Drain Kit
Alex Espresso Machine Normal Operation – Continued Drain Kit An optional drain kit can be attached for hooking the drip tray up to a drain. The drain tube can be routed into an open drain, dishwasher drain tail piece, or even a 5 gallon bucket can be used if a drain is not available. -
Page 11: Pid Controller
Alex Espresso Machine PID Controller The PID controller is used to control the heating in place of using a pressure stat. This allows for a more reliable and precise temperature control. Keep in mind the temperature shown on the display is the steam boiler temperature. -
Page 12: Brewing Espresso
Alex Espresso Machine Brewing Espresso First let me begin by explaining the three main variables of preparing great espresso. 1. Quantity of ground coffee 2. Tamping 3. The grind Quantity of Ground Coffee - Loosely fill the basket slightly mounding over the top. Then lightly run your finger arched across the basket from left to right, right to left, front to back, and then lay your finger flat on the basket and go from back to front to remove any excess coffee. -
Page 13: Steaming Milk - Basics
Alex Espresso Machine Steaming Milk – Basics First, let‟s talk about some of the things you need to learn in order to become „barista-like‟ in your techniques. Milk – Whole milk works best to steam, both in technique and in flavor! Lower fat milks contain mostly water which will not foam well and will be almost tasteless when steamed. -
Page 14: Steaming Milk - Technique
Alex Espresso Machine Steaming Milk - Technique As you face your espresso machine, point the steam arm over your drip tray and open up the steam knob in order to purge out any unwanted water that may have collected inside the wand due to condensation –... -
Page 15: Helpful Tips And Information
Alex Espresso Machine Helpful Tips and Information When turning the steam knob off, always keep the tip under the surface of the milk for approximately 3 seconds. If you pull it out too soon, you will destroy the nice velvety micro-foam. -
Page 16: Regular Maintenance
Alex Espresso Machine Regular Maintenance Backflushing is a vital maintenance procedure you must follow to help keep your machine running flawlessly for years to come. There are two types of backflushing; one with plain water, and the other with espresso machine cleaner. Plain water backflushing should be done at least once a week, however if you are so inclined, feel free to backflush with plain water as often as you like. -
Page 17: Removing The Outer Shell
Alex Espresso Machine Removing The Outer Shell Warning: Unplug the machine from the outlet before removing the outer shell. Failure to do so may cause injury and/or electrical shock. The manufacturer and its distributors assume no liability for failure to follow this warning. To remove the outer shell, remove the top cup warming tray. -
Page 18: Group Gasket And Shower Screen Replacement
Alex Espresso Machine Group Gasket And Shower Screen Replacement The group gasket is a black rubber gasket that makes the seal between the portafilter and the group head. We recommend replacing the gasket on a yearly basis. The Alex uses an E61 8.5mm gasket. -
Page 19: Cleaning The Group
Alex Espresso Machine Gasket and Screen Removal - Continued Method 2 If the gasket and screen will not come out using the previous method then you will need a scratch awl or ice pick to remove them. Using the scratch awl or ice pick, deeply pierce the gasket and then pry it down. - Page 20 Alex Espresso Machine Gasket And Screen Installation - Continued Step 2 Remove the insert basket from one of your portafilters and then insert the screen and gasket into the portafilter as shown to the right. Step 3 With the gasket and screen in the portafilter, press the portafilter into the group head as shown.
-
Page 21: Descaling
Alex Espresso Machine Descaling Descaling is the process of running a descaling agent such as citric acid through the machine to remove the accumulation of mineral deposits. If you are using softened water then it should not be necessary to descale the machine. ... -
Page 22: No Water From Hot Water Wand
Alex Espresso Machine No Water From Hot Water Wand Make sure the main power switch has been turned on for at least 15 minutes. Check the upper gauge for steam pressure. Pressure should be about 1.2 bar. If the gauge is at zero then refer to the “Not Heating”... -
Page 23: Pid Display Is Turned Off
Alex Espresso Machine PID Display Is Turned Off Make sure the main power switch is turned on and the outlet has power. Make sure the water reservoir is filled with cold softened water. If plumbed in make sure that the water supply is turned on to the machine. ... -
Page 24: Espresso Coming Out Too Slow Or Not At All
Alex Espresso Machine Espresso Coming Out Too Slow Or Not At All Activate the brew lever and check the pump pressure. Recommended setting is 9 bar. Adjust pump pressure if necessary. If pump pressure is good then try adjusting grind coarser. ... -
Page 25: Warranty
Alex Espresso Machine Warranty The Alex comes with a 1 year warranty starting from the original date of purchase to protect against defects in materials or workmanship. The warranty is void if the product has been damaged by abuse, neglect, or modification. For more detailed information about the warranty please visit our website at the following link: www.chriscoffee.com/policy We Are Here To Help...
Need help?
Do you have a question about the Alex-2 and is the answer not in the manual?
Questions and answers