Table of Contents
Advertisement
Quick Links
Download this manual
See also:
User Manual
Advertisement
Table of Contents

Related Manuals for Pantech Jest


Summary of Contents for Pantech Jest
- Page 1 User Guide...
- Page 2 User Guide...
-
Page 3: Table Of Contents
CHAPTER 1. BEFORE USING ADJUSTING VOLUME .....................32 CALLER ID FUNCTION ....................33 BEFORE USING ....................8 VIBRATE MODE ......................33 INSIDE THE PACKAGE ....................8 SPEAKERPHONE MODE ..................33 HANDSET DESCRIPTIONS ..................9 USING AUTO KEYPAD LOCK FUNCTION ..............33 KEY DESCRIPTIONS ....................11 AVAILABLE OPTIONS DURING A CALL ..............33 DISPLAY INDICATORS ....................13 MAKING AN EMERGENCY CALL ................ - Page 4 RECENT CALLS .....................61 TOUCH KEY SETTINGS ..................107 RECENT CALLS ...................... 61 MEMORY ......................108 MISSED ......................... 61 USB MODE ......................111 RECEIVED ......................62 PHONE INFO ....................... 111 DIALED ........................63 SET - UP WIZARD ....................113 BLOCKED ....................... 63 CHAPTER 5.
-
Page 5: Before Using
MOBILE IM ......................140 EMAIL ......................... 140 BEFORE USING CHAT ........................140 SETTINGS ......................141 This chapter provides important information about using the JEST including: CHAPTER 7. SAFETY AND WARRANTY Inside the package SAFETY ......................145 Handset descriptions SAFETY INFORMATION FOR WIRELESS HANDHELD PHONES ......145 Key descriptions SAFETY INFORMATION FOR FCC RF EXPOSURE .......... -
Page 6: Inside The Package
INSIDE THE PACKAGE HANDSET DESCRIPTIONS This package should include all items pictured below. If any are missing or different, immediately contact the retailer where you purchased the phone. Attention: Ne pas exposer a des tempe atures élevées (140 /60 ). Ne pas démonter . -
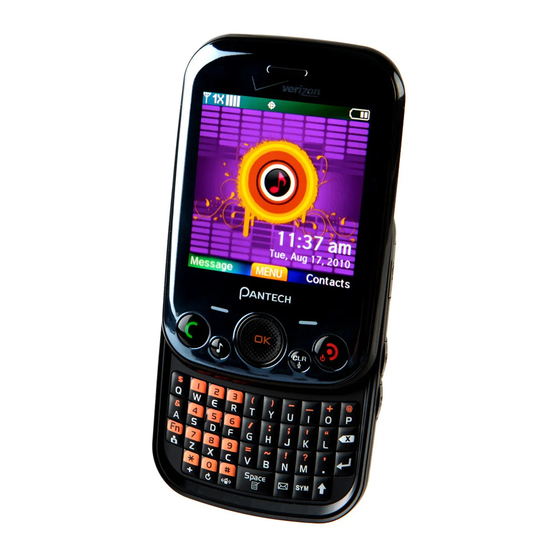
Page 7: Handset Descriptions
HANDSET DESCRIPTIONS KEY DESCRIPTIONS The following list correlates to the previous page’ s phone illustration. 1. [ ] Left Soft Key: Touch to display the Message menu or access the function listed above the key. 2. [ ] SEND Key: Press to make or receive a call. From idle mode, press to access the All Calls list. -
Page 8: Display Indicators
13. OK Key: Allows you to access the menu screen. It also allows you to accept DISPLAY INDICATORS choices when navigating through a menu. Icon Icon Descriptions 14. Display Screen: Displays the digital clock, messages, phone status and 1X Signal Strength: Indicates your phone is in the CDMA 1X network. indicator icons. - Page 9 Icon Icon Descriptions Icon Icon Descriptions E911: Global Positioning Service (GPS) for E911 is set to On for emergency Speakerphone: Speakerphone mode is active. calls only. Missed Calls: Indicates you have missed calls. Location On: GPS is set to On for Location Service and E911 calls. Message: Indicates you have new messages.
-
Page 10: Install Battery
INSTALL BATTERY Message Icons 1. Insert your finger tip into the slot (1), then push down on Unread EMS Corrupt Message top of the battery cover and slide it off to remove (2). Read EMS Pending Message Send 2. Slide the battery into the slot (3) by aligning the contacts New/Unread Message Unread MMS and press down (4) until you hear the “click”. -
Page 11: Charging Your Battery
DO’S Data Jack (making sure to align the connector as it • Only use the battery and charger approved for use with the JEST appears in the image to the right) and the wall adapter • Only use the battery for its original purpose. -
Page 12: Using The Directional Key
Swipe left, right, up or down to scroll through menus or to access shortcuts from idle mode. BASIC OPERATION This chapter addresses and explains the basic features for JEST including: Turning the phone on/off Call waiting function Calling a number from contacts... -
Page 13: Turning The Phone On/Off
TURNING THE PHONE ON/OFF This manual assumes that Display Themes is set to Oceanic Delight, and Menu Layout is set to List, which are the default settings. TURNING THE PHONE ON 1. Press and hold the END Key until the display turns on. USING THE TASK BAR •... -
Page 14: Menu Summary
MENU SUMMARY Main Menu DEPTH DEPTH DEPTH 2. Messaging 1. New Message 1. TXT Message Main Menu DEPTH DEPTH DEPTH 2. Picture Message 1. Media Center 1. Search 3. Video Message 4. Voice Message 2. Music & Tones 1. Get New Ringtones 1. - Page 15 Main Menu DEPTH DEPTH DEPTH Main Menu DEPTH DEPTH DEPTH 9. Settings & Tools 1. My Verizon 9. Settings & Tools 6. Display Settings 1. Easy Set-up 2. Master Volume 2. Banner 1. Personal Banner 3. Tools 1. Voice Commands 2.
-
Page 16: Making A Call
Main Menu DEPTH DEPTH DEPTH Main Menu DEPTH DEPTH DEPTH 9. Settings & Tools 7. Phone Settings 7. Security 1. Edit Codes #. Phone Info 1. My Number 2. Restrictions 2. SW/HW Version 3. Phone Lock Setting 3. Icon Glossary 4. -
Page 17: Missed Call Notification
3. To end a call, press the END Key 5. Press the SEND Key to dial or the Left Soft Key [Save] to save. Answer Options is set to “Auto with Handsfree”, calls are answered automatically Wait (w) after about five seconds (Refer to page 105). -
Page 18: Call Waiting Function
CALL WAITING FUNCTION CALLER ID FUNCTION If you are on a call and you receive another incoming call, you will hear a beep and the Caller ID displays the number of the person calling when your phone rings. If the caller’... -
Page 19: Making An Emergency Call
NEW MESSAGE VOICE PRIVACY To access the Messages Menu during a call: To turn the voice privacy feature On or Off: 1. Press the OK Key to unlock the keypad, then touch the Right Soft Key 1. Press the OK Key to unlock the keypad, then touch the Right Soft Key [Options], with New Message highlighted, press the OK Key. -
Page 20: Memory Function
2. Enter “FLOWERS” with the QWERTY Keypad and press the SEND Key connect. • If the Alphabetical Entry Mode icon is turned on, only capital letters will be appeared. MEMORY FUNCTION • Pressing the Mode Change Key will change between Numeric Entry Mode and Alphabetical Entry Mode. -
Page 21: Storing A Phone Number
STORING A PHONE NUMBER ADDING OR CHANGING GROUPS To organize your Contacts into groups: The Contact List stores up to 1000 entries. 1. Slide the phone up, touch the Right Soft Key [Contacts], then highlight ADDING A NEW CONTACT the desired Contact entry. 1. -
Page 22: Editing Contact Entries
3. Highlight Pic/Video, and touch the Left Soft Key [Set]. EDITING CONTACT ENTRIES 4. Select 1. My Pictures 2. My Videos, then press the OK Key. ADDING A PHONE NUMBER FROM IDLE MODE 5. Swipe the Directional Key up, down, left or right to select a picture or a 1. -
Page 23: Default Numbers
4. Edit the phone number as necessary, and then press the OK Key [SAVE] to 2. Highlight the entry that has a speed dial to be deleted. update the contact entry. 3. Touch the Left Soft Key [Edit]. 4. Highlight the phone number that has a speed dial to be deleted. EDITING STORED NAMES 5. -
Page 24: Entering Letters, Numbers & Symbols
ENTERING LETTERS, NUMBERS & SYMBOLS 4. [ ] Symbols Key: Press to open the symbols list. 5. [ ] Caps Key: Press to select a letter case for the standard text [Abc] input Your device has a QWERTY Keypad that provides a superior typing experience on a small mode. -
Page 25: Chapter 4. Menu Function
MENU FUNCTION 411: Speed Dial entry 411 (Directory Assistance) is already assigned. This chapter addresses accessing the menu and using its functions and features to customize your JEST CONTACTS RECENT CALLS TOOLS SETTINGS Voice Commands... -
Page 26: Contacts
NEW CONTACT Erase: Deletes the contact from your contact list. New TXT Message: Allows you to send a TXT Message to the contact. To add a new number to your Contact List: New Picture Message: Allows you to send a Picture Message to the contact. Using this submenu, the number is saved as a new Contact. -
Page 27: Groups
2. Touch the Left Soft Key [New]. TO SEND A TXT MESSAGE TO A GROUP 3. Enter a new group name and press the OK Key [SAVE]. 1. Slide the phone up, press the [MENU], then press Contacts, Groups. TO ASSIGN PHONE NUMBER TO GROUP 2. - Page 28 Preview, Save As Draft, Insert Quick Text, Slide, Priority Level, TO SEND A VOICE MESSAGE TO A GROUP Remove Picture, Remove Slide, Remove Sound, Remove Name Card 1. Slide the phone up, press the [MENU], then press Contacts, Cancel Message. Groups.
-
Page 29: Speed Dials
SPEED DIALS 1. Slide the phone up, press the [MENU], then press Contacts, 6. In Case Emergency. From idle mode, calls can be placed to numbers stored in speed dials by sliding the phone up, and pressing & holding the location number on the keypad. Shortcut: From idle mode, slide the phone up and touch the Right Soft Key [Contacts], then select... -
Page 30: Favorites
TO CALL AN ASSIGNED EMERGENCY CONTACT FAVORITES 1. Slide the phone up, press the [MENU], then press Contacts, 6. In Case Allows you to save your most frequently accessed contacts for quick access. Emergency. TO ASSIGN FAVORITE CONTACTS 2. Select the contact you want to call and then touch the Left Soft Key [Call] 1. -
Page 31: My Name Card
TO ERASE FAVORITE CONTACTS 2. Swipe the Directional Key left, right, up or down to select a desired contact. 1. Slide the phone up and press the Task Bar Key , swipe the Directional Key 3. To make a call, press the SEND Key . -
Page 32: Recent Calls
2. Compose your Video Message and then press the OK Key [SEND]. Please refer to page RECENT CALLS for more details on Video Message. The Recent Calls menu is a list of the last phone numbers or Contact entries for calls you •... -
Page 33: Received
View Timers: Displays usage time. DIALED • Touch the Left Soft Key [Message] to select: Displays information about the 90 most recently dialed numbers. Place a call to a dialed TXT Message: Allows you to send a TXT Message to the contact. call by simply pressing the SEND Key Picture Message: Allows you to send a Picture Message to the contact. -
Page 34: All
• Press the OK Key [OPEN] to view the entry. Picture Message: Allows you to send a Picture Message to the contact. • Press the Send Key to place a call to the number. Video Message: Allows you to send a Video Message to the contact. •... -
Page 35: Tools
VOICE COMMANDS 1. You will hear Please say a command and the Voice Commands menu will be displayed. Your phone is equipped with an Advanced Voice Commands (AVC) feature. This feature 2. If calling a contact from your Contact List, say Call <Name>. Your phone will allows you to make calls or use the phone’... - Page 36 1. You will hear Please say a command and the Voice Commands menu will be playlist for you. displayed. 1. You will hear Please say a command and the Voice Commands menu will be 2. Say “Check” followed immediately by one of the following items: displayed.
- Page 37 2. Touch the Right Soft Key [Settings] and then press 1. Confirm 3. Select 1. Train Voice 2. Reset Voice, then press the OK Key. Choices. • Train Voice: Requires that you make recordings of your voice to customize the voice recognition system.
-
Page 38: Calculator
ABOUT TIP CALCULATOR Allows you to calculate the tip and determine how much each person should pay for 1. Slide the phone up, press the [MENU], then press 9. Settings & Tools, the bill. Tools, 1. Voice Commands. 1. Slide the phone up, press the [MENU], then press 9. -
Page 39: Self Icon
END TIME 30 minutes before 1 hour before 3 hours before 5 hours before 1 Day Before Use the keypad to set an end time and touch the Left Soft Key for am/pm. 5. Press the OK Key [SAVE] to save it. The date of the event will be marked on START DATE your calendar. - Page 40 2. Select 1. My Dot Icons, then press the OK Key. MY DOT BANNER 3. To create your own icon, touch the Left Soft Key [New]. To mark/unmark 1. Slide the phone up, press the [MENU], then press 9. Settings & Tools, all, touch the Right Soft Key [Options], then press...
-
Page 41: E-Diary
• 4. Erase All: Deletes all the banners. 6. Press the OK Key [SAVE] to save your E-diary. SEND AN E-DIARY E-DIARY 1. Slide the phone up, press the [MENU], then press 9. Settings & Tools, E-Diary is a simple diary application designed to be easy to understand and convenient Tools, E-Diary. -
Page 42: Stop Watch
RESET THE ALARM SETTING 1. Slide the phone up, press the [MENU], then press 9. Settings & Tools, Tools, 7. Alarm Clock. 1. Slide the phone up, press the [MENU], then press 9. Settings & Tools, Tools, 7. Alarm Clock. Shortcut: From idle mode, swipe the Directional Key right to access... -
Page 43: World Clock
3. To stop the second and continue measuring a third one, touch the Left Soft Key NOTEPAD + [Lap]. Your phone includes an internal notepad that can be used to compose and store 4. To measure up to twenty time periods, repeat the above steps. reminders and notes. -
Page 44: Usb Mass Storage
2. Select a note, touch the Right Soft Key [Options], then press Send. MY VERIZON 3. Select Message, Picture Message, Video Message Voice Message, To access your Verizon account information: then press the OK Key. 1. Slide the phone up, press the [MENU], then press 9. - Page 45 2. Touch the Left Soft Key [Turn On/Turn Off]. A confirmation window • In the Bluetooth menu, you can turn off the device by pressing the Left Soft Key [Turn Off]. Conversely, you can turn on by pressing the Left Soft Key [Turn On].
-
Page 46: Sounds Settings
1. Swipe the Directional Key up, down, left or right to highlight a desired video or 2. Touch the Right Soft Key [Options]. videos, then press the OK Key [MARK]. If you want to change your selections, press the 3. Press 3. - Page 47 press the OK Key [SET] to save the setting or touch the Right Soft 3. Select Tone, Vibrate or Reminder, then press the OK Key. [Skip] to go to the next setting. • Tone: Swipe the Directional Key up or down to select a ringer, then press the OK Key •...
-
Page 48: Display Settings
To set the keypad volume: 5. Sounds Settings, 8. Device Connect. 1. Slide the phone up, press the [MENU], then press 9. Settings & Tools, 2. Select or Off, then press the OK Key [SET]. 5. Sounds Settings, 5. Keypad Volume. - Page 49 the OK Key [SET] or touch the Right Soft Key [Skip] to go to the down to select a desired font color. next setting. 3. Swipe the Directional Key left or right to select the desired font color and • WALLPAPER: Select a desired screen, then press the OK Key [SET].
- Page 50 To choose the background screen: [Help] to view the help for Reset Menu Settings. Menu Layout: Reset Menu Layout to the initial Menu Layout. 1. Slide the phone up, press the [MENU], then press 9. Settings & Tools, Menu Items: Reset Menu Items to the initial content of the Main Menu.
-
Page 51: Phone Settings
CLOCK FORMAT PHONE SETTINGS To choose the kind of clock to be displayed on the LCD screen: AIRPLANE MODE 1. Slide the phone up, press the [MENU], then press 9. Settings & Tools, In Airplane Mode, all menu functions can be accessed except making calls, receiving 6. - Page 52 3. Press 1. Reset Shortcut (1, 2, 3 or 4) or 2. Reset My Shortcuts. LOCATION 4. Select and press the OK Key. 1. Slide the phone up, press the [MENU], then press 9. Settings & Tools, 7. Phone Settings, Location.
- Page 53 • Phone Only: Allows you to edit the lock code for Security. (The default lock code is the PHONE LOCK SETTING last 4 digits of your phone number.) This setting specifies whether the phone should be locked whenever it is turned on. •...
-
Page 54: Call Settings
4. A confirmation message appears in the display, select Yes, and then press CHANGE NAM the OK Key. 1. Slide the phone up, press the [MENU], then press 9. Settings & Tools, 5. After reading the message that appears, press the OK Key. 7. -
Page 55: Touch Key Settings
TTY MODE ASSISTED DIALING You can attach a TTY device to your phone enabling you to communicate with parties To set the Assisted Dialing feature On or Off: also using a TTY device. A phone with TTY support is able to translate typed characters 1. -
Page 56: Memory
MEMORY • If you have selected Contacts, you can select View, 2. Copy 3. Erase after touching the Right Soft Key [Options]. SAVE OPTIONS • If you have selected Contacts, touch the Left Soft Key [Move] to move a file to Card Memory. -
Page 57: Usb Mode
FORMAT CARD Memory, 3. Card Memory. To format the card inserted: 2. Select Move All To Phone, then press the OK Key. 1. Slide the phone up, press the [MENU], then press 9. Settings & Tools, 3. Select and press the OK Key. Memory, 3. -
Page 58: Set - Up Wizard
Mobile Device Number (MDN) Mobile Identification Number (MIN) CHECK NEW Verizon Wireless To check Download Server for new Software updates: 1. Slide the phone up, press the [MENU], then press 9. Settings & Tools, SW/HW VERSION #. Phone Info, 4. Software Update. -
Page 59: Chapter 5. Media Center
SEARCH 1. Slide the phone up, press the [MENU], then press 1. Media Center, Search. MEDIA CENTER USING A microSD CARD Y our phone provides a unique feature - Media Center - that enables you to download ringtones, wallpapers, games and more from your A microSD Card (sold separately) stores sounds, videos, images, photos, music and network to your phone. -
Page 60: Music & Tones
3. Select one of the following options, then press the OK Key. MUSIC & TONES • 1. Ringtone: Set as a ringtone. A confirmation message appears. The Music & Tones menu allows you to mange ringtones, music and sound files. It also •... - Page 61 V CAST MUSIC I RHAPSODY ® NATIVE MUSIC PLAYER V CAST Music with Rhapsody® — V CAST Music with Rhapsody® is a digital music Playing Icon service that lets you listen to millions of songs from thousands of artists. Discover new and old favorites in an extensive music catalog.
- Page 62 6. To play the song, you can find it by selecting the My Library tab. Press the OK Key [STOP] to stop playing the sound. 3. Touch the Right Soft Key [Options] to access the following options: V CAST Music with Rhapsody® will work with Windows Vista or XP. •...
-
Page 63: Sync Music
MY PICTURES 2. Select the sound you want to set, touch the Left Soft Key [Set As], then select one of the following options and press the OK Key. The My Pictures menu allows you to view all the pictures you have taken, store selected •... -
Page 64: Take Picture
4. After recording the video, touch the Left Soft Key [Save] to save the video. 1. Slide the phone up, press the [MENU], then press 1. Media Center, To record another video without saving the video you just recorded, touch the 3. -
Page 65: Games
3. Select Erase Cancel Subscr. and press the OK Key. With highlighted, 3. Press the OK Key [TAKE] to take the picture. press the OK Key to remove the application. 4. After taking the picture, it will be displayed. To save the picture, touch the Left Soft Key [Save]. -
Page 66: Extras
EXTRAS DOWNLOADING NEW APPLICATIONS MESSAGING MENU To download Applications: 1. Slide the phone up, press the [MENU], then press 1. Media Center, This chapter addresses Voicemail, TXT, Picture, Video, Voice Extras. Messaging functions including: 2. Select 1. Get New Applications, then press the OK Key. 3. -
Page 67: When A New Message Arrives
WHEN A NEW MESSAGE ARRIVES PICTURE MESSAGE 1. Slide the phone up, press the [MENU], then press Messaging, 1. New 1. The following display appears when a new message arrives. Message. 2. To display the message, select View Now and then press the 2. -
Page 68: Voice Message
• Remove Slide: Removes an inserted slide message. • Cancel Message: Cancel the message and select whether to save it in Drafts. • Cancel Message: Cancel the message and select whether to save it in Drafts. 9. When completed, press the OK Key [SEND] to send the video message. 10. -
Page 69: Messages
MESSAGES Unlock: Unlocks the messages. Mark as Read Mark as Unread: Marks the messages as read or unread. Messages menu is displayed when Messages View is set to By Contacts which • Sort Alphabetically Sort By Time: Sorts the list in alphabetical order or by time. is the default setting. -
Page 70: Inbox
INBOX Mark as Read: Marks the messages as read. Mark as Unread: Marks the messages as unread. Inbox menu is displayed when Messages View is set to Time. The Inbox • Sort By Sender: Sorts the list by sender. manages received text, picture, voice, video and web alert messages. •... -
Page 71: Drafts
5. When navigating through the Sent menu, touch the Right Soft Key ERASE ALL [Options] to display the following available options. Options are dependent on To erase all messages stored in your phone: the message type and may be different from each field. 1. -
Page 72: Mobile Im
MOBILE IM SETTINGS Mobile IM menu allows you to send and receive instant messages using one of the Settings menu allows you to configure settings for messages sent or received on following messenger services: your phone. To access message settings: •... - Page 73 MESSAGING FONT SIZE 2. Touch the Left Soft Key [Add], then press 1. Add Wait 2. Add 2-Sec Pause. Please refer to page 30 for more details on PAUSE/WAIT FEATURE. Allows you to set the message font size. 1. Select Normal or Large, then press the OK Key.
-
Page 74: Chapter 7. Safety And Warranty
SAFETY INFORMATION FOR WIRELESS HANDHELD PHONES READ THIS INFORMATION BEFORE USING YOUR HANDHELD SAFETY AND WARRANTY PORTABLE CELLULAR TELEPHONE EXPOSURE TO RADIO FREQUENCY SIGNALS This chapter addresses the safety guidelines and precautions to follow Your wireless handheld portable telephone is a low power radio transmitter when operating your phone. - Page 75 Do not use the phone with a damaged antenna. If a damaged antenna comes PACEMAKERS into contact with the skin, a minor burn may result. Please contact your local The Health Industry Manufacturers Association recommends that a minimum dealer for replacement antenna. separation of six (6”) inches be maintained between a handheld wireless phone and a pacemaker to avoid potential interference with the pacemaker.
- Page 76 VEHICLES Areas with a potentially explosive atmosphere are often, but not always, clearly marked. They include fueling areas such as gas stations; below deck on boats; RF signals may affect improperly installed or inadequately shielded electronic fuel or chemical transfer or storage facilities; vehicles using liquefied petroleum systems in motor vehicles.
-
Page 77: Safety Information For Fcc Rf Exposure
SAFETY INFORMATION FOR FCC RF EXPOSURE SAR INFORMATION WARNING! READ THIS INFORMATION BEFORE USING THIS MODEL PHONE MEETS THE GOVERNMENT’S REQUIREMENTS FOR EXPOSURE TO RADIO WAVES. CAUTIONS Your wireless phone is a radio transmitter and receiver. It is designed and In August 1996 the Federal Communications Commission (FCC) of the United manufactured not to exceed the emission limits for exposure to radiofrequency States with its action in Report and Order FCC 96-326 adopted an updated safety... -
Page 78: Hearing Aid Compatibility (Hac) For Wireless
guide, is 0.279 W/Kg. (Body-worn measurements differ among phone models, We are committed to providing a selection of compatible devices for our depending upon available accessories and FCC requirements). While there may customers who wear hearing aids. be differences between the SAR levels of various phones and at various positions, THIS PHONE HAS A HAC RATING OF M4/T3 they all meet the government requirement for safe exposure. -
Page 79: Fda Consumer Update
HOW WILL I KNOW IF MY HEARING AID WILL WORK WITH A PARTICULAR low levels of RF when in the idle mode. Whereas high levels of RF can produce DIGITAL WIRELESS PHONE? health effects (by heating tissue), exposure to low level RF that does not produce You’ll want to try a number of wireless phones so that you can decide which heating effects causes no known adverse health effects. - Page 80 federal level. The following agencies belong to this working group: a base unit connected to the telephone wiring in a house, typically operate at far lower power levels, and thus produce RF exposures far below the FCC safety limits. • National Institute for Occupational Safety and Health 4.
- Page 81 Lifetime animal exposure studies could be completed in a few years. However, CRADA will also include a broad assessment of additional research needs in the very large numbers of animals would be needed to provide reliable proof of a context of the latest research developments around the world. cancer promoting effect if one exists.
- Page 82 consistent test methodology for measuring the rate at which RF is deposited to radiofrequency energy (RF), the measures described above would apply to in the heads of wireless phone users. The test method uses a tissue-simulating children and teenagers using wireless phones. Reducing the time of wireless model of the human head.
-
Page 83: Avoid Potential Hearing Loss
harmful interference be found to occur, FDA will conduct testing to assess the loss and other potential hearing problems varies. interference and work to resolve the problem. The amount of sound produced by a portable audio device varies depending on 12. -
Page 84: Fcc Compliance Information
YOU CAN OBTAIN ADDITIONAL INFORMATION ON THIS SUBJECT FROM FCC COMPLIANCE INFORMATION THE FOLLOWING SOURCES: This device complies with Part 15 of FCC Rules. Operation is subject to the following two conditions: AMERICAN ACADEMY OF AUDIOLOGY (1) This device may not cause harmful interference, and 11730 Plaza America Drive, Suite 300 (2) This device must accept any interference received. -
Page 85: 12 Month Limited Warranty
12 MONTH LIMITED WARRANTY (f) Product damaged from external causes such as fire, flooding, dirt, sand, weather conditions, battery leakage, blown fuse, theft or improper usage of Personal Communications Devices, LLC. (the “Company”) warrants to the original any electrical source. retail purchaser of this handheld portable cellular telephone, that should this product or any part thereof during normal consumer usage and conditions, be The Company disclaims liability for removal or reinstallation of the product,... - Page 86 THE EXTENT OF THE COMPANY’S LIABILITY UNDER THIS WARRANTY IS LIMITED TO IN USA: Personal Communications Devices. THE REPAIR OR REPLACEMENT PROVIDED ABOVE AND, IN NO EVENT, SHALL THE 555 Wireless Blvd. COMPANY’S LAIBILITY EXCEED THE PURCHASE PRICE PAID BY PURCHASER FOR Hauppauge, NY 11788 THE PRODUCT.
Need help?
Do you have a question about the Jest and is the answer not in the manual?
Questions and answers