Table of Contents
Advertisement
Quick Links
WELCOME
Thank you for choosing the AT&T Smart Device Pantech duo™, which
has adopted the Microsoft Windows Mobile™ 6 Standard in a dual slider
design to give you the convenience of Windows and the comfort of a
familiar shape. Using ActiveSync
®
, you can keep your PC and Pantech
duo™ synchronized at all times. The Pantech duo™ offers the various
features listed below which are designed to enhance your mobile
experience.
Key Features of the Pantech duo™
Microsoft Windows Mobile™ 6 for Smartphone OS
Full graphic TFT 262K Color LCD (240x320 pixel)
Full QWERTY keyboard
CMOS Camera (1.3 mega-pixels)
Built-in Bluetooth Technology
Advanced Voice Command Technology
2-Way Text Messaging
Multimedia Messaging Service
E-mail Messaging Service
microSD Card for External Memory (SDIO Support)
Voice Memo
Easy text entry using the XT9 text input mode
Internet Access
IMPORTANT INFORMATION
This Pantech duo™ user guide contains very important information about
how to handle and use the product.
Please read this manual thoroughly, pay attention to the warranty on
the back page and be warned of the exclusions and limitations of your
warranty, which is, for example, to prohibit using the unauthorized
accessories or components.
Advertisement
Table of Contents

Subscribe to Our Youtube Channel
Related Manuals for Pantech Duo


Summary of Contents for Pantech Duo
-
Page 1: Important Information
WELCOME Thank you for choosing the AT&T Smart Device Pantech duo™, which has adopted the Microsoft Windows Mobile™ 6 Standard in a dual slider design to give you the convenience of Windows and the comfort of a familiar shape. Using ActiveSync ®... -
Page 2: Using Shortcuts
MENU TREE Using Shortcuts Numbered menu items, such as menus, sub-menus, and options can be quickly accessed by using their shortcut numbers. In Start window, Main Menus can be accessed by pressing the number keys (1 to 0) corresponding to their location on the screen. - Page 3 MENU TREE 12 Call History 13 Organizer 13.1 Alarm 13.2 Voice Note 13.3 Notepad 13.4 Calculator 13.5 World Time 13.6 Tasks 14 Office Mobile 14.1 Excel Mobile 14.2 Powerpoint Mobile 14.3 Word Mobile 15 Games 16 Internet Explorer 17 Applications 17.1 Camera 17.2 Download Agent 17.3 File Explorer...
-
Page 4: Table Of Contents
CHAPTER 1 BEFORE USING YOUR PHONE ...15 INSIDE THE PACKAGE ... 16 HANDSET DESCRIPTION ... 17 ACTIVATING YOUR PHONE ... 19 HOME SCREEN ... 20 HOME SCREEN CUSTOMIZATION ... 20 HOME SCREEN ICONS ... 20 BATTERY USAGE ... 24 BATTERY INSTALLATION ... 24 BATTERY REMOVAL ... - Page 5 ENTER A SPACE ... 45 ENTER A SYMBOL ... 45 ENTER NUMBERS IN TEXT BOXES ... 46 ENTER PUNCTUATION IN MULTIPRESS MODE ... 46 ENTER PUNCTUATION IN XT9 MODE ... 46 ENTER TEXT IN XT9 MODE ... 47 START A NEW LINE ... 48 TURN ON CAPS LOCK ...
- Page 6 VIEW CALL TIMERS ... 79 RESET CALL TIMERS ... 80 VIEW DETAILS ABOUT A CALL ... 80 CREATE A CONTACT FROM CALL HISTORY ... 81 DELETE AN ITEM FROM CALL HISTORY ... 81 DIAL THE LAST NUMBER CALLED ... 82 FIND A CONTACT FROM CALL HISTORY ...
- Page 7 QUICKLY MOVE BETWEEN ACCOUNTS ...112 SEND A MESSAGE DRAFT ...113 REPLY TO A MESSAGE ...113 SAVE A DRAFT OF A MESSAGE ...114 SPECIFY THE LANGUAGE FOR READING A MESSAGE ...114 STOP ADDING A SIGNATURE TO MESSAGES ...115 VIEW AN ATTACHMENT ...115 VIEW MESSAGE FOLDER CONTENTS ...116 VIEW THE INBOX MESSAGE LIST ...116 VIEW THE LIST OF ACCOUNTS ...117...
- Page 8 XM RADIO MOBILE ... 146 MUSIC VIDEOS ... 146 THE BUZZ ... 147 COMMUNITY ... 149 CHAPTER 7 AT&T MALL ...151 SHOP TONES ... 152 SHOP GAMES ... 153 SHOP GRAPHICS ... 154 SHOP MULTIMEDIA ... 155 SHOP APPLICATIONS ... 156 MEDIA NET HOME ...
- Page 9 SELECT VIDEO QUALITY ... 176 COPY AN IMAGE TO YOUR PHONE ... 177 TAKE PICTURES USING A TIMER ... 178 ADJUST PICTURES AND VIDEO FOR LIGHTING CONDITIONS ... 178 SELECT WHERE PICTURES ARE SAVED ... 179 CREATE A PICTURES FOLDER ... 179 EDIT A PICTURE ...
- Page 10 SEND A LINK VIA E-MAIL ... 209 ADJUST THE SCROLLING SPEED ... 210 CHAPTER 12 CONNECTIVITY, BLUETOOTH AND ACTIVESYNC ... 211 ACTIVESYNC ... 212 INSTALL AND SET UP ACTIVESYNC ... 212 SET UP AN EXCHANGE SERVER CONNECTION ... 213 CHANGE ACTIVESYNC SETTINGS ... 214 SCHEDULE SYNCHRONIZATION AS ITEMS ARRIVE ...
- Page 11 CHAPTER 13 APPLICATIONS ...249 DOWNLOAD AGENT ... 250 FILE EXPLORER ... 251 JAVA ... 252 SPEED DIAL ... 253 VOICE COMMAND ... 254 1 - ADJUST THE MICROPHONE ... 254 2 - SET THE VOICE COMMAND BUTTON ... 254 3 - TRY OUT VOICE COMMAND ... 254 TRY OUT MORE COMMANDS ...
- Page 12 CONTENTS DISPLAY YOUR PHONE NUMBER ... 280 SERVICE DIALING NUMBERS (SDN) ... 281 SELECT TTY MODE ... 281 SOUNDS ... 282 CHANGE OR TURN SOUNDS ON OR OFF ... 282 DELETE A SOUND ... 283 COPY A SOUND FROM YOUR PC TO YOUR PHONE ... 285 PROFILES ...
- Page 13 CHAPTER 15 GAMES ...315 SOLITAIRE ... 316 START A GAME OF SOLITAIRE ... 316 HOW TO MOVE CARDS ... 316 PLAY SOLITAIRE ... 317 BUBBLE BREAKER ... 318 OVERVIEW OF BUBBLE BREAKER ... 318 BREAKER BONUS ... 318 START BUBBLE BREAKER ... 318 VIEW BUBBLE BREAKER STATISTICS ...
- Page 14 MEMO...
-
Page 15: Before Using Your Phone
Chapter 1 BEFORE USING YOUR PHONE INSIDE THE PACKAGE HANDSET DESCRIPTION ACTIVATING YOUR PHONE HOME SCREEN BATTERY USAGE... -
Page 16: Inside The Package
INSIDE THE PACKAGE This package should include all items pictured below. If any are missing or different, you should immediately contact the retailer where you purchased the phone. Handset Standard Battery AC Travel Charger User Manual... -
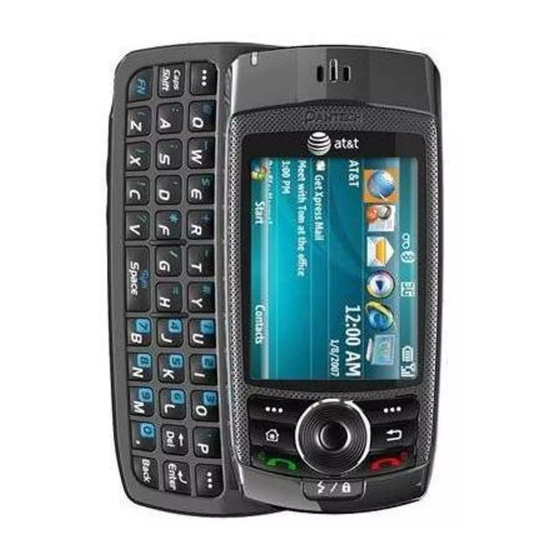
Page 17: Handset Description
HANDSET DESCRIPTION The Pantech duo™ weight is 110 g. The dimensions are 102x50x21.1 mm. Earpiece Selected Menu Item Left Soft Key Performs functions in lower left display. Home Key SEND Key Quick List/Lock Menu features Messaging ActiveSync MEdia Net IM & E-mail... - Page 18 HANDSET DESCRIPTION Camera Lens Holding device at internal antenna area might affect call quality reception. Mirror External speaker Internal Antenna Volume LCD horizon View Screen Camera Record/ Voice Command Left and Right Functional Soft Keys QWERTY keypad...
-
Page 19: Activating Your Phone
ACTIVATING YOUR PHONE If you have purchased Pantech duo™ from the AT&T Store, it has been activated already and is ready to use. If you have upgraded your phone or received a new phone by mail, it probably needs to be activated before you can use it. -
Page 20: Home Screen
The Home Screen plays an integral part in the navigational mode of your Smartphone. It is the first screen displayed every time the phone is turned on. You can easily return to the Home screen by pressing the HOME key. HOME SCREEN CUSTOMIZATION The Home Screen allows you to customize your start page. - Page 21 HOME SCREEN Indicator Voice call in progress GPRS / EDGE / 3G Data call in progress Calls are forwarded Call on hold Missed call Line 1/Line 2 Battery level Low battery Battery charging No battery Signal strength No signal No wireless coverage ActiveSync/Synchronization error Phone off Silent...
- Page 22 Indicator XT9 text input mode, uppercase Numeric input mode GPRS connection available EDGE connection available 3G connection available Bluetooth ON Missing SIM card Voice Command Enabled microSD card inserted Speaker phone on Keys [Send] key [End] key [Left] soft key <...
- Page 23 HOME SCREEN Keys A short press changes to capital letters or Numeric symbols during text entry mode. keypad A long press shows menu for changing letters or * key symbols. Numeric keypad Press and hold to insert a ‘+’ for international call 0 key Numeric Press to insert a space and long press to enter...
-
Page 24: Battery Usage
The battery is not charged when the phone is first purchased – fully charge the battery before first use. The battery will charge faster if the phone is powered off while charging. Battery operating time gradually decreases over time. If the battery fails to perform normally, you may need to replace it. -
Page 25: Battery Charging
BATTERY USAGE If the battery is not correctly placed in the compartment, the handset will not turn on and/or the battery may detach during use. BATTERY CHARGING Make sure the battery is properly installed in the handset. Use all normal cautions when working with a standard wall outlet. BATTERY STATUS CHECK LED LED is located at the left side of earpiece. -
Page 26: Power Connection
_______________________________ POWER-OFF CHARGING • The Pantech duo™ will enter ‘power-off charging mode’ automatically if you try to charge it with the device powered off. • Charging state will be displayed according to the current state. (complete, 0% ~ 90% and error ) •... -
Page 27: Battery Standby Times
BATTERY USAGE • The battery may not be fully charged at the time of purchase. • Fully charge the battery before use. • The battery must be connected to the phone in order to charge it. • Battery operating time gradually decreases over time. •... -
Page 28: Battery Handling Information
BATTERY HANDLING INFORMATION The correct usage and handling of batteries can preserve the lifetime of your phone and ensure proper operation. Operating times are subject to the usage and configuration of your handset; please see the label on your battery for your battery’s capacity. Follow these suggestions carefully. -
Page 29: Basic Operation
Chapter 2 BASIC OPERATION This chapter addresses and explains the basic features of your phone including: TURNING THE PHONE ON/OFF USING THE QUICK LIST CALL FUNCTIONS BASIC FUNCTIONS MAKING AN EMERGENCY CALL ENTERING TEXT AND NUMBERS... -
Page 30: Turning The Phone On/Off
TURNING THE PHONE ON/OFF TURNING THE PHONE ON Press and hold the END key E until your “Power On” logo appears. • If “Password” appears on the display, enter your 4-digit password to unlock your phone. • If the battery does not have enough charge to turn on the phone, the keypad will not light up. -
Page 31: Using The Quick List
USING THE QUICK LIST The Quick List provides a list of commands that you can use to quickly perform common actions. 1 Press the Quick List F key. 2 Use the Navigation Key to select the Quick List command you want. Turn off the phone. -
Page 32: Call Functions
Your Pantech duo™ phone has many options. This section will show you how to use basic functions such as making and receiving calls, locking and unlocking your phone, and managing the appearance and settings on your phone. MAKE A CALL BY ENTERING A CONTACT NAME Your phone allows you to call someone from your contact list or address book. -
Page 33: Make A Call From An Open Contact
CALL FUNCTIONS MAKE A CALL FROM AN OPEN CONTACT You can open contacts from the main screen and make a call from that contact. 1 On the Home screen, press the right soft key > [Contacts]. 2 Select the contact to call and press OK. 3 Select the phone number to call and press OK or left soft key <... -
Page 34: Make A Call Using A Recently Dialed Phone Number
MAKE A CALL USING A RECENTLY DIALED PHONE NUMBER Your phone will maintain a list of recent calls you have made. These calls are always easily accessible for redialing. 1 On the Home screen, press SEND to display a list of recent calls. 2 Select a name or phone number to make a call. -
Page 35: Answer Or Ignore A Call
CALL FUNCTIONS ANSWER OR IGNORE A CALL To answer the call, press SEND or press Answer. To reject the call, press END or press Ignore. Selecting Ignore will connect the caller to your voicemail if you subscribe to this service. ANSWER A SECOND CALL To put the first call on hold and answer the second call, press SEND key or press [Answer]. -
Page 36: Insert A Three-Second Pause In A Dialing Sequence
5 Press [Menu] [Insert Wait]. The letter w appears where the manual pause will occur in the dialing sequence. 6 Press [Done]. To resume dialing after reaching a manual pause, press OK. INSERT A THREE-SECOND PAUSE IN A DIALING SEQUENCE There may be occasions when you wish to pause dialing after you’ve selected a contact to call. -
Page 37: Basic Functions
SETTING UP YOUR VOICEMAIL _____________________ SET UP VOICEMAIL All unanswered calls to your AT&T Pantech duo™ are sent to voicemail, even if your phone is turned off. You’ll want to set up your voicemail and personal greeting as soon as you activate your Pantech duo™. -
Page 38: Lock The Keypad
LOCK THE KEYPAD Locking the keypad turns off keypad functionality. This is a helpful feature if, for example, the phone is turned on and in your pocket, and you want to prevent accidental key presses. 1 Display the Quick List by pressing F. 2 Select [Lock] and press OK or press and hold key until it enters in the lock mode directly. -
Page 39: Auto-Lock The Keypad
BASIC FUNCTIONS AUTO-LOCK THE KEYPAD When deactivating the locked key, you have to enter * key additionally. However, with Auto-Lock, you can deactivate the lock function automatically. Activate Auto-Lock as follows before using it. 1 Select [Start] [Settings] [Phone] [Auto Lock] on the Home screen. -
Page 40: Set The Idle Timer
SET THE IDLE TIMER Your Pantech duo™ will automatically return to the Home screen after a period of inactivity. You can adjust the amount of time before the Pantech duo™ defaults to the Home screen. 1 On the Home screen, press [Start], select... -
Page 41: View Operating System Information
BASIC FUNCTIONS VIEW OPERATING SYSTEM INFORMATION There may be instances when you wish to see the basic information about your phone’s operating system. This option allows you to see summaries of all the settings on your phone. 1 On the Home screen, press [Start], select Settings with the Navigation Key, or select Settings from the menu bar on top of the Home screen and press OK. -
Page 42: Explore Files And Folders
EXPLORE FILES AND FOLDERS File Explorer lets you browse the contents of folders on your phone. The root folder on the phone is named My Device. My Device is similar to My Computer on a PC and contains the My Documents, Program Files, Temp, Storage Card, and Windows folders among others. -
Page 43: Making An Emergency Call
MAKING AN EMERGENCY CALL Emergency calls do not depend on the availability of the 911 (or 112) network in your area. The emergency number will work independently of the network area you are in, with or without a SIM card inserted. Dial 911 (or 112) and press OK. -
Page 44: Entering Text And Numbers
ENTERING TEXT AND NUMBERS ENTERING TEXT AND NUMBERS You can enter text, numbers and symbols by using the keypad. The phone supports four input modes for entering text, numbers and symbols: Multipress, XT9, Numeric and symbols. Multipress and XT9 modes are used for entering text, Numeric mode is used for entering numbers, and Symbols mode is used for entering symbols like “@”, “/”, “$”... -
Page 45: Delete Characters
ENTERING TEXT AND NUMBERS DELETE CHARACTERS You can only delete characters when you are in input mode, either for numbers, names, or text. The Clear key operates similarly to a “backspace” key on a computer. 1 To backspace and delete a single character in any input mode, press Clear C key. -
Page 46: Enter Numbers In Text Boxes
ENTERING TEXT AND NUMBERS ENTER NUMBERS IN TEXT BOXES To enter numbers, use Numeric mode. If you need to enter a number within a line of text, change to Numeric mode to enter the number, and then change back to Multipress or XT9 mode to finish entering the text. 1 Change to Numeric mode by pressing and holding the * key. -
Page 47: Enter Text In Xt9 Mode
ENTERING TEXT AND NUMBERS ENTER TEXT IN XT9 MODE To form a word in XT9 mode, press the number keys that contain the letters you want. As you enter letters, XT9 analyzes your key presses and attempts to complete the word. For example, to enter the word shoe, press 7, 4, 6, 3. -
Page 48: Start A New Line
ENTERING TEXT AND NUMBERS START A NEW LINE When you are entering information in a text box, if you want to add a line break, use the OK key. 1 In a multi-line text box such as the Notes area of a contact or a calendar appointment, do the following: 2 In any input mode, press OK key. -
Page 49: Change The Input Mode
ENTERING TEXT AND NUMBERS CHANGE THE INPUT MODE There are several input modes available on your phone depending on whether you are entering contact information, phone numbers, symbols or text. Be sure you are in the input mode you desire. 1 In text input mode, press and hold the * key. -
Page 50: Using Qwerty Keyboard
USING QWERTY KEYBOARD Your phone, with a specifically designed QWERTY keyboard, that provides a superior typing experience on a small handheld for easy and comfortable text writing. You can use all of the phone functions with the keyboard either closed or open. When you open the keyboard you have the extra benefit of a full messaging keyboard. - Page 51 USING QWERTY KEYBOARD FUNCTION To type a special character or numbers, press the applicable key while holding down the FN key. To type special characters or numbers consecutively, use the FN-LOCK mode. To change to the FN-LOCK mode, double-tap the FN key. You can type special characters or numbers only in this mode.
- Page 52 MEMO...
-
Page 53: Calendar, Contacts, Call History & My Stuff
Chapter 3 CALENDAR, CONTACTS, CALL HISTORY & MY STUFF This chapter discusses using calendar and contacts menu on your phone. CALENDAR CONTACTS CALL HISTORY MY STUFF... -
Page 54: Calendar
SCHEDULE AN APPOINTMENT Your calendar allows you to schedule appointments and reminders by day, by time, or by event. 1 From the Home screen, press the left soft key < [Start]. 2 Select Calendar and press OK. 3 Press [Menu] and select New Appointment. 4 Enter information about the appointment. -
Page 55: Delete An Appointment
DELETE AN APPOINTMENT To delete an existing appointment, you will have the option of deleting just one appointment or the entire series if it is a recurring appointment. 1 From the Home screen, press the left soft key < [Start]. 2 Select Calendar and press OK. -
Page 56: Update An Appointment
UPDATE AN APPOINTMENT When your schedule or appointment information changes, you can easily edit the appointment with new information. 1 From the Home screen, press the left soft key < [Start]. 2 Select Calendar and press OK. 3 Select the appointment and press OK key and press right soft key >... -
Page 57: View Appointments For The Week
VIEW APPOINTMENTS FOR THE WEEK Each week’s appointments are clearly displayed in the calendar, when you’ve selected Week view. 1 From the Home screen, press the left soft key < [Start]. 2 Select Calendar and press OK. 3 Press [Menu] and select Week View. See also ‘Change the display of the workweek’. -
Page 58: View Your Agenda For A Specific Date
VIEW YOUR AGENDA FOR A SPECIFIC DATE You can also select a specific date to check that day’s schedule. 1 From the Home screen, press the left soft key < [Start]. 2 Select Calendar and press OK. 3 Press [Menu] select Go to Date and press 4 Enter the date to view, and press [Done]. -
Page 59: Make An Appointment Recurring
MAKE AN APPOINTMENT RECURRING If you’ve already entered a single appointment in your calendar and would like to change it to a recurring appointment, use the Occurs selection after selecting the appointment. 1 From the Home screen, press the left soft key <... -
Page 60: Show Week Numbers
SHOW WEEK NUMBERS In many cases the weeks of the year are referred to by number – the calendar function allows you the option of displaying the number of the week, between 1 and 52. 1 From the Home screen, press the left soft key <... -
Page 61: Change The Workweek Display
CHANGE THE WORK WEEK DISPLAY Depending on your schedule, you may want to change the default work week displayed. You can choose any day of the week to start and/or finish. 1 From the Home screen, press the left soft key <... -
Page 62: Change The Reminder Time
CHANGE THE REMINDER TIME By default, the reminder time is set 15 minutes prior to an appointment. 1 In Calendar, press the right soft key [Menu] and select Tools, press OK key or right navigation key, and press Options. 2 Scroll to Set reminders and press OK. 3 Change the time. -
Page 63: Contacts
Using the Contacts feature of your Pantech duo™, you can manage all the phone information you need. There are many options for adding contacts, retrieving contacts, and managing the information for each contact. CREATE A NEW CONTACT To enter a new contact manually, without having the caller on the phone, you will use the Contacts selection from the Home screen. -
Page 64: Beam A Contact
BEAM A CONTACT It is possible to use your phone to send a contact to another device such as Bluetooth radio. This is called “beaming” your contact. A list of devices will appear when you’ve selected Beam. 1 On the Home screen, press the left soft key < [Start]. -
Page 65: Call A Contact From Contact Information
If you want to receive a contact by beam, you have to follow these steps. 1 On the Home screen, press left soft key < [Start]. 2 Select Settings and press OK. 3 Select Connections and press OK. 4 Select Beam and press OK. 5 Check Receive incoming beams. -
Page 66: Call A Contact From The Contact List
CALL A CONTACT FROM THE CONTACT LIST If you do not select one of the contacts phone numbers, but you press Send, your phone will dial the default number for that contact. 1 On the Home screen, press the left soft key < [Start] and then jump to 3 or directly press right soft key [Contacts]. -
Page 67: Duplicate A Contact
4 Press the Navigation Key left or right to select the number or other contact method that you want to set as the default. For example, (m)obile, (h)ome or (w)ork. DUPLICATE A CONTACT This feature allows you to copy contacts in Device or SIM to the same area. -
Page 68: Copy All To Device / Sim
4 Press the right soft key > [Menu]. 5 When selecting SIM Contact, select Copy to Device from the popup menu and press OK. When selecting Device Contact, select Copy to SIM from the popup menu and press OK. COPY ALL TO DEVICE / SIM This feature allows you to copy all contacts in Device or SIM to other areas. -
Page 69: Delete A Contact
DELETE A CONTACT Deleting a contact is very simple, just use the Menu key once you have selected the contact. 1 On the Home screen, press the left soft key < [Start]. 2 Select Contacts and press OK. 3 Scroll to the contact to delete. 4 Press the right soft key >... -
Page 70: Create A Contact For A Caller
CREATE A CONTACT FOR A CALLER Creating a contact for a caller makes their information easier to retrieve when the call is done. The contact can be added to the Contact list during the call. 1 During a call, press the right soft key > [Menu]. -
Page 71: Find A Contact
FIND A CONTACT The contact section of your phone has an auto-fill feature that will allow you to find contacts more quickly. While entering the number or name of the contact, the phone will auto-fill the rest of the information as you press the keys, until you find the right contact. -
Page 72: Send A Text Message To A Contact
SEND A TEXT MESSAGE TO A CONTACT You can send text message from within the contact list after selecting the contact and pressing the Menu key. 1 From the Home screen, press the left soft key < [Start]. 2 Select Contacts and press OK. 3 Select a contact, and press OK. -
Page 73: Add A Picture To A Contact
ADD A PICTURE TO A CONTACT You may wish to add a picture to a contact record. You can add an existing picture, or you can put the phone in Camera mode to take the picture and add it to the contact. 1 On the Home screen, press the left soft key <... -
Page 74: Remove A Picture From A Contact
REMOVE A PICTURE FROM A CONTACT Once a picture is attached to a contact, it can easily be removed or changed from the Contacts menu by using the soft key and editing the field. 1 On the Home screen, press the left soft key <... -
Page 75: Assign A Category To A Contact
ASSIGN A CATEGORY TO A CONTACT It may be helpful to group your contacts in categories you define for easier reference. If you know the contact’s category you can easily retrieve the contact. 1 You can use categories to help you organize and group your contacts. -
Page 76: Assign A Ring Tone To A Contact
ASSIGN A RING TONE TO A CONTACT To easily identify who is calling you by the ring tone, you can assign a custom ring tone to each contact. 1 On the Home screen, press the left soft key < [Start]. 2 Select Contacts and press OK. -
Page 77: Using Speed Dials
4 Select the phone number, e-mail address, or Web page address for which to create a speed dial. 5 Press [Menu] and select Add to Speed Dial, then press OK. 6 In Keypad assignment, select the speed dial number to use. 7 Press [Done]. -
Page 78: View And Edit A Speed Dial
VIEW AND EDIT A SPEED DIAL You can view or edit all the contacts you’ve assigned to speed dial by entering the Speed Dial menu from the Start soft key. 1 On the Home screen, press the left soft key <... -
Page 79: Call History
CALL HISTORY Call history provides details of all calls received, missed and dialed. 1 From the Home screen, press the left soft key < [Start]. 2 Select Call History and OK. To view only missed calls, incoming calls, or outgoing calls, press [Menu] select Filter, and then press the type of calls to view. -
Page 80: Reset Call Timers
RESET CALL TIMERS When call information is no longer required, the call timers can be set to zero. 1 From the Home screen, press the left soft key < [Start]. 2 Select Call History and press OK. 3 Press [Menu] and select View Timers from the popup menu and press OK. -
Page 81: Create A Contact From Call History
CALL HISTORY CREATE A CONTACT FROM CALL HISTORY While you are in the Call History function, you can select any of the calls and automatically add that caller to your contact list. 1 From the Home screen, press the left soft key <... -
Page 82: Dial The Last Number Called
DIAL THE LAST NUMBER CALLED If you need to quickly call the last number you have called, this shortcut allows you to do so without using menus. 1 On the Home screen, press SEND twice. FIND A CONTACT FROM CALL HISTORY There is an option in the Call History for finding contacts from your contact list. -
Page 83: Send An E-Mail Message From Call History
CALL HISTORY SEND AN E-MAIL MESSAGE FROM CALL HISTORY To use this function, the E-mail address of the person you are sending an E-mail to must be included in their contact information card. 1 From the Home screen, press the left soft key <... -
Page 84: My Stuff
The My Stuff displays My Pictures, My Ringtones, My Videos, Notes, and Templates. My Stuff’s menu is same as File Explorer. MY STUFF... -
Page 85: Voicemail & Messaging
Chapter 4 VOICEMAIL & MESSAGING This chapter addresses Voicemail, Text, Multimedia Message, Video and E-mail Messaging functions including: VOICEMAIL TEXT MESSAGING MULTIMEDIA MESSAGING E-MAIL... -
Page 86: Voicemail
Voicemail is available at all times. When you call your voicemail the messages will be played back in the order they were received. You will have options to save, delete, replay, or skip each message. CALL YOUR VOICEMAILBOX Retrieving your voicemail is simple and can be accessed directly from the Home screen. -
Page 87: Text Messaging
CREATE A TEXT MESSAGE The Pantech duo™ allows you to create text messages quickly. You create a text message by typing in a phone number or by selecting a contact first. -
Page 88: Delete All Messages
DELETE ALL MESSAGES To clear all messages in a folder, you will need to show all the folders and select the folder you want. 1 On the Home screen, press the left soft key < [Start] select Messaging and press OK. 2 Select Messages and press OK. -
Page 89: Multimedia Message
MULTIMEDIA MESSAGE Multimedia Messaging Service allows you to send multimedia messages to others, which can include text, graphics and ring tones in a message. CREATE A MULTIMEDIA MESSAGE Creating a Multimedia message is simple and you can add images or attachments to the message. -
Page 90: Text Box
MULTIMEDIA MESSAGE If Multimedia message was sent successfully, a ‘Message sent successfully’ dialog will appear. You can quickly enter Multimedia message numbers from your contact cards. In To, press [Menu] and select ‘Add recipient’ from the list. Then, select the recipient’s phone number. To cancel a Multimedia message, just press [Menu] [Cancel Composer]. - Page 91 MULTIMEDIA MESSAGE Menu option Press [Munu] [Check Name], convert phone Check Name number to corresponding name, if that number is registered in contact list. You can add content such as text, image, sound, video, vCard, vCalendar, and Attachments. Press [Menu] [Add Item] [Text]: enter a text message in the text box.
- Page 92 MULTIMEDIA MESSAGE Menu option My Text Priority Level Page Layout Options Save Cancel Composer Description Press [Menu] [My Text]. You can add predefined text messages to text field. You can set the importance of Multimedia Message. Press [Menu] [Priority Level] [High]: set Multimedia Message to be important.
-
Page 93: View Multimedia Message
MULTIMEDIA MESSAGE VIEW MULTIMEDIA MESSAGE To view Multimedia Message, simply select Multimedia Message from the Messaging menu and you will see a list of Inbox messages. 1 On the Home screen, press the left soft key < [Start], select Messaging and press OK. 2 Select Multimedia Message which you want to see for list of Inbox messages. -
Page 94: Change Messaging Account Options
MULTIMEDIA MESSAGE 5 Press [Menu] [Save] Save to save address to phonebook. 6 Press [Menu] [Details] to show detailed information about current Multimedia Message, such as message size, sender. 7 Press [Menu] [Delete] to delete current message in the inbox list. 8 Press [Menu] [Back] to terminate Multimedia Message viewer and go back to the Inbox message list. -
Page 95: Change How The Message List Displays
MULTIMEDIA MESSAGE CHANGE HOW THE MESSAGE LIST DISPLAYS You can change the order in which messages are displayed and show the date and time that messages were received. 1 On the Home screen, press the left soft key < [Start], select Messaging and press OK. 2 Press [Menu] [Tools] [Options] [Display]. -
Page 96: E-Mail
The Pantech duo™ allows you to send e-mails with several options. You can copy, blind copy, set priority, and store e-mails just as you would from a computer. The Pantech duo™ uses Outlook as the default mail program. You can send and receive e-mail messages in one of these ways: •... -
Page 97: Folder Behavior With A Direct Connection To An E-Mail Server
FOLDER BEHAVIOR WITH A DIRECT CONNECTION TO AN E-MAIL SERVER The behavior of the folders you create depends on whether you are using POP3 or IMAP4. • If you use POP3 and you move e-mail messages to a folder you created, the link is broken between the messages on the phone and their copies on the mail server. -
Page 98: To Edit An Account
4 Select your e-mail provider, one or both of Internet e-mail or Exchange server. 5 Enter your display name and press the Next soft key. 6 Enter your Incoming mail server and select Account type and press the Next soft key. 7 Enter your user information, such as user name, password, and press the Next soft key. -
Page 99: Create An E-Mail Message
CREATE AN E-MAIL MESSAGE You can create an e-mail message from a contact card, or by typing in the address. 1 On the Home screen, press left soft key < [Start], select Messaging and press OK. 2 Select the e-mail account with which you want to send. -
Page 100: Overview Of E-Mail Security
OVERVIEW OF E-MAIL SECURITY You can help prevent impersonation, tampering, and eavesdropping when sending e-mail messages from your Outlook e-mail account by using Secure Multipurpose Internet Mail Extensions (S/MIME) digital signatures and encryption. A signature helps prevent impersonation and tampering. Impersonation occurs when a hacker sends e-mail messages and pretends to be someone else. -
Page 101: Download A Complete E-Mail Message
DOWNLOAD A COMPLETE E-MAIL MESSAGE You can save e-mail messages and retrieve them at any time when you synchronize or connect to your mail server. 1 On the Home screen, press the left soft key < [Start], select Messaging and press OK. 2 Select an e-mail account and the message to download. -
Page 102: Mark A Folder For Synchronization
MARK A FOLDER FOR SYNCHRONIZATION When you synchronize your Outlook e-mail account with your PC, the same Inbox folders that are in Outlook on your PC are created on your phone. 1 On the Home screen, press the left soft key < [Start], select Messaging and press OK. -
Page 103: Add A Picture To An E-Mail Message
ADD A PICTURE TO AN E-MAIL MESSAGE You can retrieve pictures that have been downloaded to your phone and insert them into your e-mail messages. 1 In the message area of an e-mail message, press [Menu] [Insert] [Picture]. 2 Select the picture you want to add. VERIFY THE DIGITAL SIGNATURE ON A SIGNED MESSAGEYOU RECEIVE For additional security, you can check digital signatures on messages before opening them. -
Page 104: Send And Receive Internet E-Mail Messages
SEND AND RECEIVE INTERNET E-MAIL MESSAGES Using the Pantech duo™ you can connect to the Internet to send and receive e-mails. 1 On the Home screen, press [Start] [Messaging]. 2 Select the Internet e-mail account for which you want to send and receive messages. -
Page 105: Set Up An Internet E-Mail Account Manually
SET UP AN INTERNET E-MAIL ACCOUNT MANUALLY Before you set up your Internet e-mail account, ensure that you have the necessary information. Setting User name Password Domain Server type Account name Network Incoming mail server Require SSL connection Outgoing mail server Outgoing server requires... - Page 106 Setting Use different user name for outgoing server User name Password Domain Require SSL connection (Outgoing mail server only) E-MAIL Description Check box, where you enter a separate setting for your outgoing e-mail server.. Your user name for the outgoing e-mail server.
-
Page 107: Delete A Message
DELETE A MESSAGE Messages from any account can be deleted. Select the Messaging function from the Home screen. 1 On the Home screen, press the left soft key < [Start], select Messaging and press OK. 2 Select an account. 3 Select the message to delete. 4 Press [Menu] [Delete]. -
Page 108: Edit Predefined Text
EDIT PREDEFINED TEXT You can edit the predefined text included with the phone to create words or phrases that you frequently use in messages. 1 On the Home screen, press the left soft key < [Start], select Messaging and press OK. 2 Select an account. -
Page 109: Empty The Deleted Items Folder
EMPTY THE DELETED ITEMS FOLDER If you don’t have a need to store deleted items, you can delete the Deleted Items folder itself. 1 On the Home screen, press left soft key < [Start], select Messaging and press OK. 2 Select an account. 3 Press [Menu] [Tools] [Empty Deleted Items]. -
Page 110: Insert Predefined Text Into A Message
INSERT PREDEFINED TEXT INTO A MESSAGE To save time when entering text, you can insert predefined text into messages. 1 On the Home screen, press the left soft key < [Start], select Messaging and press OK. 2 Select an account and press [Menu] [New]. 3 Press [Menu] [My Text]. -
Page 111: Move A Message To A Different Folder
5 Press Mark as Read or Mark as Unread. The message display is changed to reflect its new status: normal text for read messages and bold text for unread messages. When you synchronize or send and receive e-mail, the message is displayed as read or unread in all locations. -
Page 112: Open A Message
OPEN A MESSAGE To review or use a message you open it from its account in the Messaging function. 1 On the Home screen, press the left soft key < [Start], select Messaging and press OK. 2 Select an account. 3 Select the message to open and press OK. -
Page 113: Send A Message Draft
SEND A MESSAGE DRAFT If you wish to have a message draft reviewed, you can retrieve a stored draft or an open draft and send it to someone else. 1 On the Home screen, press the left soft key < [Start], select Messaging and press OK. -
Page 114: Save A Draft Of A Message
2 A draft of the message is stored in the Drafts folder of the account you are in. SPECIFY THE LANGUAGE FOR READING A MESSAGE The Pantech duo™ has many languages and character sets from which to choose. Each message can be composed in whatever language you require. -
Page 115: Stop Adding A Signature To Messages
STOP ADDING A SIGNATURE TO MESSAGES If you have previously added a signature to an account and wish to stop using it, you can turn the signature off for that account. 1 On the Home screen, press the left soft key <... -
Page 116: View Message Folder Contents
VIEW MESSAGE FOLDER CONTENTS You can store messages in folders and create the types of folders you need. 1 On the Home screen, press the left soft key < [Start], select Messaging and press OK. 2 Select an account. 3 Press [Menu] [Folders]. 4 Press the folder to view. -
Page 117: View The List Of Accounts
VIEW THE LIST OF ACCOUNTS If you have added accounts to your phone, you can see a list of all the accounts at one time. 1 On the Home screen, press the left soft key < [Start], select Messaging and press OK. 2 The list of accounts displays with the number of unread messages in the Inbox of each account shown in parentheses. - Page 118 MEMO...
-
Page 119: Organizer
Chapter 5 ORGANIZER ALARM VOICE NOTE NOTEPAD CALCULATOR WORLD TIME TASKS... -
Page 120: Alarm
USING THE ALARM You can use the alarm clock to set a wake-up alarm or set an alarm to remind you of an appointment. 1 On the Home screen, press the left soft key < [Start], then left soft key [More...] and select Organizer and press OK. -
Page 121: Voice Note
VOICE NOTE In addition to making and receiving calls, scheduling and keeping contacts, the Pantech duo™ allows you to save your own reminders and messages in voice format. CREATE A VOICE NOTE When you wish to create a voice note, after making the selections described here, you will speak into the microphone just as you would speak on a call. -
Page 122: Listen To A Voice Note
LISTEN TO A VOICE NOTE You can retrieve any voice notes you wish. When the voice notes were saved, they were recorded by time and category. 1 On the Home screen, press the left soft key [Start], then left soft key [More...] and select Organizer and select Voice Note and press 2 Select the voice note to play and press the right soft key [Menu] and press [Play]. -
Page 123: Rename A Voice Note
VOICE NOTE RENAME A VOICE NOTE You have the option of renaming a voice note, or assigning it to a different category. 1 On the Home screen, press the left soft key < [Start], then left soft key [More...] and select Organizer and select Voice Note and press 2 Select the voice note to rename. -
Page 124: Notepad
Using Notepad, you can create memos for important things, and manage them. TO ACCESS NOTEPAD On the Home screen, press the [Start] soft key and select [Organizer] [Notepad]. CREATING A MEMO 1 Press the New soft key. 2 Enter the memo text and press the Done soft key. -
Page 125: Deleting A Memo
NOTEPAD DELETING A MEMO 1 Scroll to the memo you want. 2 Press the Menu soft key and select Delete. 3 Press the OK soft key to confirm the deletion. -
Page 126: Calculator
USING THE CALCULATOR Perform standard mathematical operations such as addition, subtraction, multiplication, and division. 1 On the Home screen, press the left soft key < [Start], then left soft key [More...] and select Organizer and press OK. Select Calculator and press OK. 3 Enter a number using the keypad. -
Page 127: World Time
WORLD TIME USING THE WORLD TIME You can set up the world clock with the time zones you want, and then check the current time of the city you need at any time. 1 On the Home screen, press the left soft key [Start], then left soft key [More...] and select Organizer and press OK. -
Page 128: Tasks
CREATE A TASK The Pantech duo™ allows you to create a new task with reminders for your task list from your phone or from your PC. 1 On the Home screen, press the left soft key < [Start], then left soft key [More...] and select Organizer and press OK. -
Page 129: Assign A Category To A Task
ASSIGN A CATEGORY TO A TASK The categories you can assign to a task are the same as those categories you’ve defined for appointments and contacts. You can also add categories from the Task menu. 1 On the Home screen, press the left soft key < [Start], then left soft key [More...] and select Organizer and press OK. -
Page 130: Delete A Task
DELETE A TASK To remove a task from your list you will delete it. Marking a task as complete will not delete the task from your list. 1 On the Home screen, press the left soft key < [Start], then left soft key [More...] and select Organizer and press OK. -
Page 131: Locate A Task
LOCATE A TASK There are many options for finding a task on your list; you can view and sort the entire task list, or filter the list by category. 1 On the Home screen, press the left soft key < [Start], then left soft key [More...] and select Organizer and press OK. - Page 132 MEMO...
-
Page 133: At&T Music
Chapter 6 AT&T MUSIC This chapter addresses AT&T Music applications to play, buy, identify and join music communities. WINDOWS MEDIA PLAYER SHOP MUSIC MUSIC ID XM RADIO MOBILE MUSIC VIDEOS THE BUZZ COMMUNITY ®... -
Page 134: Windows Media Player
WINDOWS MEDIA PLAYER This device comes with Microsoft You can play Windows MP3 audio files that are stored on your phone, on a memory card, or on the Web. You can open Windows Media Player like this: 1 On the Home screen, press the left soft key [Start] select AT&T Music and press OK. -
Page 135: Start Synchronization
WINDOWS MEDIA PLAYER You can also use the desktop Windows files. Licenses and protected files are copied. And also make sure that ® you have Windows Media Player desktop computer. If you use different version of your Windows ® Media Player , the procedure to copy files may vary. -
Page 136: Playing Media Files
WINDOWS MEDIA PLAYER In order to access libraries, you should press the key of [Menu] from the player screen and then select [Library]. The library screen contains categories, such as My Music, My Videos, My TV and My Playlists. From the library screen, press [Menu] and you can see following options: •... -
Page 137: Select A Category
WINDOWS MEDIA PLAYER 2 Press the [Menu] soft key and select Update Library. 3 When libraries have been updated, press the [Done] soft key. 4 Select a category. 5 Scroll to the library you want to play and press the [Play] soft key. If the file does not appear in a library, on the Library screen, press the [Menu] soft key and select Open File. -
Page 138: Playing Media Files On A Network
WINDOWS MEDIA PLAYER ___________________________________________ PLAYING MEDIA FILES ON A NETWORK 1 On the Library screen, press the [Menu] soft key and select Open URL. 2 Enter a URL address in the URL field, or scroll to one of the URL address that you have used from the History field. -
Page 139: Opening The Playlist
WINDOWS MEDIA PLAYER 4 Press to return to the player screen or [Menu] [Player]. 5 Press OK to start playing the files. 6 To save the playlist, press the [Now Playing] soft key and then the [Menu] soft key, and select Save Playlist. - Page 140 WINDOWS MEDIA PLAYER _______________________________________________________ CHANGING THE WINDOW MEDIA PLAYER SETTINGS You can customize the appearance and functionality of Windows Media Player. On the player screen, press the [Menu] soft key and select Options. You can use the following options: • Playback: Select the options for playback. You can select the way time is displayed on the player screen, or whether or not to pause playback when you launch another program, and resume playback after a phone call.
-
Page 141: Shop Music
SHOP MUSIC This menu connects to AT&T’s music download site. 1 On the Home screen, press the left soft key < [Start] select AT&T Music and press OK. 2 Select Shop Music and press OK. -
Page 142: Using Id Song
This menu allows you to find out title, artist and other information about the song by just sending the sound of the song. 1 On the Home screen, press the left soft key < [Start] select AT&T Music and press OK. 2 Select Music ID and press OK. -
Page 143: Using Manage Id's
MUSICID 4 To share the song ID with another user, highlight Share ID press the OK key. Enter the recipient’s phone number and press the Share ID! Soft key. Within a short time, he will receive a message containing a Music ID link to the song. 5 If the song cannot be found, the handset displays a “Sorry, No Match Try Again!”... -
Page 144: Getting Help With Music Id
GETTING HELP WITH MUSIC ID 1 Highlight help me out and press the OK key to select a topic. The screen displays a list of helpful topics related to the Music ID application. These topics cover: • IDing a Song: provides information about the analysis process. -
Page 145: Xm Radio Mobile
XM RADIO MOBILE Selecting XM Radio Mobile from the AT&T Music sub menu launches an application which allows the user to listen to streaming audio. 1 On the Home screen, press the left soft key < [Start] select AT&T Music and press OK. 2 Select XM Radio Mobile and press OK. -
Page 146: Music Videos
Selecting Music Videos from the AT&T Music sub menu launches the browser to provide you with links to the most popular multimedia contents. 1 On the Home screen, press the left soft key < [Start] select AT&T Music and press OK. 2 Select Music Videos and press OK. -
Page 147: The Buzz
Selecting The Buzz from the AT&T Music sub menu launches a preinstalled java application (e.g. Billboard). The application allows the user to obtain relevant music industry news and information about your favorite music artists, access to an artists main page (containing discographies, ringtones, concert dates, etc.), concert information, games, and setup options for your own personal billboard notifications. - Page 148 7 Once the phone number has been successfully registered, press the OK soft key to continue onto the main Billboard mobile menu where you are given a list of categories to choose from: • CHARTS: provides you with a top 20 list of popular Ringtones, and tunes such as R&B/Hip Hop, Rock, Pop, Latin, Country, and Rap.
-
Page 149: Community
COMMUNITY Selecting Community from the AT&T Music sub menu launches the browser to either one or more of the hot user communities. This menu allows you to interact with your friends and the community. 1 On the Home screen, press the left soft key < [Start] select AT&T Music and press OK. - Page 150 MEMO...
-
Page 151: At&T Mall
Chapter 7 AT&T MALL This chapter addresses AT&T Mall applications to shop for Tones, Games, Graphics, Multimedia, and Accessing the Media Net Home site. SHOP TONES SHOP GAMES SHOP GRAPHICS SHOP MULTIMEDIA SHOP APPLICATIONS MEDIA NET HOME... -
Page 152: Shop Tones
Selecting this menu launches the Web browser to AT&T’s Tones menu. 1 On the Home screen, press the left soft key < [Start] select AT&T Mall and press OK. 2 Select Shop Tones and press OK. 3 Follow the on-screen options. The downloaded files can be stored into the Main Memory or Storage Card found within the My Stuff (Phone) location. -
Page 153: Shop Games
SHOP GAMES Selecting this menu launches the Web browser to AT&T’s Game menu. 1 On the Home screen, press the left soft key < [Start] select AT&T Mall and press OK. 2 Select Shop Games and press OK. 3 Follow the on-screen options. The downloaded files can be stored in the Java folder found within the Applications menu. -
Page 154: Shop Graphics
Selecting this menu launches the Web browser to AT&T’s Graphics. 1 On the Home screen, press the left soft key < [Start] select AT&T Mall and press OK. 2 Select Shop Graphics and press OK. 3 Follow the on-screen options. The downloaded files can be stored in the My Pictures folder found within the My Stuff (Phone) location. -
Page 155: Shop Multimedia
SHOP MULTIMEDIA Selecting this menu launches the Web browser to AT&T’s Multimedia menu. 1 On the Home screen, press the left soft key < [Start] select AT&T Mall and press OK. 2 Select Shop Multimedia and press OK. 3 Follow the on-screen options. The downloaded files can be stored in the My Videos folder found within the My Stuff (Phone) location. -
Page 156: Shop Applications
SHOP APPLICATIONS Selecting this menu launches the Web browser to AT&T’s Applications menu. 1 On the Home screen, press the left soft key < [Start] select AT&T Mall and press OK. 2 Select Shop Applications and press OK. 3 Follow the on-screen options. The downloaded apps. -
Page 157: Media Net Home
MEDIA NET HOME The MEdia Net Home menu option allows you to quickly access your AT&T MEdia Net homepage using the built-in browser. This page gives you quick access to information such as local weather, sports scores, horoscope information and quick links to the previously mentioned shopping sites. - Page 158 MEMO...
-
Page 159: Cellular Video
Chapter 8 CELLULAR VIDEO MEDIA CLIP OPTIONS USING THE VIDEO CATEGORIES CUSTOMIZING CELLULAR VIDEO MY PURCHASES PARENTAL CONTROLS... -
Page 160: Cellular Video
Your phone is equipped with a WAP (Wireless Application Protocol) browser which allows you to access Internet and then upload media files directly to your phone. These media files are displayed using the built-in Media Player. Cellular Video (CV) is a media service which allows you to not only navigate to your favorite web sites but stream media content (Weather, News/Sports highlights, etc.) directly to your phone. -
Page 161: Highlight The Desired Media Clip Or Select From
CELLULAR VIDEO 4 Highlight the desired media clip or select from one of the available categories and press the Select soft key or the OK key. -
Page 162: Media Clip Options
MEDIA CLIP OPTIONS With the media currently active on the phone (either playing or paused), press the [Menu] soft key to open a list of the following streaming media options. LIBRARY This feature launches the Windows Media Library showing My Music, My Videos, My TV, My Playlists, and Now Playing. -
Page 163: Options
MEDIA CLIP OPTIONS OPTIONS The following options are available: • Playback – Show time as: set the show time elapsed or remaining. – Set the Pause playback while using another program to stop the video if you launch another program. –... -
Page 164: Settings
MEDIA CLIP OPTIONS SETTINGS This feature pauses the content and navigates you to the Player Settings menu where you can configure the Media Player’s Volume setting. 1 Use the Up or Down Navigation key to increase/ decrease the current volume setting for the player while in Portrait mode. -
Page 165: Using The Video Categories
USING THE VIDEO CATEGORIES This grouping of media categories provides access to an additional listing of streaming media. Where the previous Favorites list of media stream can be user edited and updated, this list of categories is defined by AT&T’s homepage and cannot be changed. VIEWING A VIDEO CLIP 1 From the Home screen, press the Start soft key. -
Page 166: Customizing Cellular Video
CUSTOMIZING CELLULAR VIDEO UPDATING THE FAVORITES LIST The list of media providers which appears in the Favorites section of the Cellular Video homepage can be edited and changed by the user. 1 From the Home screen, press the Start soft key. Highlight Cellular Video and press the OK key. -
Page 167: Adding A Video Alert
CUSTOMIZING CELLULAR VIDEO ADDING A VIDEO ALERT When new media is available for upload to your phone (such as breaking news), you can set your phone to notify you of the new available content. 1 From the Home screen, press the Start soft key. Highlight Cellular Video and press the OK key. -
Page 168: My Purchases
The Cellular Video homepage can be used to shop for streaming multimedia content. The My Purchases section can help keep track of your purchase history and view any new resale products. 1 From the Home screen, press the Start soft key. Highlight Cellular Video and press the OK key. -
Page 169: Parental Controls
PARENTAL CONTROLS Your phone can be configured to block both purchased and streamed media content. Before filtering, you must first establish a PIN/password and a contact e-mail address. Once those have been established, you can choose one of the two available filter options: Content Filter and Purchase Blocker. -
Page 170: Configuring The Filters
PARENTAL CONTROLS 6 Use the Navigation keys to highlight the Save button and press the OK key. Allow a few minutes for your information to be received and accepted by MEdia Net. You can then use this information to activate the parental filters. CONFIGURING THE FILTERS 1 From the Home screen, press the Start soft key. -
Page 171: Im&Email, Mobitv, Media Net, Office Mobile
Chapter 9 IM&E-MAIL, MOBITV, MEDIA NET, OFFICE MOBILE IM&E-MAIL MOBITV MEDIA NET OFFICE MOBILE... -
Page 172: Im&Email, Mobitv, Media Net, Office Mobile
IM&E-MAIL, MOBITV, MEDIA NET, OFFICE MOBILE IM&E-MAIL _________________________ INSTANT MESSAGING Your handset comes with the ability to sign onto Instant Messaging. You must first create an active account using your PC, and then you can connect and chat using the following applications: •... -
Page 173: Media Net
IM&E-MAIL, MOBITV, MEDIA NET, OFFICE MOBILE MEDIA NET See MEdia net home in Chapter 7. AT&T Mall. OFFICE MOBILE _______________________________ DATA ANALYSIS ON THE GO View spreadsheets, even when you’re out of the office. You can use the Chart Wizard to view Microsoft Office Excel Mobile charts on the go. _______________________________________________________ PRACTICE MICROSOFT POWERPOINT PRESENTATIONS Practice and view your slides with Microsoft Office PowerPoint Mobile... - Page 174 MEMO...
-
Page 175: Camera
Chapter 10 CAMERA This chapter addresses picture and video functions including: TAKING, VIEWING AND EDITING PICTURES USING THE CAMERA USING THE CAMCORDER... -
Page 176: Camera / Camcorder Mode
CAMERA / CAMCORDER MODE Use the Camera program to take, view, and edit pictures as well as record and launch video clips stored on your device or on a storage card. You can also send pictures and video clips to others, or set a picture as the background in the Home screen. -
Page 177: Copy An Image To Your Phone
CAMERA / CAMCORDER MODE COPY AN IMAGE TO YOUR PHONE You can upload standard image files from a PC to your phone. You should customize the size and resolution of your images for display on the phone screen. 1 Connect the phone to your PC. 2 On your PC, copy the image file you want. -
Page 178: Take Pictures Using A Timer
CAMERA / CAMCORDER MODE TAKE PICTURES USING A TIMER Using the timer, you can be in the picture you take. Just place the phone on a stable support and press the camera button, then get into position. 1 On the Home screen, press [Start] [More...], select Applications and select Camera. -
Page 179: Select Where Pictures Are Saved
CAMERA / CAMCORDER MODE SELECT WHERE PICTURES ARE SAVED You can set the default location where pictures are saved. If you select main memory, pictures are saved to permanent storage on your device, which may require that you consider the storage needs of other programs. -
Page 180: Edit A Picture
CAMERA / CAMCORDER MODE EDIT A PICTURE You can actually edit pictures and videos on the Pantech duo™ using the Menu key. 1 On the Home screen, press [Start], [More...], select Applications and select File Explorer, select My Pictures. 2 Select the picture to edit, and press OK. -
Page 181: View Pictures As A Slide Show
CAMERA / CAMCORDER MODE VIEW PICTURES AS A SLIDE SHOW However you have stored the pictures and videos, you can review them consecutively in a slide show format. 1 On the Home screen, press [Start], [More...], select Applications and select File Explorer, select My Pictures. -
Page 182: Set A Picture As The Home Screen
CAMERA / CAMCORDER MODE SET A PICTURE AS THE HOME SCREEN Any picture you have uploaded can be saved as the background for the Home screen. 1 On the Home screen, press [More...], select Applications and select File Explorer, select My Pictures. -
Page 183: Send A Picture Via Multimedia Mesage
CAMERA / CAMCORDER MODE SEND A PICTURE VIA MULTIMEDIA MESAGE You can attach pictures to messages and send them to someone else. 1 On the Home screen, press [Start], [More...], select Applications and select File Explorer, select My Pictures. 2 Select the picture to send. 3 Press [Menu] [Send via Multimedia Msg.]. -
Page 184: Save A Copy Of A Picture
CAMERA / CAMCORDER MODE SAVE A COPY OF A PICTURE Store pictures in your phone by saving them to a pre-created folder. 1 On the Home screen, press [Start], [More...], select Applications and select File Explorer, select My Pictures. 2 Select the picture to save and press OK. 3 Press [Menu] [Save] [Save As...]. -
Page 185: Camera / Camcorder Operations
CAMERA / CAMCORDER OPERATIONS CAMERA • Supports JPEG File Format (jpg) VIDEO • Supports QCIF(176x144), QVGA (320x240) size of video • Supports 3gp File Format (3gp) RECORD A VIDEO By using the camera function, you can take pictures or you can record video by selecting the Camcorder option. -
Page 186: Play Recorded File
CAMERA / CAMCORDER OPERATIONS PLAY RECORDED FILE After you’ve recorded and stored a video file, you can retrieve it at any time and play it back on the phone. 1 Press 1 on the keypad. The first left icon in upper Menu bar changes to Camcorder icon 2 Press left soft key <... -
Page 187: Snapshot
CAMERA / CAMCORDER OPERATIONS SNAPSHOT To take a quick picture, you will use the snapshot feature of the phone. After taking a picture, you can store it, delete it, or forward it. 1 On the Home screen, press [Start], [More...], select Applications and select Camera and press OK. -
Page 188: Camera / Camcorder Controls
CAMERA / CAMCORDER CONTROLS Just as with an ordinary camera, your phone can be adjusted to control the brightness, color, resolution, etc. From the Menu you have access to all the image parameters you will want to adjust. CAMERA MENU The menu is reached after selecting Camera from the Home screen and gives you access to these parameters: storage, balance, white balance, and color effect. - Page 189 CAMERA / CAMCORDER CONTROLS Item Choose white balance in list. Default value is ‘Auto’. White [Auto] : Auto control of the white value. Balance [Sunny] : Sunny setting of the white value. [Cloudy] : Cloudy setting of the white value. [Incandescent] Incandescent setting of the white value.
-
Page 190: Camcorder Menu
CAMERA / CAMCORDER CONTROLS CAMCORDER MENU The Camcorder Menu allows you to control video features such as resolution and quality, and allows you to select the mode and turn the audio on and off. 1 On the Home screen, press [Start], [More...], select Applications and select Camera and press OK. - Page 191 CAMERA / CAMCORDER CONTROLS Item Choose storage in list. Default value is ‘Phone’. [Phone] Capture files stored in the Device of file Storage box. [External] capture files stored in the “SD Memory Card” Choose Profiles in list. Default value is ‘176 X 144’. Profiles [176 X 144] Recording resolution is in 176 X 144.
-
Page 192: General Settings
CAMERA / CAMCORDER CONTROLS GENERAL SETTINGS Camera/Camcorder Settings allows you to control the backlight, auto hide, review, shutter sound and time out. 1 On the Home screen, press [Start], [More...], select Applications and select Camera and press OK. 2 Press right soft key > [Menu]. 3 Select Settings, select General and press 4 Change values using Navigation Keys and press OK key. - Page 193 CAMERA / CAMCORDER CONTROLS Item Keep backlight on Check Keep backlight on during previewing during previewing and recording in list. and recording Default is checked. Check Full Screen in list. Default is unchecked. Full Screen This item operates while in Landscape mode. If Full Screen is checked, preview is displayed in full screen.
-
Page 194: Camera Settings
CAMERA / CAMCORDER CONTROLS CAMERA SETTINGS Camera Settings allows you to control the multi shot count and image prefix. 1 On the Home screen, press [Start], [More...], select Applications and select Camera and press OK. 2 Press right soft key > [Menu]. 3 Select Settings, select Camera and press OK. -
Page 195: Camcorder Settings
CAMERA / CAMCORDER CONTROLS CAMCORDER SETTINGS Camcorder Settings allows you to control the Limit Recording and File Extension. 1 On the Home screen, press [Start], [More...], select Applications and select Camera and press OK. 2 Press right soft key > [Menu]. 3 Select Settings, select Camcorder and press 4 Change values using Navigation Keys. -
Page 196: Overview Of The Default Hardware Button Assignments
CAMERA / CAMCORDER CONTROLS OVERVIEW OF THE DEFAULT HARDWARE BUTTON ASSIGNMENTS By default, these hardware buttons are assigned to Camera functions. Hardware Button NAVIGATION left NAVIGATION right NAVIGATION up NAVIGATION down Camera/Camcorder Function Start Record Video/Stop Record Video, Take a picture Brightness down Brightness up Zoom in... -
Page 197: Mobile Internet Explorer
Chapter 11 MOBILE INTERNET EXPLORER This chapter addresses Internet services and web browsing. For more detailed information contact your service provider. USING INTERNET EXPLORER... -
Page 198: Using Internet Explorer
USING INTERNET EXPLORER ADD A WEB PAGE TO THE FAVORITES LIST Internet Explorer functions on your phone much the same as it does on your PC. You can maintain a list of web sites in your favorites list. Add each site to the list through the Internet Explorer menus. 1 From the Home screen, press [Start] and select Internet Explorer. -
Page 199: Change Connection Options
USING INTERNET EXPLORER CHANGE CONNECTION OPTIONS Depending on your location and your access settings, you can connect to different networks through Internet Explorer. 1 From the Home screen, press [Start] and select Internet Explorer. 2 Press [Menu] [Tools] [Options]. 3 Press Connections. Do one of the following: •... -
Page 200: Change Web Page Display Options
USING INTERNET EXPLORER CHANGE WEB PAGE DISPLAY OPTIONS There are Web page display options to choose from: Text Size, one column, Fix To Screen, and desktop. 1 From the Home screen, press [Start] and select Internet Explorer. 2 Select one of the web sites. 3 Press [Menu] [View]. -
Page 201: Clear History, Cookies, Or Temporary Files
USING INTERNET EXPLORER CLEAR HISTORY, COOKIES, OR TEMPORARY FILES Internet Explorer typically stores a list of the sites you’ve visited, cookies (files simplifying return to a site), or temporary files. Clearing these files is simple. 1 From the Home screen, press [Start] and select Internet Explorer. -
Page 202: Delete A Favorite
USING INTERNET EXPLORER DELETE A FAVORITE Any favorite can be deleted from your favorites list at any time. 1 From the Home screen, press [Start] and select Internet Explorer. 2 Press Favorites. 3 Select the favorite to delete. 4 Press [Menu] [Delete]. 5 Press Yes to confirm the deletion. -
Page 203: Edit A Favorite
USING INTERNET EXPLORER EDIT A FAVORITE You can change the name, URL, or description of a web site in your favorites list. 1 From the Home screen, press [Start] and select Internet Explorer. 2 Press [Favorites]. 3 Select the favorite to edit. 4 Press [Menu] [Edit]. -
Page 204: Go To A Web Page
USING INTERNET EXPLORER GO TO A WEB PAGE The Internet Explorer on your phone accesses web pages by letting you enter the address in the address bar after pressing the menu key. 1 From the Home screen, press [Start] and select Internet Explorer. -
Page 205: Open Internet Explorer
USING INTERNET EXPLORER OPEN INTERNET EXPLORER Internet Explorer is one of the easily accessible options from the Home Screen. 1 From the Home screen, press [Start] and select Internet Explorer. REFRESH A WEB PAGE To refresh a web page use the Menu soft key and select Refresh. 1 From the Home screen, press [Start] and select Internet Explorer. -
Page 206: View A Favorite
USING INTERNET EXPLORER VIEW A FAVORITE To view a favorite site at any time, just go into the Favorites list and select the site you wish to visit. 1 From the Home screen, press [Start] and select Internet Explorer. 2 Press Favorites. 3 Select a favorite and press [Go]. -
Page 207: Move A Favorite To A Folder
USING INTERNET EXPLORER MOVE A FAVORITE TO A FOLDER After you’ve created folders in your Favorites list, you can move any of the sites already on the list into one of the folders. 1 From the Home screen, press [Start] and select Internet Explorer. -
Page 208: Show Or Hide Pictures On Web Pages
USING INTERNET EXPLORER SHOW OR HIDE PICTURES ON WEB PAGES The images in the Web pages can be hidden or not on screen. 1 From the Home screen, press [Start] and select Internet Explorer. 2 Press [Menu] [View] [Show Pictures]. 3 A check mark next to Show Pictures indicates that pictures will be displayed on Web pages. -
Page 209: Send A Link Via E-Mail
USING INTERNET EXPLORER SEND A LINK VIA E-MAIL One of the options your phone provides is sending a link through e-mail. You will use the Tools menu on the Internet Explorer menu bar. 1 From the Home screen, press [Start] and select Internet Explorer. -
Page 210: Adjust The Scrolling Speed
USING INTERNET EXPLORER ADJUST THE SCROLLING SPEED You will use the scrolling feature of the phone to view web pages – it can be adjusted to scroll as slowly or as quickly as you need. 1 From the Home screen, press [Start] and select Internet Explorer. -
Page 211: Connectivity, Bluetooth And Activesync
Chapter 12 PC CONNECTIVITY, BLUETOOTH AND ACTIVESYNC This chapter addresses Bluetooth and ActiveSync functions. ACTIVESYNC BLUETOOTH OVERVIEW OF BLUETOOTH VIRTUAL COM PORTS... -
Page 212: Activesync
Microsoft ActiveSync synchronizes data between your phone and PC. ActiveSync is already installed on you phone, but you need to install it on your PC before you can synchronize data. INSTALL AND SET UP ACTIVESYNC Install ActiveSync on your PC as described on the Windows Mobile Getting Started Disc. -
Page 213: Set Up An Exchange Server Connection
ACTIVESYNC SET UP AN EXCHANGE SERVER CONNECTION To complete this configuration, you will need to get the name of the server and the server domain name from your service provider or system administrator. You must also know your Exchange user name and password. -
Page 214: Change Activesync Settings
7 To change available synchronization settings, select the type of information, and press [Menu] select Settings and press OK. 8 To change the rules for resolving synchronization conflicts, press [Menu] select Advanced and press OK. 9 Press [Finish]. CHANGE ACTIVESYNC SETTINGS Once you set up synchronization using the Sync Setup wizard on the PC, you can later change your synchronization settings: •... -
Page 215: Schedule Synchronization As Items Arrive
ACTIVESYNC SCHEDULE SYNCHRONIZATION AS ITEMS ARRIVE You can schedule automatic synchronization between your phone and Exchange Server every time an item arrives or is changed in Exchange Server if your company is running Exchange Server with Exchange ActiveSync, and after your first full synchronization with Exchange Server. -
Page 216: Change The Synchronization Schedule
CHANGE THE SYNCHRONIZATION SCHEDULE Before changing synchronization settings, disconnect the phone from your PC. 1 On the phone Home screen, press [Start], select ActiveSync and press OK. 2 Press right soft key [Menu] select Schedule and press OK. 3 Do one or more of the following: To sync When you are working, or e-mail volume is high... -
Page 217: Start And Stop Synchronization
ACTIVESYNC START AND STOP SYNCHRONIZATION The ActiveSync program allows you to access a PC to keep information on both the PC and the phone current. There are several types of information you will want to keep updated on both. 1 On the phone Home screen, press [Start], select ActiveSync and press OK. -
Page 218: Change Settings For An Information Type
CHANGE SETTINGS FOR AN INFORMATION TYPE Before changing synchronization settings on the phone, disconnect it from your PC. 1 On the Home screen, press [Start], select ActiveSync, press OK. 2 Press [Menu], select Options and press OK. 3 Select one of the information types. Do one of the following: •... -
Page 219: Connect The Phone
ACTIVESYNC CONNECT THE PHONE There are several options for connecting your phone to your PC. Both devices will need to use the ActiveSync program. To synchronize using ActiveSync, you must install ActiveSync on your PC before connecting your phone to the PC. 1 Turn on the phone. -
Page 220: Connect To A Pc Using Chargeable Usb Cable
CONNECT TO A PC USING CHARGEABLE USB CABLE The Pantech duo™ provides a USB connector for transferring data to and from your computer via USB cable. 1 Plug the USB Data Cable into a standard USB connector of your computer. -
Page 221: Change E-Mail Security Options
ACTIVESYNC CHANGE E-MAIL SECURITY OPTIONS ActiveSync lets you set up S/MIME e-mail encryption and signing. You will have to obtain a valid certificate for signing or encrypting e-mail before you will be able to sign or encrypt e-mail successfully. 1 In the phone Home screen, press [Start], select ActiveSync and press OK. -
Page 222: Exclude An E-Mail Address From Reply All
EXCLUDE AN E-MAIL ADDRESS FROM REPLY ALL ActiveSync can help you manage your e-mail by ignoring a specified e-mail address when you reply to all senders from the phone. If you specify your own primary e-mail address, this can reduce the number of e-mails you receive by ensuring that you do not receive your own e-mail. -
Page 223: Bluetooth
BLUETOOTH One remote networking option that is available to you with the Pantech duo™ is Bluetooth wireless. By activating Bluetooth you can exchange information easily with other devices. ACCEPT A BLUETOOTH PARTNERSHIP A Bluetooth partnership is a direct link to other devices. Both devices that wish to connect must establish or accept a “partnership”... -
Page 224: Create A Bluetooth Partnership
CREATE A BLUETOOTH PARTNERSHIP Ensure that the two devices are within close range and that both Bluetooth-enabled devices are discoverable. 1 On the Home screen, press [Start], select Settings, press OK. 2 Scroll to Connections and press OK. 3 Select Bluetooth. 4 Select ‘Add new device…’, and press OK. -
Page 225: End A Bluetooth Partnership
BLUETOOTH END A BLUETOOTH PARTNERSHIP Through the connections menu, all Bluetooth partnerships that have been enabled are displayed. You can end a partnership at any time. 1 On the Home screen, press [Start], select Settings, press OK. 2 Scroll to Connections and press OK. 3 Select Bluetooth. -
Page 226: Make Your Device Discoverable
MAKE YOUR DEVICE DISCOVERABLE To receive beamed information, beaming devices or computers must be able to detect your device. 1 On the Home screen, press [Start], select Settings, press OK. 2 Scroll to Connections and press OK. 3 Select Bluetooth. 4 Use left and right Navigation Keys to select Turn on Visibility and press [Done]. -
Page 227: Rename A Bluetooth Partnership
BLUETOOTH RENAME A BLUETOOTH PARTNERSHIP You can give a more meaningful name to a Bluetooth partnership to help you recognize it when selecting from a list of partnerships. 1 On the Home screen, press [Start], select Settings, press OK. 2 Scroll to Connections and press OK. 3 Select Bluetooth. -
Page 228: Turn Bluetooth On And Off
TURN BLUETOOTH ON AND OFF By default Bluetooth is turned off. If you turn it on, and then turn off your device, Bluetooth also turns off. When you turn on your device again, Bluetooth turns on automatically. 1 On the Home screen, press [Start], select Settings, press OK. -
Page 229: Receive Beamed Information
BLUETOOTH RECEIVE BEAMED INFORMATION Your phone can automatically receive beamed information, but you must enable the phone to do so through the Connections menu. 1 On the Home screen, press [Start], select Settings, press OK. 2 Scroll to Connections and press OK. 3 Select Beam and press OK. -
Page 230: Beam An Item
BEAM AN ITEM In the Calendar, Contacts, Tasks, and Pictures programs, you can beam files and information to other devices using Bluetooth. 1 From the program, select the item you want to beam, such as an appointment in Calendar, a task in Tasks, a contact card in Contacts, or a picture in Pictures. -
Page 231: Set Up A Bluetooth-Enabled Headset
BLUETOOTH SET UP A BLUETOOTH-ENABLED HEADSET You can use a Bluetooth-enabled headset (or other Bluetooth-enabled hands-free device) with your device when you create a Bluetooth partnership between your device and the Bluetooth headset. 1 Make sure that the two devices are turned on and within close range, and that the Bluetooth- enabled headset is discoverable. -
Page 232: Set Up A Stereo Headset
SET UP A STEREO HEADSET Windows Mobile-based devices support A2DP (Advanced Audio Distribution Profile), which is used by Bluetooth-enabled stereo headsets. Make sure that your stereo headset also supports A2DP. 1 Make sure that your device and the stereo headset are turned on, discoverable, and within close range. -
Page 233: Turn Wireless Power On Or Off
BLUETOOTH TURN WIRELESS POWER ON OR OFF You can turn the power off to your wireless connections in a single location. This is a quick way to preserve battery power or to prepare your device for an airplane flight. 1 Press the F briefly to display the Quick List. 2 Press Wireless Manager. -
Page 234: Connect To Intranet Urls
CONNECT TO INTRANET URLS Some companies use periods in their intranet URLs (for example, intranet.companyname.com). A Work URL exception tells Internet Explorer Mobile to look on the Work network to find the URL instead of searching the Internet. 1 On the Home screen, press [Start], select Settings, press OK. -
Page 235: Use A Specific Connection To Connect To The Internet
BLUETOOTH USE A SPECIFIC CONNECTION TO CONNECT TO THE INTERNET When you create the connection, be sure to set the Connects to setting to The Internet. 1 On the Home screen, press [Start], select Settings, press OK. 2 Scroll to Connections and press OK. 3 Press [Menu] then Advanced. -
Page 236: Edit A Vpn Connection
EDIT A VPN CONNECTION If you have access to a Virtual Private Network (VPN) you can use your phone on the VPN. You will want to establish and edit the VPN connection first. 1 On the Home screen, press [Start], select Settings, press OK. -
Page 237: Overview Of Bluetooth Virtual Com Ports
OVERVIEW OF BLUETOOTH VIRTUAL COM PORTS Some programs can connect only though a serial (COM) port. This can be true even if the device itself is Bluetooth-enabled. To make it possible for such programs to use a Bluetooth connection, you must set up a virtual COM port. -
Page 238: Connect To Internet On Pc Through Bluetooth Internet Sharing
OVERVIEW OF BLUETOOTH VIRTUAL COM PORTS 5 Press [Menu] and select New Outgoing Port. 6 Select a numbered COM port from the list and press [Done]. If the port cannot be created, it is in use. Select a different numbered port. To use this COM port to communicate only with devices with which your device has a Bluetooth partnership, select the Secure Connection check box. -
Page 239: Connect To Internet On Pc Through Usb Internet Sharing
OVERVIEW OF BLUETOOTH VIRTUAL COM PORTS 5 Press [Connect]. 6 Double click or right click and select connect to your device on paired list of PC. 7 Press Yes when the message, ‘… Would you like to add it to your device list?’ appears. 8 Type Passcode on your device and type same passcode on PC. -
Page 240: Create A Dial-Up Connection
OVERVIEW OF BLUETOOTH VIRTUAL COM PORTS CREATE A DIAL-UP CONNECTION Every network connection is different. You should gather all of the relevant information or network settings you need before starting this process. 1 On the Home screen, press [Start], select Settings, press OK. -
Page 241: Create A Proxy Connection
OVERVIEW OF BLUETOOTH VIRTUAL COM PORTS CREATE A PROXY CONNECTION Every network connection is different. You should gather all of the relevant information or network settings you need before starting this process. 1 On the Home screen, press [Start], select Settings, press OK. -
Page 242: Create A Vpn Connection
OVERVIEW OF BLUETOOTH VIRTUAL COM PORTS CREATE A VPN CONNECTION Every network connection is different. You should gather all of the relevant information or network settings you need before starting this process. 1 On the Home screen, press [Start], select Settings, press OK. -
Page 243: Delete A Dial-Up Connection
OVERVIEW OF BLUETOOTH VIRTUAL COM PORTS DELETE A DIAL-UP CONNECTION If a dial-up connection is no longer need, delete it from the Connections menu. As with all options, you can control all the different connections possible through the phone. 1 On the Home screen, press [Start], select Settings, press OK. -
Page 244: Delete An Intranet Url
OVERVIEW OF BLUETOOTH VIRTUAL COM PORTS DELETE AN INTRANET URL You may have stored URLs in your Work URL Exceptions list. When a URL is no longer needed there, delete it through the Advanced Connections menu. 1 On the Home screen, press [Start], select Settings, press OK. -
Page 245: Delete A Vpn Connection
OVERVIEW OF BLUETOOTH VIRTUAL COM PORTS DELETE A VPN CONNECTION When you are sure a VPN connection will no longer be needed – delete it from the Connections menu. 1 On the Home screen, press [Start], select Settings, press OK. 2 Scroll to Connections and press OK. -
Page 246: Edit A Proxy Connection
OVERVIEW OF BLUETOOTH VIRTUAL COM PORTS EDIT A PROXY CONNECTION To edit a proxy connection, go to the Connections menu and select the connection to delete. 1 On the Home screen, press [Start], select Settings, press OK. 2 Scroll to Connections and press OK. 3 Select Proxy and press OK. -
Page 247: Edit An Intranet Url
OVERVIEW OF BLUETOOTH VIRTUAL COM PORTS EDIT AN INTRANET URL To edit an Intranet URL, go to the Connections menu and the Advance menu, and select the connection to delete. 1 On the Home screen, press [Start], select Settings, press OK. 2 Scroll to Connections and press OK. -
Page 248: Connecting The Gps Intermediate Driver To Gps Hardware
OVERVIEW OF BLUETOOTH VIRTUAL COM PORTS CONNECTING THE GPS INTERMEDIATE DRIVER TO GPS HARDWARE Some programs can connect only though GPS Intermediate Driver to GPS Hardware. To make it possible for such programs to use the GPS Intermediate Driver, you must set up a GPS COM port. 1 On the Home screen, press [Start], select Settings, press OK. -
Page 249: Applications
Chapter 13 APPLICATIONS DOWNLOAD AGENT FILE EXPLORER JAVA SPEED DIAL VOICE COMMAND TASK MANAGER INTERNET SHARING GET TELENAV MY-CAST WEATHER MYSPACE MOBILE CLEARVUE PDF... -
Page 250: Download Agent
This phone has Download Agent for updating OS images. 1 On the Home screen, press [Start], select Applications, press OK. 2 Scroll to Download Agent and press OK. 3 Scroll to the image package file and press [Install]. DOWNLOAD AGENT... -
Page 251: File Explorer
FILE EXPLORER This phone has File Explorer, which opens an explorer window. This is very similar to the one that Microsoft Windows® has. File Explorer will allow you to navigate to folders and files, and it will allow you manage, delete, copy, or edit files and folders on your phone. -
Page 252: Java
Enables Java programs launch and run under the Windows Mobile Application. JAVA... -
Page 253: Speed Dial
SPEED DIAL This phone has Speed Dial, with access to a phone number with a short cut number for speed dialing or to an e-mail or URL address for quick access. 1 On the Home screen, press [Start], select Applications, press OK. 2 Scroll to Speed Dial and press OK. -
Page 254: Voice Command
The Pantech duo™ has the most advanced voice command technology available in cell phones. You can manage and use your phone without pressing buttons by setting up the Voice Command systems. Follow these three easy steps: 1 Adjust the Microphone. -
Page 255: Try Out More Commands
VOICE COMMAND 2 Press and release the Voice Command Button. A short melody will play and a microphone icon will appear at the top of your screen. 3 In a clear voice say, “Help”. 4 After Voice Command finishes speaking, answer “General”. -
Page 256: Using The Voice Command Button
USING THE VOICE COMMAND BUTTON The Voice Command Button is used to activate or cancel voice recognition: • Press and release to talk or interrupt. • Press and hold to cancel. (*Not available on all devices) There are two ways to cancel voice recognition: •... -
Page 257: Making Phone Calls
VOICE COMMAND MAKING PHONE CALLS You can call contacts and dial numbers with voice commands. • “Call <contact>” to call a contact whose phone number is stored on your device. • “Call <contact> at/on <location>” to call a contact at a specific phone number. - Page 258 _________________________________ WHEN CONFIRMING, SAY • “Yes” or “Correct” to call. • “No” or “Incorrect” to try again. _________________________________ WHEN ASKED WHICH LOCATION, SAY • an offered “<location>” to call. • “No” to try again or continue on to next contact in a list. __________ EXAMPLES •...
-
Page 259: Showing Contacts
VOICE COMMAND SHOWING CONTACTS You can show a contact card using voice commands. ____ • “Show <contact>” • “Lookup <contact>” Then, the devices display the contact on screen. <CONTACT> SUPPORTS THE FOLLOWING FORMATS: • Nickname • First Last • First Last Suffix •... -
Page 260: Reading Appointments
READING APPOINTMENTS You can request information from your calendar using voice commands. There are several variations of each calendar command. Use the one you find the most natural. Calendar reminders are read aloud as they occur. This can be turned on and off. -
Page 261: Playing Music
VOICE COMMAND WHILE LISTENING TO APPOINTMENTS, YOU CAN PUSH THE VOICE COMMAND BUTTON TO INTERRUPT AND SAY • “Next” for the next appointment • “Previous” for the previous appointment • “Repeat” to hear the current appointment again • “Cancel” to stop reading appointments NOTES •... -
Page 262: Starting Programs
WHILE LISTENING TO OPTIONS, YOU CAN PUSH THE VOICE COMMAND BUTTON TO INTERRUPT AND SAY • “That One” to choose the current option • “<choice>” to choose an option EXAMPLES • “Play Artist” • “Play Scott Bishop Band” • “Play Album by Scott Bishop Band” •... -
Page 263: Getting Phone Status
VOICE COMMAND GETTING PHONE STATUS You can set the ring volume and configure flight mode plus learn the battery level, signal strength, date and time using voice commands. ____ • “What time is it?” to hear the current time. • “What date is it?” to hear the current date. •... -
Page 264: Personalization
PERSONALIZATION Navigate through [Start] [Applications] [Voice Command] so as to begin the personalization. GENERAL OPTIONS There are many choices in the Voice Command feature of your phone. You can enable, disable, password protect, and control availability. • Voice Enabled - When yes, Voice Command is running and waiting for you to press and release the Voice Button. -
Page 265: Phone Options
VOICE COMMAND PHONE OPTIONS When using the Voice Command feature to place and receive calls, you will have the option of having your commands confirmed before being carried out. • Call Confirmations – When yes, Voice Command asks you to confirm that the correct name was recognized before placing the call. -
Page 266: General Tips
GENERAL TIPS Voice command has many features to manage. This section describes some of the simple ways to manage Voice command. How do I get Help? – Say “Help”, it is context sensitive and will assist you with currently available commands. Do I have to wait until a question finishes to answer? –... -
Page 267: Phone And Contact Tips
VOICE COMMAND PHONE AND CONTACT TIPS You will want to use some of the information in this section to make using your phone and contacts list with Voice command easier. • How do I call voicemail? – Make a contact named ‘voicemail’ and add each of your voicemail numbers. -
Page 268: Reading Appointments Tips
READING APPOINTMENTS TIPS Voice command will act as you have instructed when you want it on or off in different situations. • Quiet Voice Command during a meeting or a movie – Voice Command will not make any noise if the device volume is off or set to vibrate. -
Page 269: Starting Programs Tips
VOICE COMMAND • Sometimes the artist isn’t what I expect – Voice Command uses the AlbumArtist property to organize tracks by artist. This is different from the Artist property displayed by Windows Explorer and by default in Windows Media Player. •... -
Page 270: Troubleshooting
GENERAL TROUBLESHOOTER This section contains answers to some of the most common questions you will have when using Voice command with your Pantech duo™. The Voice Command Button doesn’t work when the password screen is displayed – The password screen blocks the Voice Command Button to avoid other people from placing phone calls while your device is locked. - Page 271 VOICE COMMAND The microphone icon doesn’t display – Try the following: • Make sure the button you’re pressing is assigned to Voice Command. • Make sure you are not holding the button long enough to engage the press and hold to cancel feature. I can’t use the Voice Command Button reliably –...
-
Page 272: Reading Appointments Troubleshooter
______________________________________________ PHONE AND CONTACT TROUBLESHOOTER These are common questions users have about using Voice command with their phones. I can’t use Voice Command during a call – Voice Command is temporarily disabled during phone calls. I say a contact name but it is not recognized – •... -
Page 273: Task Manager
VOICE COMMAND ________________________________________ PLAYING MUSIC TROUBLESHOOTER Playing the first song takes a long time – Store all your tracks in one folder for fastest access to media. My device cannot find my files – If your device cannot find files on your storage card, try removing it and re-inserting it. -
Page 274: Internet Sharing
But this device does not have built-in GPS capabilities, so you need GPS receiver. MY-CAST WEATHER – DEMO Now you can get weather on your cell phone! Anytime and anywhere you are. For more information, check the website http://www.my-cast.com MYSPACE MOBILE MySpace Mobile is a new service that will allow customers to interact with MySpace through their mobile phones. -
Page 275: Settings
Chapter 14 SETTINGS Choosing the Settings option from the Home screen allows you to view and in some cases change the status of your phone, the hardware and software version, the phone number and other important reference information about your phone. ... -
Page 276: Phone
AUTO ANSWER Set how quickly calls are automatically answered during hands-free operation. These settings do not apply when the ring type is Silent. AUTO LOCK Refer Basic functions of the Chapter 2 Basic Operation. CALL FORWARDING 1 On the Home screen, click [Start] [Settings] [Phone] [Call Forwarding]. -
Page 277: Call Options
CALL OPTIONS You can customize settings related to call functions, such as an answering option, voicemail and SMS access. 1 On the Home screen, click [Start] [Settings] [Phone] [Call Options]. 2 Available Setting Options: • Any key answer: When this option is activated, you can answer incoming calls by pressing any key •... -
Page 278: Turn Call Waiting Notifications On And Off
TURN CALL WAITING NOTIFICATIONS ON AND OFF During a phone conversation, you will be notified of an incoming call if this option is selected. 1 On the Home screen, click [Start] [Settings] [Phone] [Call Waiting]. 2 Select or clear Provide call waiting notifications, then click Done. -
Page 279: Fixed Dialing
FIXED DIALING When this option is activated, your phone allows outgoing calls only to the limited set of phone numbers. You can call only those numbers that are included in the Fixed Dialing Number list or which begin with the same digit(s) as a phone number on the list. -
Page 280: Add A Network
ADD A NETWORK 1 On the Home screen, click [Start] [Settings] [Phone] [Networks]. 2 Click Menu > Find a new Network. 3 Do one of the following: • Select the network checkbox(es) you want to add. Then click Done. • If you don’t see the network you want, click [Menu] [Add] and select a network from the list. -
Page 281: Service Dialing Numbers (Sdn)
SERVICE DIALING NUMBERS (SDN) You can view the list of Service Dialing Numbers (SDN) assigned by your service provider. These numbers include emergency numbers, customer service numbers and directory inquiries. This menu is available only when your SIM card supports Service Dialing Numbers. -
Page 282: Sounds
The Pantech duo™ comes with a large standard set of ringtones and sounds. You can also add your own as long as they are in the correct format. CHANGE OR TURN SOUNDS ON OR OFF Any sound can be toggled on or off at any time, or you can turn the phone’s sound off altogether. -
Page 283: Delete A Sound
DELETE A SOUND You can only delete sounds that you have added. You cannot delete sounds pre-installed in the phone. 1 From the Home screen, press the left soft key < [Start]. 2 Select Settings and press OK. 3 Scroll to Sounds and press OK. 4 Press [Menu] [Delete Sounds] and then OK. -
Page 284: Copy A Sound From Your Pc To Your Phone
COPY A SOUND FROM YOUR PC TO YOUR PHONE After a sound file is located on your phone, you can use it for a ring tone. Sound files in .wav, .mid, mp3 or .wma formats can be used. 1 Connect the phone to your PC using a USB connection. -
Page 285: Profiles
VIEW THE LIST OF PROFILES You can store a set of parameters and options for your phone in what is known as a “profile”. By developing and selecting a profile you will be establishing the baseline features of operation for the phone. 1 From the Home screen, press the left soft key <... -
Page 286: Change The Current Profile
CHANGE THE CURRENT PROFILE If you have more than one profile on your phone, there are two simple methods of changing to another profile. 1 On the Home screen, use the up and down Navigation Keys to select Profile and press OK. 2 Select a different profile from the list. -
Page 287: Home Screen
HOME SCREEN CHANGE THE HOME SCREEN APPEARANCE 1 On the Home screen, click [Start] [Settings] [Home Screen]. 2 Under Home screen layout, Color scheme, and Background image, select the options you want. 3 Under Time out, select the length of time you want the Home screen to be displayed if you are not using the device, and click Done. -
Page 288: Clock
SET THE DATE AND TIME 1 On the Home screen, click [Start] [Settings] [Clock] [Date and Time]. 2 In Time Zone, select your time zone. 3 In Date, edit the month, day, or year. 4 In Time, edit the hour, minute, and second. 5 Click [Done]. -
Page 289: Connections
CONNECTIONS WIRELESS MANAGER You can turn the power off to your wireless connections in a single location. This is a quick way to preserve battery power or to prepare your device for an airplane flight. 1 On the Home screen, click [Start] [Settings] [Connections]. -
Page 290: Create A Bluetooth Partnership
CREATE A BLUETOOTH PARTNERSHIP Ensure that the two devices are within close range and that both Bluetooth-enabled devices are visible. 1 On the Home screen, click [Start] [Settings] [Connections] [Bluetooth]. 2 Click [Add New Device]. Your device searches for other Bluetooth-enabled devices and displays them in the list. -
Page 291: Create A Dial-Up Connection
CONNECTIONS CREATE A DIAL-UP CONNECTION Every network connection is different. You should gather all of the relevant information or network settings you need before starting this process. 1 On the Home screen, click [Start] [Settings] [Connections]. 2 Click Dial-up. 3 Click [Menu] [Add]. 4 Enter the following information: •... -
Page 292: Create A Gprs Connection
CREATE A GPRS CONNECTION Every network connection is different. You should gather all of the relevant information or network settings you need before starting this process. 1 On the Home screen, click [Start] [Settings] [Connections]. 2 Click GPRS. 3 Click [Menu] [Add]. 4 Enter the following information: •... -
Page 293: Create A Proxy Connection
CONNECTIONS CREATE A PROXY CONNECTION Every network connection is different. You should gather all of the relevant information or network settings you need before starting this process. 1 On the Home screen, click [Start] [Settings] [Connections]. 2 Click Proxy. 3 Click [Menu] [Add]. 4 Enter the following information: •... -
Page 294: Create A Vpn Connection
CREATE A VPN CONNECTION Every network connection is different. You should gather all the relevant information or network settings you need before starting this process. 1 On the Home screen, click [Start] [Settings] [Connections]. 2 Click VPN. 3 Click [Menu] [Add]. 4 Enter the following information: •... -
Page 295: End A Bluetooth Partnership
CONNECTIONS END A BLUETOOTH PARTNERSHIP 1 On the Home screen, click [Start] [Settings] [Connections] [Bluetooth]. 2 Click [Menu] [Devices]. 3 Select the Bluetooth partnership you want to end. 4 Click [Menu] [Delete]. DELETE A DIAL-UP CONNECTION 1 On the Home screen, click [Start] [Settings] [Connections]. -
Page 296: Delete A Gprs Connection
DELETE A GPRS CONNECTION 1 On the Home screen, click [Start] [Settings] [Connections]. 2 Click GPRS. 3 Select the connection to delete. 4 Click [Menu] [Delete]. 5 Click Yes, and click Done. DELETE A PROXY CONNECTION 1 On the Home screen, click [Start] [Settings] [Connections]. -
Page 297: Change An Intranet Url
CONNECTIONS CHANGE AN INTRANET URL 1 On the Home screen, click [Start] [Settings] [Connections]. 2 Click [Menu] [Advanced] [Menu] [Work URL Exceptions]. 3 Select the URL to edit. 4 Click [Menu] [Edit]. 5 Edit the URL, then click Done. MAKE YOUR DEVICE VISIBLE In order for your device to receive beamed information, beaming devices or computers must be able to detect it. -
Page 298: Turn On And Off Bluetooth
TURN ON AND OFF BLUETOOTH By default Bluetooth is turned off. If you turn it on, then turn off your device, Bluetooth also turns off. When you turn on your device again, Bluetooth turns on automatically. 1 On the Home screen, click [Start] [Settings] [Connections] [Bluetooth]. -
Page 299: Beam An Item
CONNECTIONS BEAM AN ITEM In the Calendar, Contacts, Notes, Tasks, and Pictures programs, you can beam files and information to other devices using Bluetooth. 1 From the program, select the item you want to beam, such as an appointment in Calendar, a task in Tasks, a contact card in Contacts, or a picture in Pictures. -
Page 300: Set Up An Outgoing Bluetooth Com Port
SET UP AN OUTGOING BLUETOOTH COM PORT The New Outgoing Port menu command is available only if one or more Bluetooth-connected devices support serial (COM) connections. 1 Make sure that your device is connected to the other device via Bluetooth. 2 On the Home screen, click [Start] [Settings] [Connections]. -
Page 301: Set Up A Bluetooth-Enabled Headset
CONNECTIONS SET UP A BLUETOOTH-ENABLED HEADSET You can use a Bluetooth-enabled headset (or other Bluetooth-enabled hands-free device) with your device when you create a Bluetooth partnership between your device and the Bluetooth headset. 1 Make sure that the two devices are turned on and within close range, and that the Bluetooth- enabled headset is visible. -
Page 302: Security
Your Pantech duo™ has several easy-to-use security features. You can enable the device lock, or you can enable security certificates such as SSL. ENABLE THE DEVICE LOCK 1 From the Home screen, press the left soft key < [Start]. 2 Select Settings and press OK. -
Page 303: Disable The Device Lock
DISABLE THE DEVICE LOCK When you disable a device lock, remember to disable the automatic feature that locks the device if it is unused for a specified amount of time. 1 From the Home screen, press the left soft key <... -
Page 304: View A Certificate
VIEW A CERTIFICATE Your phone is able to use personal security certificates that you add to the phone and it also has root certificates that come pre-installed. 1 From the Home screen, press the left soft key < [Start]. 2 Select Settings and press OK. 3 Scroll to Security and press OK. -
Page 305: Activating The Sim Pin
4 Select Certificates and press OK. 5 Choose one of the following: • Personal to view the list of personal certificates. • Intermediate to view the list of intermediate • Root to view the list of root certificates. 6 Select a certificate. 7 Press [Menu], then Delete. -
Page 306: Locking The Sim Card
LOCKING THE SIM CARD When SIM Lock is enabled, your phone works only with the current SIM card. To use another SIM card, you must enter the SIM lock password. 1 On the Home screen, press the [Start] soft key. 2 Select [Settings] [Security] [Enable SIM Lock]. -
Page 307: Encryption
ENCRYPTION When you will want to encrypt any files, select ‘Encrypt files placed on storage cards’ check box. You can save encrypted files which are placed on a storage card. Such files are readable only by this Windows Mobile-based device. MASTER CLEAR When you have purchased your phone, all the settings are pre- configured and installed. -
Page 308: Remove A Program
REMOVE A PROGRAM You can remove programs that have been added to the phone at any time. Be sure that you select the right program before removing it. 1 From the Home screen, press the left soft key < [Start]. 2 Select Settings and press OK. -
Page 309: Power Management
POWER MANAGEMENT You can use Power Management to check the battery and configure settings that prolong battery life. 1 From the Home screen, press the left soft key < [Start]. 2 Select Settings and press OK. 3 Scroll to Power Management and press OK. 4 Adjust the following: •... -
Page 310: Ipm Power Mode
(IPM: Intel Power Management) This mode is used to accelerate the operating speed of the smartphone. Two modes are available: turbo mode and default mode. In turbo mode, the CPU operates at its full speed of 416 MHz for about five seconds. -
Page 311: Accessibility
ACCESSIBILITY The accessibility settings will determine the size of the text and characters, time outs, call alerts, and volumes on the phone. 1 From the Home screen, press the left soft key < [Start]. 2 Select Settings and press OK. 3 Select ‘More...’, press OK, and then select Accessibility. -
Page 312: Regional Settings
REGIONAL SETTINGS You can specify the language, locale, date and time style, as well as number and currency formatting options. 1 From the Home screen, press the left soft key < [Start]. 2 Select Settings and press OK. 3 Select ‘More...’, press OK, then select Regional Settings. -
Page 313: Error Reporting
ERROR REPORTING Error Reporting sends information needed by technical support groups to diagnose a program error for a device running Windows Mobile software. A text file is created whenever an error is detected, and can be delivered to support personnel if you choose to send it. If a program error occurs, Error Reporting starts automatically. - Page 314 MEMO...
-
Page 315: Games
Chapter 15 GAMES There are many games included with your Pantech duo™. SOLITAIRE BUBBLE BREAKER MIDNIGHT POOL BRAIN CHALLENGE SCRABBLE BLAST TIGER WOODS PGA TOUR 07 JEWEL QUEST 2... -
Page 316: Solitaire
START A GAME OF SOLITAIRE 1 On the Home screen, press [Start] [Games] [Solitaire]. 2 Start new game. 3 When you have finished playing a game, begin a new one by pressing [Menu] [New Game]. HOW TO MOVE CARDS A number or character is displayed above each card stack. 1 On the keypad, press the number or character above the card you want to move, and then press the number or character above the stack to... -
Page 317: Play Solitaire
SOLITAIRE PLAY SOLITAIRE 1 Move any aces on the seven stacks to the four card spaces at the top of the screen, and then make any other available plays. 2 When you have made all available plays, press Draw to turn over cards. The top card that is face up on the deck is always available for play. -
Page 318: Bubble Breaker
OVERVIEW OF BUBBLE BREAKER Bubble Breaker is easy to learn, yet difficult to master. The objective is to align similar bubbles to form large blocks of bubbles before bursting them. The more bubbles you have in the block before they are burst, the greater number of points you will receive. -
Page 319: View Bubble Breaker Statistics
BUBBLE BREAKER Bubble Breaker allows you to vary your playing experience. In Bubble Breaker, press [Menu] [Options], and select the following: • Play Sounds: Turns game sounds on or off. • Guest Mode: Enables guests to play without affecting the statistics. -
Page 320: Midnight Pool - Demo
MIDNIGHT POOL — DEMO In Gameloft’s Midnight Pool™, you can pit yourself against a host of colorful characters ranging in skill from amateur to veritable pool shark, challenging them and betting on matches. Link up your trick shots during challenges and games using either US 8-ball, UK 8-ball or 9 ball rules, depending on your preference. -
Page 321: Brain Challenge - Demo
BRAIN CHALLENGE — DEMO Just like your body, your brain needs to exercise to stay in shape. Maintaining it simply involves completing little exercises without pain, stress, or boredom. That’s where Brain Challenge™ comes in! It’s like a real vitamin boost for your brain. Brain Challenge is more than just a game or program. -
Page 322: Scrabble Blast - Demo
SCRABBLE BLAST — DEMO SCRABBLE Blast is the newest way to play your favorite word game! Part classic SCRABBLE and part fast-paced puzzle-game, SCRABBLE Blast takes the crossword-style game play you’re familiar with to an exciting new level. SCRABBLE tiles fall from the sky, connect them in any direction to make great words and rack up the points. -
Page 323: Tiger Woods Pga Tour 07 - Demo
TIGER WOODS PGA TOUR 07 — DEMO Tee off with EA SPORTS™ Tiger Woods PGA TOUR against Tiger Woods or other PGA TOUR golf legends including: Colin Montgomerie, Vijay Singh, and John Daly. Compete on up to six world class courses. Practice any course for a full round or single hole. 3D views and broadcaster commentary capture every drive, chip, and putt as winning shots earn you Trophy Balls. -
Page 324: Jewel Quest 2 - Demo
JEWEL QUEST 2 — DEMO The Jewel Quest phenomenon continues with all-new addictive puzzle fun. Rupert picks up a new treasure trail in search of the grandest Jewel Board ever! Guide him through the mystery as he explores Africa in search of jewels and his lost love. -
Page 325: Safety And Warranty
Chapter 16 SAFETY AND WARRANTY This chapter addresses the safety guidelines and precautions to follow when operating your phone. Before operating your phone, please be aware of all the safety details. This chapter contains the terms and conditions of services and the warranty for your phone. -
Page 326: Safety Information For Wireless Handheld Phones
SAFETY INFORMATION FOR WIRELESS HANDHELD PHONES Read this information before using your Handheld Portable Cellular Telephone. EXPOSURE TO RADIO FREQUENCY SIGNALS Your wireless handheld portable telephone is a low power radio transmitter and receiver. When it is ON, it receives and also sends out radio frequency (RF) signals. -
Page 327: Driving Safety
SAFETY INFORMATION FOR WIRELESS HANDHELD PHONES DRIVING SAFETY Talking on the phone while driving is extremely dangerous and is illegal in some states. Remember, safety comes first. Check the laws and regulations on the use of phones in the areas where you drive. Always obey them. -
Page 328: Electronic Devices
SAFETY INFORMATION FOR WIRELESS HANDHELD PHONES ELECTRONIC DEVICES Most modern electronic equipment is shielded from RF energy. However, certain electronic equipment may not be shielded against the RF signals from your wireless phone. PACEMAKERS The Health Industry Manufacturers Association recommends that a minimum separation of six (6"... -
Page 329: Potentially Explosive Atmospheres
SAFETY INFORMATION FOR WIRELESS HANDHELD PHONES AIRCRAFT FCC and Transport Canada Regulations prohibit using your phone while in the air. Turn your phone OFF before boarding an aircraft. BLASTING AREAS To avoid interfering with blasting operations, turn your phone OFF when in a “blasting area”... -
Page 330: Precautions
SAFETY INFORMATION FOR WIRELESS HANDHELD PHONES PRECAUTIONS Your Handheld Portable Telephone is a high quality piece of equipment. Before using the device, please read all the instructions and cautionary markings on (1) AC Adaptor (2) Battery and (3) Product Using Battery. DO NOT use this equipment in an extreme environment where high temperature or high humidity exists. -
Page 331: Safety Information For Fcc Rf Exposure
SAFETY INFORMATION FOR FCC RF EXPOSURE WARNING! Read this Information before using CAUTIONS In August 1996 the Federal Communications Commission (FCC) of the United States with its action in Report and Order FCC 96-326 adopted an updated safety standard for human exposure to radio frequency electromagnetic energy emitted by FCC regulated transmitters. -
Page 332: Sar Information
THIS MODEL PHONE MEETS THE GOVERNMENT’S REQUIREMENTS FOR EXPOSURE TO RADIO WAVES. Your wireless phone is a radio transmitter and receiver. It is designed and manufactured not to exceed the emission limits for exposure to radiofrequency (RF) energy set by the Federal Communications Commission of the U.S. -
Page 333: Safety Information For Battery Usage
SAR INFORMATION The FCC has granted an Equipment Authorization for this model phone with all reported SAR levels evaluated as in compliance with the FCC RF exposure guidelines. SAR information on this model phone is on file with the FCC and can be found under the Display Grant section of http://www.fcc.gov/oet/fccid after searching on PP4TX-215. -
Page 334: Fcc & Industry Canada Regulatory Compliance
FCC & INDUSTRY CANADA REGULATORY FCC & Industry Canada Regulatory Compliance This device complies with Part 15 of the FCC Rules. Operation is subject to the following two conditions: (1) this device may not cause harmful interference, and (2) this device must accept any interference received, including interference that may cause undesired operation. - Page 335 FCC & INDUSTRY CANADA REGULATORY COMPLIANCE Statement according to FCC part 15.19: This device complies with Part 15 of the FCC Rules. Operation is subject to the following two conditions: (1) this device may not cause harmful interference, and (2) this device must accept any interference received, including interference that may cause undesired operation.
-
Page 336: Fcc Hearing-Aid Compatibility Regulations For Wireless Devices
FCC HEARING-AID COMPATIBILITY REGULATIONS FOR WIRELESS DEVICES FCC ID : JYCPC-C810 Trade Name/Model(s): AT&T / C810 FCC Classification: Licensed Portable Transmitter Held to Ear (PCE) FCC Rule Part(s): §20.19 HAC Standard: ANSI PC63.19-2005 D3.6 On July 10, 2003, the U.S. Federal Communications Commission (FCC) Report and Order in WT Docket 01-309 modified the exception of wireless phones under the Hearing Aid Compatibility Act of 1988 (HAC Act) to require digital wireless phones be compatible with... - Page 337 FCC HEARING-AID COMPATIBILITY REGULATIONS FOR WIRELESS DEVICES In the above example, if a hearing aid meets the M2 level rating and the wireless phone meets the M3 level rating, the sum of the two values equal M5. This should provide the hearing aid user with “normal usage” while using their hearing aid with the particular wireless phone.
-
Page 338: Fda Consumer Update
FDA CONSUMER UPDATE 1. Do wireless phones pose a health hazard? The available scientific evidence does not show that any health problems are associated with using wireless phones. There is no proof, however, that wireless phones are absolutely safe. Wireless phones emit low levels of radiofrequency energy (RF) in the microwave range while being used. - Page 339 FDA CONSUMER UPDATE 3. What kinds of phones are the subjects of this update? The term “wireless phone” refers here to hand-held wireless phones with built-in antennas, often called “cell,” “mobile,” or “PCS” phones. These types of wireless phones can expose the user to measurable radiofrequency energy (RF) because of the short distance between the phone and the user’s head.
- Page 340 FDA CONSUMER UPDATE The Project has also helped develop a series of public information documents on EMF issues. FDA and the Cellular Telecommunications & Internet Association (CTIA) have a formal Cooperative Research and Development Agreement (CRADA) to do research on wireless phone safety.
- Page 341 FDA CONSUMER UPDATE 10. What about children using wireless phones? The scientific evidence does not show a danger to users of wireless phones, including children and teenagers. If you want to take steps to lower exposure to radiofrequency energy (RF), the measures described above would apply to children and teenagers using wireless phones.
-
Page 342: Protect Your Warranty
PROTECT YOUR WARRANTY Read your Warranty carefully, with special consideration to paragraph seven of the Limited Warranty for your unit. “Warranty does not apply to... or to any product or part thereof which has suffered through alteration... mishandling, misuse, neglect or accident”. -
Page 343: Manufacturer's Warranty
MANUFACTURER’S WARRANTY 12 MONTH LIMITED WARRANTY The AT&T Personal Communications (the Company) warrants to the original retail purchaser of this AT&T handheld portable cellular telephone, that should this product or any part thereof during normal consumer usage and conditions, be proven defective in material or workmanship that results in product failure within the first twelve (12) month period from the date of purchase, such defect(s) will be repaired or replaced (with new or rebuilt parts) at the Company’s option, without... - Page 344 MANUFACTURER’S WARRANTY applications, ringtones, games and graphics) and any other data added to your device. In addition, if your wireless device utilizes a SIM or Multimedia card, please remove the card before submitting the device and store for later use when your device is returned, the AT&T Personal Communications is not responsible for and does not guarantee restoration of any third-party software, personal information or memory data contained in, stored on, or integrated with any wireless device,...
Need help?
Do you have a question about the Duo and is the answer not in the manual?
Questions and answers