
Related Manuals for Microlife WatchBP O3


Summary of Contents for Microlife WatchBP O3
- Page 1 Affordable ABPM and strictly guideline-based SBPM for accurate out-of-office blood pressure measurement. Instruction Manual...
- Page 2 The Microlife WatchBP O3 (Out Of Office) is designed to provide reliable and unbiased ambulatory and self blood pressure measurement results, and strictly follows European Society of Hypertension (ESH) and American Heart Association (AHA) recommendations for out-of-office blood pressure measurement .The WatchBP O3 device has been clinically...
-
Page 3: Table Of Contents
Product description Name of parts and display ........ 3–4 «AMBULATORY» mode ........17–21 «HOME» mode ..........22–23 Before using WatchBP O3 for the first time «CASUAL» mode ..........24–25 Activating the device ..........5 Confirm cuff size ............. 6 Viewing, deleting and transferring measurements Viewing measurements ......... -
Page 4: Product Description
Product description Name of parts ERP NO.3MZ1-1 Batteries:4xAAA 1.5VDC Microlife AG, 9443 Widnau / Switzerland www.watchbp.com SN:WWYXXXXX Patent Pending mmHg Cuff Socket D I A mmHg /min ON/OFF Button Battery Compartment M Button (Memory) Display USB Port Mode Switch Medication Button... - Page 5 Display Mode Indication Morning Data Evening Data Doctor Symbol Date/Time Outside Measurement Time Systolic Value Relax Diastolic Value Battery Display Pulse Indicator Pulse Rate Stored Value Number of Stored Data Time Left to Next Automatic Measurement...
-
Page 6: Before Using Watchbp O3 For The First Time
Before using WatchBP O3 for the first time Activating the Device Pull out the protective strip from the battery compartment. 2) Set the month – Use M Button to set the Month. Press the ON/OFF Button to confirm. 1) Set the year – Upon removing the protective strip or installing new batteries, the Year number flashes in the display. -
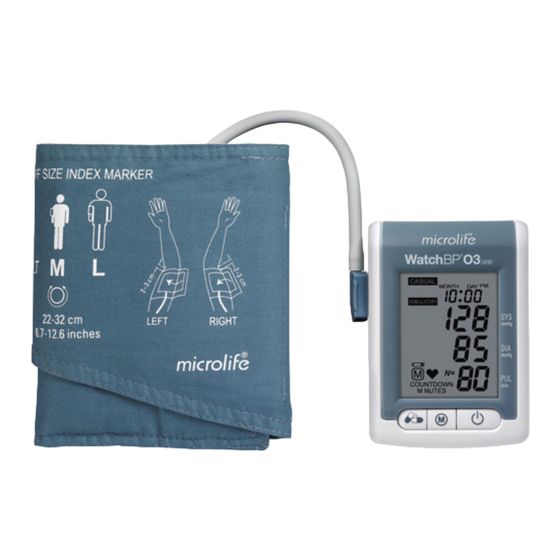
Page 7: Confirm Cuff Size
ON/OFF Button pressed, the A variety of different cuff sizes are available for use date and time are set, and the current time is with the WatchBP O3 device. displayed. please use only Microlife cuffs! M (Medium size) 22 - 32 cm (8.7 - 12.6 inches) -
Page 8: Selecting The Operation Mode
Prior to each measurement, use the Mode Switch «AMBULATORY» Mode on the side of the device to select the proper Select «AMBULATORY» mode for fully programmable measurement mode. The WatchBP O3 offers three 24-hour patient out-of-office blood pressure measurement modes: «AMBULATORY», «HOME» or measurement. - Page 9 fixed intervals of 15, 20, 30, or 60 minutes, as asleep hours can be programmed using the provided programmed by the physician. WatchBP O3 software. Intervals for the awake and asleep hours can also be programmed independently. Setting Ambulatory Measurement Schedule...
-
Page 10: Home» Mode
Selecting the operation mode (cont.) Two measurement periods «HOME» Mode The awake measurement period can be programmed Select «HOME» mode for patient home blood to start at anytime between 4AM to 10AM, and the pressure measurement in accordance with the guidelines of the European Society of Hypertension asleep measurement period can be set to anytime between 9PM to 2AM. - Page 11 No measurements on non-work days Two sets of measurements per day The patient should carry out readings on 7 ESH guidelines recommend one double measurement consecutive working days (or normal week days), be taken in the morning between 06:00 - 09:00 No readings should be taken on «non-working»...
- Page 12 7 working days, patients return to the office measurements between 04:00 - 12:00 and evening with the WatchBP O3 device for an evaluation of measurements between 18:00 - 24:00. their home blood pressure measurement data.
-
Page 13: Casual» Mode
«CASUAL» Mode 250 measurements safely stored In «CASUAL» mode, the device functions like The WatchBP O3 device can store up to 250 single a regular blood pressure monitor – single measurements in «CASUAL» mode. measurements are automatically stored and can be When memory is full, each new measurement will automatically overwrite the earliest measurement. -
Page 14: Recording The Taking Of Medication
Recording the taking of medication Medication record 2) Release the Medication Button and the Pill icon will flash in alternation with the recorded time. The patient can record the time medication is taken by pressing the Medication Button. Press and hold 1) Press and hold the Medication Button for 2 seconds and the Pill icon will appear. -
Page 15: Medication Record
50 records safely stored Delete stored medication records The WatchBP O3 device can store up to 50 To clear the memory of all medication records, press medication records. and hold the Medication Button for 7 seconds. The “CL” symbol will flash. Press M to delete the memory * When the memory is full, the device will display Full. -
Page 16: Measurement Interval Programming
Measurement interval programming Installing the software program Connecting the device to a computer 1) Put the CD in the CD-ROM drive of your computer. 1) Connect the device to computer. A successful Alternatively click on «setup.exe» in the CD’s connection is displayed by «PC» on the device. directory. -
Page 17: Programming The Interval Schedule
Programming the interval schedule 3) Assign the measurement intervals for the awake and asleep hours by using the drop-down menu 1) Using the drop-down menu on the lower-left of to choose from 15, 20, 30, and 60 minutes as the the screen, choose from 4AM to 10AM as the start measurement interval. -
Page 18: Taking Blood Pressure Measurements
Taking blood pressure measurements In «AMBULATORY» mode 2) Positioning the cuff and device – Fit the cuff closely, but not too tight. Make sure that the cuff Be sure the device is set to «AMBULATORY» Mode. is 2~3 cm (1 inch) above the elbow with the tube on the inside of the arm. - Page 19 3) Proper Positioning the cuff using Anchor Strap Option 1: Use the Shoulder Sling and Anchor Option 2: Use the Shoulder Strap and Anchor Strap to position the cuff as demonstrated in the Strap to position the cuff as demonstrated. diagram below.
- Page 20 4) Next measurement indicator – The device will 5) Measurement reminder – One minute before display the next measurement time, indicated by the next scheduled measurement, the device will a countdown in minutes on the display. partially inflate and immediately deflate the cuff to remind the patient of the next measurement.
- Page 21 Taking blood pressure measurements (cont.) 6) Measurement reminder – Five seconds before 7) During measurements – the patient should be the next measurement, the device will emit a reminded to remain still, refrain from talking, short series of beeps to notify the patient of the and to breath normally during the measurement.
-
Page 22: Ambulatory» Mode
8) Repeat measurements in the case of an 9) Storing measurement data – The WatchBP O3 error – The device will automatically repeat the automatically stores each measurement result, measurement after a two minute countdown along with the measurement date and time. -
Page 23: Home» Mode
Taking blood pressure measurements (cont.) In «HOME» mode 2) Applying the cuff – Patients should be trained on how to properly fit the cuff to their own arm. Be sure the device is set to «HOME» Mode. The cuff should fit closely around the arm, but not too tight, and be placed 2~3cm above the elbow with the tube on the inside of the arm. - Page 24 3) Start the measurement – Press the ON/OFF 5) Finishing the measurement – Once the two Button to start measurement. measurements are complete, measurement data is automatically stored for later reference by the physician. If an error displays after the /min measurements, the process should be repeated once again.
- Page 25 Taking a blood pressure measurements (cont.) In «CASUAL» mode 2) Applying the cuff – Patients should be trained on how to properly fit the cuff to their own arm. Be sure the device is set to «CASUAL» Mode. The cuff should fit closely around the arm, but not too tight, and be placed 2~3cm above the elbow with the tube on the inside of the arm.
-
Page 26: Casual» Mode
If an error displays after the /min measurements, the process should be repeated once again. 6) Storing measurement data – The WatchBP O3 automatically stores each measurement result, 4) During the measurement –The cuff will inflate along with the measurement date and time. -
Page 27: Viewing, Deleting And Transferring Measurements
Viewing, deleting and transferring measurements Viewing measurements In «AMBULATORY» mode 1) Use the Mode switch to first select the type of 1) When the M Button is pressed, it briefly displays measurements wished to be viewed. the total number of measurements stored, e.g. N=20. - Page 28 2) Pressing the M Button again displays the average In «Home» mode of all awake hours. 1) When the M Button is pressed, it briefly displays the total number of measurements stored, e.g. N=20. 3) Pressing M Button once again shows the average of all night hours.
- Page 29 Viewing, deleting and transferring measurements (cont.) 2) Pressing the M Button again displays the average In «CASUAL» mode of all morning data. 1) When the M Button is pressed, it briefly displays the total number of measurements stored, e.g. N=63, followed immediately by the average of all measurements stored in memory.
-
Page 30: Deleting Measurements
Deleting measurements 3) Release the M Button and press it once more while the delete symbol flashes. Data from «AMBULATORY», «HOME» and «CASUAL» mode measurements can be deleted independent of each other. 1) Use the Mode switch to first select the type of measurements you wish to delete. -
Page 31: Transferring Measurements
Viewing, deleting and transferring measurements (cont.) Transferring measurements Software commands 1) Connect the device to computer. A successful Store data Click «Save», the file name is connection is displayed by «PC» on the device. formed automatically from the 2) Start the software program. patient’s identity number and the suffix «WatchBPO3_(date). -
Page 32: Appendix
Appendix Battery indicator Replacing low batteries When batteries are placed into battery compartment, When the batteries need to be replaced, the Battery the battery symbol and the number indicating Symbol will flash each time the device is switched on. battery power will be displayed. Please replace new 1) Open the battery compartment at the back of the batteries for ABP patient test if the number is equal device. -
Page 33: Safety, Care, Accuracy Test And Disposal
Safety, care, accuracy test and disposal Safety and protection Observe the storage and operating conditions This device may be used only for the purpose described in the “Technical specifications” section described in this booklet. The device comprises of of this manual. sensitive components and must be treated with caution. -
Page 34: Accuracy Test
Air dry the cuff. DO NOT iron the cuff cover. Do not iron the cuff! Accuracy test Disposal We recommend the WatchBP O3 device be tested for Batteries and electronic instruments must accuracy every 2 years or after mechanical impact be disposed of in accordance with the locally (e.g. -
Page 35: Error Messages
Error messages If an error occurs during measurement, the Error Description Potential cause and measurement is interrupted and an error remedy message «Er» is displayed. «Er 1» Signal too The pulse signals weak on the cuff are too weak. Re-position the cuff and repeat the measurement. - Page 36 «HI» Pulse or cuff The pressure in the «Er 3» No pressure An adequate pressure pressure too cuff is too high (over in the cuff cannot be generated high 300 mmHg) OR the in the cuff. A leak pulse is too high may have occurred.
-
Page 37: Technical Specifications
Range: 0 - 299 mmHg Resolution: 1 mmHg Static accuracy: pressure within ±3 mmHg Pulse accuracy: ±5 % of the readout value Power source: 4X1.5 V Batteries; size AAA Microlife reserves the right to alter technical specifications without prior written notice. -
Page 38: Guarantee Card
Date: confirming date of purchase or purchase receipt. Batteries and wearing parts are not Telephone: covered by this guarantee. Email: Product: WatchBP O3 Product Number: 3MZ1-1 Serial Number: Date:...
Need help?
Do you have a question about the WatchBP O3 and is the answer not in the manual?
Questions and answers