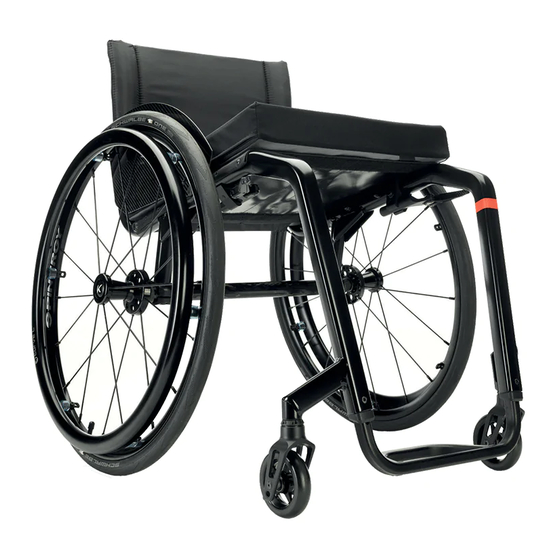
Küschall KSL Service Manual
Hide thumbs
Also See for KSL:
- User manual (48 pages) ,
- Service manual (32 pages) ,
- User manual (36 pages)
Table of Contents
Advertisement
Quick Links
Advertisement
Table of Contents

Related Manuals for Küschall KSL


Summary of Contents for Küschall KSL
- Page 1 Service Manual...
-
Page 3: Table Of Contents
Service Manual Table of contents General ......................... 4 Introduction Spare parts Fastening with hexagon socket bolts Visual check Identifying and repairing faults Frame ..........................6 Adjusting the frame Changing the frame Seat ..........................7 Adjusting the seat height Replacing the seat cover Backrest ........................ -
Page 4: General
Service Manual General Introduction This Service Manual contains all the technical information necessary for the inspection, configuration or repair of a Küschall® wheelchair. To maintain the necessary levels of safety and reliability, every wheelchair must be thoroughly examined once a year. Some aspects of the assembly and configuration of the wheelchair require a high level of expertise. -
Page 5: Visual Check
Service Manual Torque All screw connections must be tightened with the torques specified in the following instructions. Adhering to the given torques requires the use of a torque spanner. Checks Check that all bolts have been tightened with the torque specified in ... -
Page 6: Frame
Service Manual Frame Frame Adjusting the frame The seat width, seat depth, lower leg length and tipping point are determi- ned by the design of the frame and cannot be changed retrospectively. A modification of the tip behaviour can only be achieved by ordering a new, one-off backrest. -
Page 7: Seat
Service Manual Seat Seat Adjusting the seat height The seat height can only be adjusted by fitting a larger or smaller rear wheel and at the same time using a larger or smaller front wheel fork. SHv [mm] Possible front seat heights: 450 - 510 As the seat angle is dictated by the design of the frame, the seat height rear (SHh) also changes by 10 mm. -
Page 8: Backrest
Service Manual Back Backrest Adjusting the backrest height Readjusting the push handle/telescopic tube Difficulty: Tools: Ã3 ˜™™ Remove the backrest padding. Remove the screw connection and adjust the desired height of the push handle or the telescopic tube. Insert the screw connection again and tighten the nut. -
Page 9: Replacing Velcro® Tapes For Adjustable Backrests
Service Manual Back Replacing Velcro® tapes for adjustable backrests à 3,4, 5 8, 10 Ò2 Difficulty: Tools: ˜˜˜ The upper backrest bands can be taken straight off, the backrest must be removed in order to access the lower ones. Remove backrest cover. ... -
Page 10: Replacing Push Handles With Light Cover
Service Manual Back Replacing push handles with Light cover à 3, 4 Ò2 Difficulty: Tools: ˜˜™ Remove bolts on both sides. Push the cover down a little to expose the bolt . Remove bolts on both sides. Remove mudguard or clothes guard. ... -
Page 11: Foldable Backrest, Angle Adjustable (Optional)
Service Manual Back Foldable backrest, angle adjustable (optional) Optionally, a foldable, angle-adjustable backrest can be fitted. For assembling a special Küschall training is necessary. When switching to the foldable backrest, the axle of the rear wheels must also be replaced with a new one that is 2 cm wider , ... -
Page 12: Footrests
Service Manual Footrests Footrests Three types of footrest are available: A footrest in aluminium or titanium and a footrest with an adjustable footplate. The titanium footrest requires a different sleeve in order to secure it in the frame. Replacing the footrest Ã... -
Page 13: Sides
Service Manual Sides Sides Fitting the clothes guard à 5 Difficulty: Tools: drill, drill bit: ø5,2 ˜˜™ The clothes guard is customised to fit the geometry of the individual wheelchair. It must therefore only be replaced by another clothes guard of the same size. Remove bolts ... -
Page 14: Front Wheels
Service Manual Front wheels Front wheels Replacing the front wheel fork Difficulty: Tools: ˜™™ Remove the sealing cap . Do this by inserting two screwdrivers into the notches and carefully prising the sealing cap out. Remove nut and washer . ... -
Page 15: Rear Wheels
Service Manual Rear wheels Rear wheels Checking the tyre pressure Tyre Max. pressure Low-resistance tyre 7 bar 700 kPa 101 psi Treaded tyre (marathon) 7.5 bar 750 kPa 108 psi Slick tyres (speed run) 10 bar 1000 kPa 145 psi Mountain bike tyre 4 bar 400 kPa... -
Page 16: Replacing The Rear Wheels
Service Manual Rear wheels Replacing the rear wheels Difficulty: ˜˜™ Proceed as follows if the rear wheels are replaced by ones of a different size or with other tyres: Check function of the parking brakes. Adjust seat height, Chap. -
Page 17: Fitting Tubed Tyres To Carbon Wheels
Service Manual Rear wheels Fitting tubed tyres to carbon wheels Difficulty: ˜˜˜ Tubed tyres must be attached to the rim using a special adhesive! Carry out a test fitting first without using any adhesive. Check the valve length, insert extension if necessary. ... -
Page 18: Brakes
Service Manual Brakes Brakes Fitting / adjusting the parking brake à 5 Difficulty: Tools: ˜˜™ Following each positioning, the rear wheel parking brakes (e.g. when changing the wheel chamber) must be readjusted. The parking brake function is only guaranteed if the tire has the corresponding air pressure. -
Page 19: Options & Accessories
Service Manual Options & accessories Options & accessories Fitting an antitipper à 5 Difficulty: Tools: ˜˜˜ Undo bolt and remove the lower part of the axle holder. Secure the adapter bracket with a bolt and apply a low-strength ... - Page 20 Küschall AG Benkenstrasse 260 CH-4108 Witterswil kueschall@invacare.com www.kueschall.com Service Manual K ENGLISH | 2011-12 küschall® distributors Belgium & Luxemburg: Invacare nv • Autobaan 22 • B-8210 Loppem Tel: (32) (0)50 83 10 10 • Fax: (32) (0)50 83 10 11 • belgium@invacare.com Danmark: Invacare A/S •...
Need help?
Do you have a question about the KSL and is the answer not in the manual?
Questions and answers