Table of Contents
Advertisement
Advertisement
Table of Contents

Related Manuals for Extech Instruments EX570


Summary of Contents for Extech Instruments EX570
- Page 1 User's Guide True RMS Multimeter with IR Thermometer Extech EX570...
- Page 2 Introduction Congratulations on your purchase of the Extech EX570 True RMS Autoranging Multimeter. This meter measures AC/DC Voltage, AC/DC Current, Resistance, Capacitance, Frequency, Duty Cycle, Diode Test, and Continuity plus Thermocouple Temperature and InfraRed Temperature. It features a waterproof, rugged design for heavy duty use. Proper use and care of this meter will provide many years of reliable service.
- Page 3 • Expired or damaged batteries can cause cauterization on contact with the skin. Always, therefore, use suitable hand gloves in such cases • See that the batteries are not short-circuited. Do not throw batteries into the fire. EX570-ENG V2.3 3/09...
-
Page 4: Safety Instructions
NEVER operate the meter unless the back cover and the battery and fuse covers are in place and fastened securely. If the equipment is used in a manner not specified by the manufacturer, the protection provided by the equipment may be impaired. EX570-ENG V2.3 3/09... -
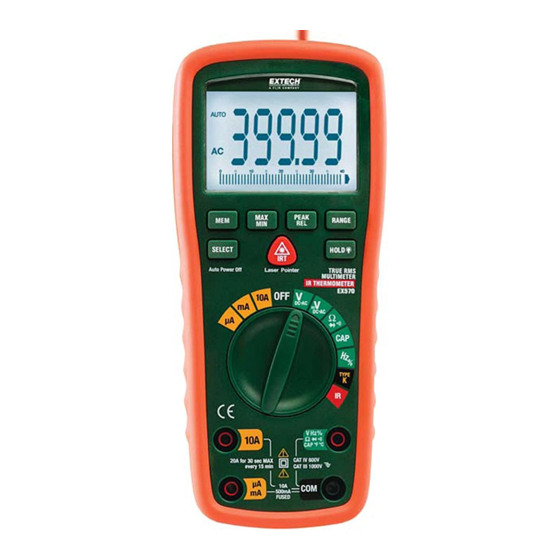
Page 5: Controls And Jacks
) (ohms) Farads (capacitance) mega (10 ) (ohms) Auto Power Off Ω Ohms Peak Hertz (frequency) Volts Percent (duty ratio) Relative Alternating current AUTO Autoranging Direct current HOLD Display hold ºF Degrees Fahrenheit ºC Degrees Centigrade Maximum Minimum EX570-ENG V2.3 3/09... -
Page 6: Ac/Dc Voltage Measurements
Press the SELECT button to select “DC” or “AC” millivolts. Touch the black test probe tip to the negative side of the circuit. Touch the red test probe tip to the positive side of the circuit. Read the voltage in the display. EX570-ENG V2.3 3/09... -
Page 7: Ac/Dc Current Measurements
4. Touch the test probe tips across the circuit or part under test. It is best to disconnect one side of the part under test so the rest of the circuit will not interfere with the resistance reading. 5. Read the resistance in the display. EX570-ENG V2.3 3/09... -
Page 8: Continuity Check
4. Touch the test probes to the diode under test. Forward voltage will typically indicate 0.400 to 0.700V. Reverse voltage will indicate “OL”. Shorted devices will indicate near 0V and an open device will indicate “OL” in both polarities. EX570-ENG V2.3 3/09... - Page 9 The meter will not make measurements through glass. Steam, dust, smoke, etc. can obscure measurements. To find a hot spot, aim the meter outside the area of interest then scan across (in an up and down motion) until the hot spot is located. EX570-ENG V2.3 3/09...
-
Page 10: Thermocouple Temperature Measurements
Hz jack. 3. Touch the test probe tips to the circuit under test. 4. Read the frequency on the display. 5. Press the SELECT button to indicate “%”. 6. Read the % duty cycle in the display. EX570-ENG V2.3 3/09... -
Page 11: Autoranging/Manual Range Selection
2. Press the MAX/MIN key again and the display icon "MIN" will appear. The meter will display and hold the minimum reading and will update only when a new “min” occurs. 3. To exit MAX/MIN mode press and hold the MAX/MIN key for 2 seconds. EX570-ENG V2.3 3/09... -
Page 12: Display Backlight
The auto off feature will turn the meter off after 15 minutes. To disable the auto power off feature, hold down the SELECT button and turn the meter on. “APO d” will appear in the display. Turn the meter off and then on again to re-enable the auto power off feature. EX570-ENG V2.3 3/09... -
Page 13: Maintenance
WARNING: To avoid electric shock, do not operate the meter until the battery cover is in place and fastened securely. NOTE: If your meter does not work properly, check the fuses and batteries to make sure that they are still good and that they are properly inserted. EX570-ENG V2.3 3/09... -
Page 14: Replacing The Fuses
[SIBA 70-172-40], 10A/1000V fast blow for the 10A range [SIBA 50-199-06]). 6. Replace and secure the rear cover, battery and battery cover. WARNING: To avoid electric shock, do not operate your meter until the fuse cover is in place and fastened securely. EX570-ENG V2.3 3/09... -
Page 15: Specifications
±(2.0% reading + 3 ±(2.0% reading + 3 digits) digits) (20A: 30 sec max with reduced accuracy) NOTE: Accuracy is stated at 65 F to 83 F (18 C to 28 C) and less than 75% RH. EX570-ENG V2.3 3/09... - Page 16 (probe accuracy not included) ±4°C Temperature IR -30 to -6°C ±(1.0%rdg + 2°C) -5 to 100°C ±(2.0%rdg + 2°C) 101 to 550°C 1°C/°F ± 8°F -22 to 23°F 24 to 212°F ±(1.0%rdg + 4°F) 213 to 1022°F ±(2.0%rdg + 4°F) EX570-ENG V2.3 3/09...
- Page 17 Edition (2001) to Category IV 600V and Category III 1000V; Pollution Degree 2. Approvals Copyright © 2009 Extech Instruments Corporation. All rights reserved including the right of reproduction in whole or in part in any form. www.extech.com EX570-ENG V2.3 3/09...
-
Page 18: Warranty
Repair & Returns: Extension 210; E-mail: repair@extech.com Product specifications subject to change without notice For the latest version of this User’s Guide, Software updates, and other up-to-the-minute product information, visit our website: www.extech.com Extech Instruments Corporation, 285 Bear Hill Rd., Waltham, MA 02451 EX570-ENG V2.3 3/09...
Need help?
Do you have a question about the EX570 and is the answer not in the manual?
Questions and answers