Lifescan OneTouch Ultra 2 Owner's Booklet
Lifescan blood glucose monitoring owner's booklet ultra 2
Hide thumbs
Also See for OneTouch Ultra 2:
- Test instructions (2 pages) ,
- Quick reference manual (2 pages)
Advertisement
Quick Links
Advertisement

Related Manuals for Lifescan OneTouch Ultra 2


Summary of Contents for Lifescan OneTouch Ultra 2
- Page 1 Blood Glucose Monitoring System Link the Effects of Food to Glucose Results Owner’s Booklet...
- Page 2 Of course, you may still have questions. If you do, our Customer Service representatives would be happy to answer your call. You can reach them at 1 800 227-8862, anytime—24 hours a day. You can also obtain information at www.LifeScan.com.
- Page 3 Table of contents Setting up your system • Getting to know your OneTouch ® Ultra ® 2 Blood Glucose Meter and Test Strips • Turning your meter on and off • Using the meter display backlight • Setting up your meter NOTE: Before testing, read this owner’s booklet carefully.
- Page 4 Getting a blood sample Prepare the OneTouch ® UltraSoft ® Blood Sampler Remove the blue cap and put a new lancet in the sampler. Twist off the protective disk. Replace the cap and cock the sampler. Get a drop of blood Hold the OneTouch ®...
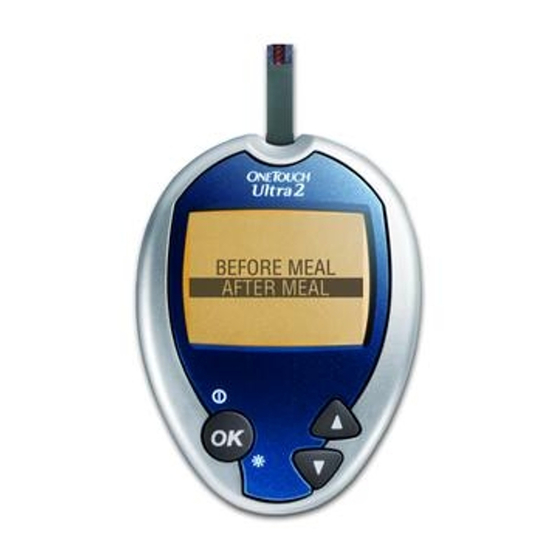
- Page 5 Attaching flags or comments to your results Add a meal flag to track different types of averages While viewing your test result, press to get the MEAL FLAG screen. Press to highlight BEFORE MEAL AFTER MEAL To confirm your selection, press The meal flag you chose will appear above the result.
- Page 6 Before you begin Before using this product to test your blood glucose, carefully read this booklet and the inserts that come with the OneTouch ® Ultra ® Test Strips and OneTouch ® Ultra ® Control Solution. Take note of warnings and cautions throughout this booklet, which are identified with .
- Page 7 The OneTouch ® Ultra Your new OneTouch ® Ultra a OneTouch ® Ultra ® 2 Meter (batteries included) b OneTouch ® Ultra ® Control Solution c OneTouch ® UltraSoft ® Blood Sampler If another type of lancing device was included, see the separate instructions that came with that lancing device.
-
Page 8: Test Strip
Setting up your system Getting to know your OneTouch Meter and test strips Front Test port Insert test strip here to Display turn meter on for testing OK button Turns the meter on/off Turns the backlight on/off Confirms menu selections Up and down buttons Select or change information Indicates selection available... - Page 9 Turning your meter on To perform a test, insert a test strip as far as it will go. The meter will briefly perform system checks, then the display will turn on. With the meter turned off, press and hold seconds to access MAIN MENU. Check that the screen shows solid black for two seconds.
- Page 10 Setting the meter language, date and time You can change many of the settings that came pre-set with your meter. Before using your meter for the first time or if you change the meter battery, you should check and update these settings. Make sure you complete steps 1 through 9 below to ensure your desired settings are saved.
- Page 11 3. Choose a language Now press to highlight the language of your choice. To confirm your selection, press The display now shows the NOTE: If you select the wrong language, press and hold for five seconds to turn the meter off. Then, turn the meter back on and re-start from step 1.
- Page 12 5. Set the date In the DATE SET UP change the first value. To confirm your selection, press Press to change the second value. To confirm your selection, press Press to change the year. To confirm your selection, press The display now shows the 6.
- Page 13 7. Set the hour and “AM” or “PM” Press to set the hour. Check AM/PM. If not correct, continue to press the hour and “AM” or “PM” are correct. You can ONLY change “AM” and “PM” when you pass 12:00. Make sure “AM” or “PM” is correct while you are setting the hour.
- Page 14 9. Confirm your settings The choice bottom of the screen. If your settings are correct, press settings and return to the WARNING: The unit of measure mg/dL must be displayed here. If your display shows mmol/L rather than mg/dL, contact Customer Service.
- Page 15 If you do not wish to track separate result averages for before and after meals, nor attach comments to any test result, you may turn this feature off. If you turn off the flags/comments feature, you will not see test result screen after you complete a blood glucose test. You will be able to review the ALL RESULTS AVG averages.
- Page 16 Starting the test process Have these things ready when you test your blood glucose level: • OneTouch ® Ultra ® • OneTouch Ultra • Lancing device • Sterile lancets with protective disks • OneTouch ® Ultra NOTE: • Use only OneTouch your OneTouch •...
- Page 17 1. Check the code on the test strip vial before inserting the strip Code numbers are used to calibrate your meter with the test strips you are using. 2. Insert a test strip to turn on the meter Start with the meter off. If you have turned the meter on to change settings or review past results, turn it off.
- Page 18 3. Match the code on the meter with the code on the test strip vial If the code on the meter does not match the code on the test strip vial, press match the code number on the test strip vial. The new code number will flash on the display for three seconds, then briefly stop flashing, after which the display will advance to the...
- Page 19 NOTE: • If the APPLY BLOOD screen appears before you are sure the codes match, remove the test strip, and re-start from step 1, see page 11. • If you change APPLY BLOOD to APPLY CONTROL by mistake, press change it back to APPLY BLOOD. Customer Service 1 800 227-8862...
- Page 20 Getting a blood sample Overview of the OneTouch Ejection/Cocking control Depth Puncture settings adjustment knob Depth indicator CAUTION: To reduce the chance of infection: • Make sure to wash the puncture site with soap and water before sampling. • Never share a lancet or a lancing device with anyone. •...
- Page 21 Choosing the right sampling site at the right time The OneTouch ® Ultra ® 2 Meter allows you to sample blood from your fingertip, forearm or palm. At times, results obtained at the forearm or palm may be different from a fingertip measurement. Talk to your healthcare professional before you begin using your forearm or palm for sampling.
- Page 22 CAUTION: æ • You think your blood glucose is rapidly falling, such as within two hours of exercise or a rapid-acting insulin injection or insulin pump bolus. Testing with a fingertip sample may identify hypoglycemia or an insulin reaction sooner than testing with a forearm or palm sample.
- Page 23 Choose a different puncture site each time you test. Repeated punctures in the same spot may cause soreness and calluses. If bruising occurs at an alternate site or you have difficulty getting a sample, consider sampling from a fingertip instead. You may want to review the choice of sites with your healthcare professional.
- Page 24 2. Insert a sterile lancet into the OneTouch ® UltraSoft ® Blood Sampler Insert the lancet into the holder and push in firmly. Twist the protective disk until it separates from the lancet and save the disk for later use. Do not twist the lancet.
- Page 25 5. Cock the OneTouch ® UltraSoft Slide the ejection/cocking control back until it clicks. If it does not click, it may have been cocked when you inserted the lancet. 6. Puncture your finger Hold the OneTouch ® UltraSoft firmly against the side of your finger. Press the release button.
- Page 26 7. Get a round drop of blood Gently squeeze and/or massage your fingertip until a round drop of blood of at least one microliter ( actual size) forms on your fingertip. If the blood smears or runs, do not use that sample.
- Page 27 Lancing and sampling from an alternate site Sampling from your palm or forearm allows you to use your fingertips less often. You may find that obtaining a blood sample from an alternate site is less painful than using a fingertip. Getting a blood sample from your forearm or palm is different than getting a sample from your fingertips.
- Page 28 Blue cap for fingertip sampling only 1. Remove the blue cap by twisting it off 2. Insert a sterile lancet into the OneTouch UltraSoft ® Blood Sampler Insert the lancet into the holder and push in firmly. Twist the protective disk until it separates from the lancet and save the disk for later use.
- Page 29 3. Twist on the OneTouch ® UltraClear until it is snug 4. Adjust the depth setting You may have to adjust the OneTouch UltraSoft ® Blood Sampler to a deeper setting to get a large enough drop of blood from your forearm or palm. Twist the depth adjustment knob toward the larger dots to increase the depth.
- Page 30 6. Puncture your forearm or palm Press and hold the OneTouch Sampler against your forearm or palm for a few seconds, then press the release button. Keep holding the sampler and cap against your skin until a round drop of blood forms under the cap.
- Page 31 Applying blood and reading results Once you have a blood sample and your meter shows the APPLY BLOOD screen, you are ready to obtain a blood glucose result. If your meter does not show the screen, remove the unused test strip APPLY BLOOD and re-start the test process.
- Page 32 2. Apply the sample Touch and hold the drop of blood to the narrow channel in the top edge of the test strip. Blood will be drawn into the strip. Keep holding the drop of blood to the top edge of the test strip until the confirmation window is full.
- Page 33 3. Read your result When the meter detects blood in the test strip, it begins to count down from 5 to 1. Then, your blood glucose level appears on the display, along with the unit of measure, and the date and time of the test.
-
Page 34: Unexpected Test Results
Unexpected test results Refer to these cautions higher than, or not what you expect. CAUTION: You may get false low glucose results if you are severely dehydrated. If you think you are severely dehydrated, contact your healthcare professional immediately. CAUTION: If your test result is lower than 70 mg/dL or is shown as , it may mean hypoglycemia (low blood glucose). - Page 35 CAUTION: High glucose results If your test result is higher than 180 mg/dL, it may mean hyperglycemia (high blood glucose). If you are uncertain about this test result, consider re-testing. Your healthcare professional can work with you to decide what actions, if any, you should take if your results are higher than 180 mg/dL.
- Page 36 After getting a result Once you have read your result, you may: • Attach notes to this result if the flags/comments feature is on, see page 32, or • Review your meter memory by pressing page 36, or • Turn the meter off by removing the test strip. Removing the used lancet If you would like to cover the exposed lancet tip, remove the sampler cap by twisting it off.
- Page 37 Disposing of the used lancet and test strip It is important to discard the used lancet carefully after each use to avoid unintended lancet stick injuries. Used test strips and lancets may be considered biohazardous waste in your area. Be sure to follow your local regulations for proper disposal.
- Page 38 Attaching flags or comments to your results Your meter allows you to attach optional notes to your blood glucose result. There are two kinds of notes and different reasons to apply them. Note type Recommendation Meal flag Add a meal flag to every blood glucose result.
- Page 39 You can attach these notes just after a blood glucose test before you remove your used test strip from your meter. You can also modify notes when reviewing a past result. You will not be able to add a meal flag or comment to a result marked as a control solution test.
- Page 40 Add or change a meal flag If the flags/comments feature is turned on, the up arrow at the bottom right corner of the result screen will flash when a result is first displayed to remind you to enter a meal flag. To add or change a meal flag: 1.
- Page 41 Add or change a comment The down arrow at the bottom right corner of the result screen will flash after you enter a meal flag for a new result to remind you to consider entering a comment. To add or change a comment: 1.
- Page 42 Reviewing past results and averages If you have just completed a test, press get to the MAIN MENU press and hold screen you can choose: MENU • LAST RESULT • ALL RESULTS recent results four at a time, or • to select one of three types of result averages.
- Page 43 All results The meter will display four results at a time, in the order the tests were done, starting with the most recent. For each test result, the meter will display the date and time of the test. Results may also contain the following symbols: HI if the result was above 600 mg/dL, LO if the result was below 20 mg/dL, if a comment has been chosen for the result,...
- Page 44 To view older results, press holding To return to the main menu, highlight Result averages If the flags/comments feature is on, the meter will display the three types of averages you can access: • the average of all test results, •...
- Page 45 In result averages, a HIGH GLUCOSE 600 mg/dL, and a LOW GLUCOSE Control solution results are not part of your averages. From any screen showing averages, press back to the previous screen. To return to the main menu from the press until is highlighted, then press...
- Page 46 Downloading results to a computer You can use your meter with OneTouch Software (DMS) for storing your records and to help you spot patterns for planning meals, exercise, and medication. OneTouch information downloaded from the meter into charts and graphs. 1.
- Page 47 3. Get ready to transfer readings Connect the OneTouch ™ Interface Cable to the COM or USB port on your computer. Make sure the meter is turned off. If you insert the cable while the meter is already on, the meter will not respond to computer commands. Then connect the other end of the OneTouch Interface cable...
- Page 48 Control solution testing OneTouch ® Ultra a known amount of glucose and is used to check that the meter and the test strips are working properly. Do a control solution test: to practice the test process instead of • using blood, once a week, •...
- Page 49 Performing a control solution test Start with the meter off. If you have turned the meter on to change settings or review past results, turn it off. 1. Check the code on the test strip vial before inserting the strip 2.
- Page 50 3. Match the code on the meter with the code on the test strip vial If the code on the meter does not match the code on the test strip vial, press match the code number on the test strip vial. The new code number will flash on the display for three seconds, then briefly stop flashing, after which the display will advance to the...
- Page 51 5. Prepare and apply control solution Shake the control solution vial before each test. Remove the cap and squeeze the vial to discard the first drop. Then wipe the tip with a clean tissue or cloth. Hold the vial upside down and gently squeeze a hanging drop.
- Page 52 7. Check if the result is in range Compare the result displayed on the meter to the control solution range printed on the test strip vial. Each vial of test strips may have a different control solution range. If the results you get are not within this range, the meter and strips may not be working properly.
- Page 53 Caring for your system Your OneTouch ® Ultra ® 2 Blood Glucose Monitoring System does not need any special maintenance. Storing your system Store your meter, strips, control solution and other items in your carrying case after each use. Store each item in a cool, dry place below 86°F, but do not refrigerate.
- Page 54 Checking for expiration or damage to strips and control solution Test strips and control solution have expiration dates printed on their vials. When you first open a test strip or control solution vial, you must record the discard date (date opened plus three months) in the space provided on the label.
- Page 55 Do not get any liquids, dirt, dust, blood, or control solution inside the meter through the test port or the data port. Never spray cleaning solution on the meter or immerse it in any liquid. Cleaning your OneTouch ® UltraSoft ®...
- Page 56 Batteries Your OneTouch two 3.0 Volt CR 2032 lithium batteries (or equivalent). Replacement batteries can be found in most stores where batteries are sold. Your meter comes with two batteries already installed —one that powers the meter only and one that powers the backlight. Low meter battery The meter shows a battery icon ( upper right corner of the display or a low...
- Page 57 Low backlight battery Replace the backlight battery when you can no longer see the backlight coming on. There will not be any icon on the meter display to indicate a low backlight battery. Note that the meter will provide accurate blood glucose results even when the backlight battery needs to be replaced.
- Page 58 2. Insert the new battery With the “+” side facing up toward you, place the battery in the compartment within the fold of the ribbon. Push the battery until it snaps into the battery clasp. Insert the two battery door tabs into the matching holes on the meter, and push down until you hear the door click into place.
- Page 59 Understanding error and other messages The OneTouch ® Ultra ® 2 Meter displays messages when there are problems with the test strip, with the meter, or when your blood glucose levels are higher than 600 mg/dL or lower than 20 mg/dL. Messages do not appear in all cases when a problem has occurred.
- Page 60 Message What it means You may have a very high blood glucose level (severe hyperglycemia), over 600 mg/dL. Meter is too hot (above 111°F) or too cold (below 43°F) to work correctly. Customer Service 1 800 227-8862 What to do Re-check your glucose level.
- Page 61 Message What it means There is a problem with the meter. Error message could be caused either by a used test strip or a problem with the meter. What to do Do not use the meter. Contact Customer Service. Repeat the test with a new test strip;...
- Page 62 Message What it means The sample was applied before the meter was ready. One of the following may apply: You may have high glucose and have tested in an environment near the low end of the system’s operating temperature range (43–111°F).
- Page 63 Message What it means There may be a problem with the test strip. For example, it may have been damaged or moved during testing. The sample was improperly applied. There may be a problem with the meter. Error 4 information begins on previous page What to do If you tested in a normal or warm environment, repeat the test...
- Page 64 Message What it means The meter has detected a problem with the test strip. Possible causes are test strip damage or an incompletely filled confirmation window. Meter battery is low but still has enough power to perform a test. Meter battery does not have enough power to perform a test.
- Page 65 Message What it means No result in memory, such as the first time use of the meter or after a download of all data to a computer. Your meter was unable to recall this result. This result will not be included in result averages.
- Page 66 Detailed information about your system Comparing meter and laboratory results Test results with the OneTouch This helps you and your healthcare professional to compare your meter results with laboratory tests. If you have been using another type of meter—one that provides whole-blood-calibrated results—you may notice that your test results with the OneTouch approximately 12% higher.
- Page 67 Your hematocrit (percentage of your blood that is red blood cells) • is high (above 55%) or low (below 30%). You are severely dehydrated. • You tested at a temperature near the low end of the operating • range (43°F ) and you get a high glucose result (i.e., greater than 180 mg/dL).
- Page 68 Technical specifications Reported result range 20–600 mg/dL Calibration Sample Sample size Test time Assay method Meter power source Backlight power source Unit of measure Memory Automatic shutoff Size Weight Customer Service 1 800 227-8862 Plasma-equivalent Fresh capillary whole blood Minimum 1 microliter 5 seconds Glucose oxidase biosensor One replaceable 3.0 Volt CR 2032 lithium...
- Page 69 Low battery Direct current Guarantee LifeScan guarantees that the OneTouch defects in material and workmanship for three years, valid from the date of purchase. The guarantee extends only to the original purchaser and is not transferable.
- Page 70 Electrical and safety standards This meter complies with CISPR 11: 2003, Class B (Radiated Only). Emissions of the energy used are low and not likely to cause interference in nearby electronic equipment. The meter has been tested for immunity to Level 3 electrostatic discharge as specified in IEC 61000-4-2.
- Page 71 Index AVG ....38 AFTER MEAL AFTER MEAL flag ....ALL RESULTS AVG .
- Page 72 Lancet, disposal ....Lancet, inserting in sampler Lancet, protective disk ..Lancing ..... Language, choosing in set up message LOW BATTERY...
- Page 73 Such a license is granted only when the device is used with OneTouch No test strip supplier other than LifeScan, Inc. is authorized to grant such a license. The accuracy of results generated with LifeScan meters using test strips manufactured by anyone other than LifeScan has not been evaluated by LifeScan.
- Page 74 Call Customer Service toll-free, 24 hours a day, 7 days a week English 1 800 227-8862 Español 1 800 381-7226 Visit us at www.LifeScan.com © 2005 LifeScan, Inc., Milpitas, CA 95035 AW06344501B Rev. date: 12/2005...