
Related Manuals for VTech BM3000


Summary of Contents for VTech BM3000
- Page 1 User’s manual Full Colour Video and Audio Baby Monitor Model: ht tp: // hk phones.v tec h.c om BM3000/ BM3000 Twin...
-
Page 2: Table Of Contents
TABLE OF CONTENTS IMpOrTANT SAFETy INSTrUCTIONS ......1 SET Up THE BABy MONITOr ..........4 Package Contents ...............4 Baby unit battery installation ..........5 Baby unit installation ............6 Baby unit installation options ..........7 2.4.1 Tabletop to wall mount installation ......7 Parent unit battery installation ...........12 Parent unit installation ............14 Parent unit battery charging ..........15 GET TO KNOW THE BABy MONITOr ......16... - Page 3 4.8.1 Pair new CAM ............29 4.8.2 Unpair CAM ............29 Language ................30 BABy UNIT OpErATION ..........31 Power the baby unit on or off ..........31 Speaker volume ..............31 Play lullabies ..............31 5.3.1 To play lullabies: ...........31 5.3.2 To skip to the next lullaby ........31 5.3.3 To stop playing lullabies ........31 Night vision ................32...
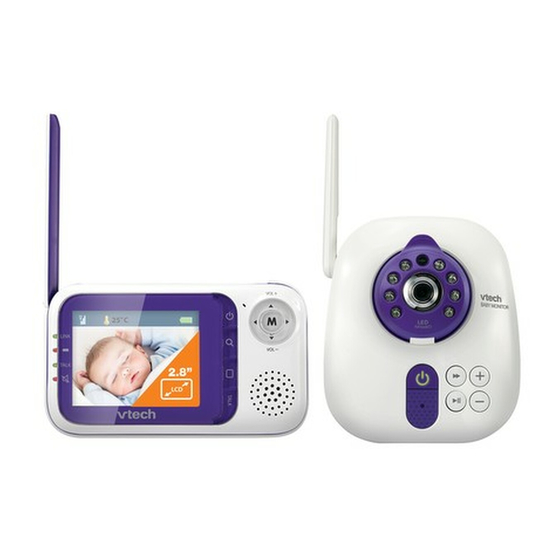
- Page 4 Product introduction BM3000 is a video and audio monitor which consists of one parent unit (BM3000 pU) and one baby unit (BM3000 BU). BM3000 twin is a video and audio monitor which consists of one parent unit (BM3000 twin pU) and two baby units (BM3000 twin BU).
-
Page 5: Important Safety Instructions
IMpOrTANT SAFETy INSTrUCTIONS When using your equipment, basic safety precautions should always be followed to reduce the risk of fire, electric shock and injury, including the following: Follow all warnings and instructions marked on the product. Adult setup is required. This product is intended as an aid. - Page 6 Do not place this product on an unstable table, shelf, stand or other unstable surfaces. This product should not be placed in any area where proper ventilation is not provided. Slots and openings in the back or bottom of this product are provided for ventilation. To protect them from overheating, these openings must not be blocked by placing the product on a soft surface such as a bed, sofa or rug.
- Page 7 Cautions Use and store the product at a temperature between 10 C and 39 Do not expose the product to extreme cold, heat or direct sunlight. Do not put the product close to a heating source. Batteries should not be exposed to excessive heat such as bright sunshine or fire.
-
Page 8: Set Up The Baby Monitor
• 1 Parent unit battery compartment cover • 1 Battery for parent unit • Baby unit battery compartment cover (1 for BM3000, 2 for BM3000 twin) • Baby unit power adapter (1 for BM3000, 2 for BM3000 twin) • 1 Parent unit power adapter •... -
Page 9: Baby Unit Battery Installation
Baby unit battery installation You can power up the baby unit by connecting it to AC power and installing four AA alkaline batteries. Even if the baby unit is connected to AC power, you must also install four AA alkaline batteries for the baby unit to operate. -
Page 10: Baby Unit Installation
Baby unit installation Install the baby unit as shown below. Make sure that the power outlet is not controlled by a wall switch. Bundle the power cord neatly with the self-adhesive strap. Power outlet not controlled by a wall switch Raise the antenna for better reception. -
Page 11: Baby Unit Installation Options
Baby unit installation options The baby unit is ready for tabletop use. Use the provided wall mount if you want to mount it on a wall. Make sure to test the reception and the baby unit position before completing the wall mounting installation (see Test your video and audio monitor before use on 23). - Page 12 Align the wall mount and screws with the holes in the wall as shown. Make sure to attach the screw in the middle hole first so that the wall mount position is fixed. Then attach the other screw in the top hole. Place the baby unit on the wall mount and tighten the screw into the threaded socket at the bottom to secure the baby unit.
- Page 13 Bundle the power cord neatly with the self-adhesive strap. Make sure to keep the power adapter cord away from children’s reach. Option 2: Use this method so that you can relocate the baby unit with the wall mount easily. Place the wall mount on a wall and then use a pencil to mark the top and the bottom holes as shown.
- Page 14 If you drill the holes into a stud, go to step 3. -Or- If you drill the holes into an object other than a stud, insert the wall anchors into the holes and tap gently on the ends with a hammer until the wall anchors are flush with the wall.
- Page 15 Place the baby unit on the wall mount and tighten the screw into the threaded socket at the bottom to secure the baby unit. Align the holes on the wall mount with the screws on the wall and slide the wall mount down until it locks into place.
-
Page 16: Parent Unit Battery Installation
parent unit battery installation You can power up the parent unit by connecting it to AC power or to the rechargeable battery provided. Even if the parent unit is connected to AC power, we recommend you also install the battery. This guarantees continual operation in case of a power outage. - Page 17 To replace the battery, press down on the large tab of the battery and pull it out of the battery compartment, then follow the steps on 12 to install the battery. Notes • The operating time for using the rechargeable battery is short. If you want to monitor your baby for a long time, we recommend you connect the parent unit to AC power.
-
Page 18: Parent Unit Installation
parent unit installation Install the parent unit as shown below. Make sure that the power outlet is not controlled by a wall switch. Bundle the adapter cord neatly with the attached self-adhesive strap. Raise the antenna for Power outlet not better reception. -
Page 19: Parent Unit Battery Charging
parent unit battery charging Once you have installed the parent unit (see page14) and its battery for 2 seconds to turn it on. The battery (see page 12), press icon i ndicates the battery status (see the table below). The parent unit battery is fully charged after 12 hours of continuous charging. -
Page 20: Get To Know The Baby Monitor
GET TO KNOW THE BABy MONITOr Baby unit overview 1 _ Camera 8 _ + (Volume up) 2 _ Infrared LEDs Press to increase the listening volume (page 31). Backup light for night vision 9 _ - (Volume down) (page 32). (On/off) Press to decrease the listening volume (page 31). -
Page 21: Baby Unit Lights
12 _ Camera angle adjustment tab Tilt to adjust camera angle. 13 _ Speaker To listen to lullabies. To listen to broadcasts from the parent unit. 14 _ Temperature sensor 15 _ Battery compartment cover 16 _ power jack Baby unit lights n/off) On in red when the baby unit is powered by... -
Page 22: Parent Unit Overview
parent unit overview 6 _ MIC (Microphone) /off) /BACK Press and hold to turn on or off (page 33). While in a menu, press to return to the previous menu (Zoom) (page 24). While viewing in single-CAM While viewing in mode, mode, press to zoom in or out press to move leftward... - Page 23 11 _ /VOL - mode, press to scroll up or down to highlight a desired Press to decrease the speaker camera (page 33). volume (page 33). While in a menu, press to Press to enter the menu (page 24). scroll down. While in a menu, press to While viewing in mode,...
-
Page 24: Parent Unit Lights
parent unit lights LINK On when strong signal strength is detected between the parent unit and the selected baby unit. Flashes when the parent unit cannot link to the selected baby unit. Off when the parent unit is turned off. On when the parent unit battery is being charged. -
Page 25: Parent Unit Display Screen Icons
parent unit display screen icons Connection status displays when strong signal strength is detected between the baby unit and the parent unit. displays when moderate signal strength is detected between the baby unit and the parent unit. displays when the link between the baby unit and the parent unit is lost. -
Page 26: Positioning And Operating Range
positioning and operating range 3.6.1 position the video and audio monitor Place the parent unit within the operating range (see below) of the baby unit. We recommend the parent unit is at least 1 metre away from the baby unit to avoid audio feedback. If you still experience audio feedback, move the parent unit and the baby unit farther apart. -
Page 27: Test Your Video And Audio Monitor Before Use
3.6.3 Test your video and audio monitor before use It is important to test the video and audio monitor when it is installed initially, and at regular times thereafter. Test your parent unit and baby units if they have not been used for a long time or you suspect they are defective. -
Page 28: Using Your Baby Monitor
USING yOUr BABy MONITOr parent unit settings To enter the parent unit menu: Press M when the parent unit is not in use. Press until the desired feature is highlighted on the left side. Press M or to enter that feature menu. Press until the desired feature or option is highlighted on the right side. -
Page 29: Sensitivity
to choose ALErT TONE, then press M or Press Press to choose No Link Alert, then press M or Press to choose On or Off, then press M to confirm your selection. You hear a confirmation tone. Note The no link alert only works while viewing that particular baby unit in single-CAM mode or in multi-CAM mode. -
Page 30: Maximum Temperature
To set the minimum temperature of the baby unit: Press M when the parent unit is not in use. Press to choose TEMpErATUrE, then press M Press M or again to choose Minimum. Press to choose a desired baby unit or all baby units, then press M or to choose the desired temperature, then press M to Press... -
Page 31: Temperature Format
4.4.4 Temperature format You can set the temperature scale of the baby unit. The temperature scale is preset to Fahrenheit. To change the temperature scale: Press M when the parent unit is not in use. TEMpErATUrE Press to choose , then press M or Press to choose Format, then press M or Fahrenheit... -
Page 32: Sound-Activated Screen
Sound-activated screen When the parent unit screen is turned off manually (see page 34), you can set the screen to be turned on automatically whenever there are sounds detected from the baby units after 20 seconds of silence. The parent unit screen will turn off automatically when no sounds are detected from the baby units within 50 seconds. -
Page 33: Pair/ Unpair Cam
pair/ unpair CAM 4.8.1 pair new CAM The baby units and parent unit provided are already paired. If you want to replace an old baby unit, the new baby unit must be paired to the parent unit before use. Make sure you power on the baby unit (see page 31) and the parent unit (see page 33) before pairing. -
Page 34: Language
Press to choose Unpair CAM, then press M or Press to choose a desired baby unit, then press M. when the screen displays To unpair CAM # from the Press system, press [zoom] key. Press M when the screen displays Press [M] key to confirm. -
Page 35: Baby Unit Operation
BABy UNIT OpErATION power the baby unit on or off • Press and hold for 2 seconds to turn on the baby unit. The Power indicator light flashes once and turns on. • Press and hold for 2 seconds to turn off the baby unit. -
Page 36: Night Vision
Night vision To help you monitor your baby even at night, the baby unit automatically uses the light from its infrared LEDs for transmitting images to the parent unit when it is turned on in a dark room. However, it only transmits black-and-white images. -
Page 37: Parent Unit Operation
pArENT UNIT OpErATION power the parent unit on or off • Press and hold for 2 seconds to turn on the parent unit. The display screen turns on. • Press and hold for 2 seconds again to turn off the parent unit. The display screen turns off. -
Page 38: View
View You can change the screen to view images from different baby units, or you can turn off the screen. To view different baby units: Press to scroll to the desired baby units. They are shown in chronological order: CAM 1, CAM 2, CAM 3, CAM 4 and multi-CAM. -
Page 39: Troubleshooting
TrOUBLESHOOTING If you have difficulty with your video and audio monitor, please try the suggestions below. My video and audio monitor does not work at all. • Make sure the baby units, parent unit and the batteries are installed and charged correctly (pages 5 to 15). For optimum daily performance, charge the parent unit when it is not in use. - Page 40 The video and audio monitor produces high-pitched noise. • The parent unit may be too close to the baby units. Make sure the parent unit and the baby units are at least 1 metre away from one another. • You may be too close to the baby unit when you press and hold TALK. Make sure the parent unit and the baby units are at least 1 metre away from one another.
- Page 41 • Remove the battery and then install it again. Turn on the baby unit and the parent unit. Allow up to one minute for the parent unit and the baby unit to synchronise. • Other electronic products may cause interference with your video and audio monitor.
- Page 42 The parent unit beeps and is not performing normally. • Move the parent unit closer to the baby units (but not less than 1 metre). The parent unit may be out of range. • If the parent unit is powered by the provided battery, it may not have enough charge for the parent unit to perform normally.
-
Page 43: Care And Maintenance Instructions
CArE AND MAINTENANCE INSTrUCTIONS Operating range This baby unit and parent unit can communicate over only a certain distance - which can vary with the locations of the baby unit, the parent unit, the weather, and the layout of your home. When the parent unit is out of range, the parent unit displays Waiting for linking... - Page 44 Cleaning your video and audio monitor Your video and audio monitor has a durable plastic casing that should retain its luster for many years. Clean it only with a soft cloth slightly dampened with water or mild soap. Do not use excess water or cleaning solvents of any kind.
-
Page 45: Technical Specifications
TECHNICAL SpECIFICATIONS Frequency control Crystal controlled PLL synthesizer Transmit frequency Baby unit: 2405 - 2478.5 MHz Parent unit: 2405 -2478.5 MHz Channels 2.8” Color LCD (QVGA 320x240 pixel) Nominal effective Maximum power allowed by FCC and IC. range Actual operating range may vary according to environmental conditions at the time of use. - Page 46 Customer Service Hotline: (852) 2666 5558 Technical Inquiry Hotline: (852) 2667 7433 VTECH TELECOMMUNCATIONS LTD. A member of THE VTECH GrOUp OF COMpANIES. Safe&Sound is a trademark of VTech Communications, Inc. and registered in the United States. © 2013-2014 VTech Telecommunications Ltd. All Rights Reserved.
Need help?
Do you have a question about the BM3000 and is the answer not in the manual?
Questions and answers