Pepwave AP One User Manual
Ap series
Hide thumbs
Also See for AP One:
- User manual (44 pages) ,
- User manual (60 pages) ,
- User manual (68 pages)
Table of Contents
Advertisement
AP One AC mini
January 2015
C
& T
OPYRIGHT
RADEMARKS
Specifications are subject to change without notice. Copyright © 2015 Pepwave Ltd. All Rights Reserved. Pepwave and the
Pepwave logo are trademarks of Pepwave Ltd. Other brands or products mentioned may be trademarks or registered trademarks of
their respective owners.
Advertisement
Table of Contents

Related Manuals for Pepwave AP One


Summary of Contents for Pepwave AP One
- Page 1 Specifications are subject to change without notice. Copyright © 2015 Pepwave Ltd. All Rights Reserved. Pepwave and the Pepwave logo are trademarks of Pepwave Ltd. Other brands or products mentioned may be trademarks or registered trademarks of their respective owners.
-
Page 2: Table Of Contents
User Manual Table of Contents Introduction and Scope......................4 Product Features and Benefits .................... 5 Package Contents........................6 AP One AC mini ........................6 Hardware Overview ....................... 7 AP One AC mini ........................7 Installation ..........................8 Installation Procedures ..................... 9 Using the Dashboard ...................... - Page 3 Device ........................... 46 Client List ..........................46 WDS Info ..........................47 Portal ............................ 47 Rogue AP ..........................48 Event Log ..........................48 Restoring Factory Defaults ..................... 49 10.1 AP One AC mini ......................49 Appendix ..........................50 http://www.pepwave.com Copyright © Pepwave 2015...
-
Page 4: Introduction And Scope
From the small but powerful AP One AC mini to the top-of-the-line AP One 300M our AP Series offers wireless networking solutions to suit any business need, and every access point is loaded with essential features such as multiple SSIDs, VLAN, WDS, and Guest Protect. -
Page 5: Product Features And Benefits
WDS support allows secure and fast network expansion. Guest Protect support guards sensitive business data and subnetworks. WMM (Wi-Fi Multimedia) and QoS (Quality of Service) support keeps video and other bandwidth-intensive data flowing fast and lag-free. http://www.pepwave.com Copyright © Pepwave 2015... -
Page 6: Package Contents
User Manual Package Contents AP One AC mini 1 x AP One AC mini 1 x Power supply 1 x Instruction sheet 1 x Wall mount http://www.pepwave.com Copyright © Pepwave 2015... -
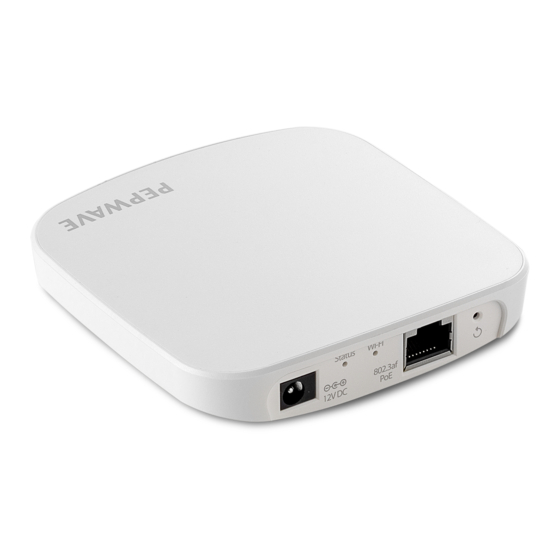
Page 7: Hardware Overview
User Manual Hardware Overview AP One AC mini Front View Rear Panel View LED Indicators RED – Access point initializing Status GREEN – Access point ready OFF – 2.4/5GHz Wi-Fi radio off BLINKING – AP sending/receiving data Wi-Fi GREEN – 2.4/5GHz Wi-Fi radio on Note that this model includes a 2.4GHz Wi-Fi radio and a 5GHz Wi-Fi radio that can... -
Page 8: Installation
User Manual Installation Your access point acts as a bridge between wireless and wired Ethernet interfaces. A typical setup follows: http://www.pepwave.com Copyright © Pepwave 2015... -
Page 9: Installation Procedures
Google Chrome 2.0 or above, connect to https://192.168.0.3. 6. Enter the default admin login ID and password, admin and public respectively. 7. After logging in, the Dashboard appears. Click the System tab to begin setting up your access point. http://www.pepwave.com Copyright © Pepwave 2015... -
Page 10: Using The Dashboard
When your access point is connected to a WAN, this field displays the WAN IP address. For more information, click the Details… link, which displays the following: IP Address Status This field displays the current WAN connection status. http://www.pepwave.com Copyright © Pepwave 2015... -
Page 11: User Manual
This field displays your access point’s model number. Model Firmware The firmware version currently running on your access point appears here. This field displays your access point’s uptime since the last reboot or shutdown. Uptime http://www.pepwave.com Copyright © Pepwave 2015... - Page 12 The radio frequency currently used by your access point appears here. If you’re using Radio the AP One AC mini or the AP One In-Wall and have configured both radios, this displays both radios in use. This field displays the security policy your access point is currently using. If you’re using...
- Page 13 Select Per SSID or AP Send / Recv to determine the data displayed in the graphs Usage Data Type below. Hourly Check this box to graph wireless network usage on an hourly basis. Wireless Network Usage/Number of These graphs detail recent wireless network usage. Wireless Clients http://www.pepwave.com Copyright © Pepwave 2015...
-
Page 14: Configuration
Enter a name to identify the location of your access point. This name can be retrieved Location via SNMP. Admin User This field specifies the administrator username of the web admin. It is set as admin by default. Name http://www.pepwave.com Copyright © Pepwave 2015... - Page 15 CIDR format, which is between 0 and 32 inclusively. For example: 192.168.0.0/24. To define multiple subnets, separate each IP subnet, one per line. For example: 192.168.0.0/24 10.8.0.0/16 Language Choose a language for the administration interface. http://www.pepwave.com Copyright © Pepwave 2015...
-
Page 16: Firmware
Time region used by the system. All choices are based on UTC. To choose a time server other than the default, enter the URL here. To restore the Time Server default time server, click the Default button. http://www.pepwave.com Copyright © Pepwave 2015... -
Page 17: Event Log
The section allows you to turn on event logging at a specified remote syslog server. Event Log Remote Syslog Check this box to turn on remote system logging. Remote Syslog Enter the IP address or hostname of the remote syslog server, as well as the port number. Host http://www.pepwave.com Copyright © Pepwave 2015... -
Page 18: Snmp
This option specifies the port which SNMP will use. The default port is 161. SNMPv1 This option allows you to enable SNMP version 1. SNMPv2c This option allows you to enable SNMP version 2c. SNMPv3 This option allows you to enable SNMP version 3. http://www.pepwave.com Copyright © Pepwave 2015... - Page 19 Select one of the following valid authentication protocols: NONE Authentication HMAC-MD5 Protocol HMAC-SHA When HMAC-MD5 or HMAC-SHA is selected, an entry field will appear for the password. Authentication Enter a password to use with the selected authentication protocol. Password http://www.pepwave.com Copyright © Pepwave 2015...
-
Page 20: Controller
Check this box to enable remote management. Management Select Auto, InControl, or AP Controller as your remote AP management method. Controller Type When Auto is selected, your access point will automatically choose the appropriate mode. http://www.pepwave.com Copyright © Pepwave 2015... -
Page 21: Configuration
Upload. The new settings can then be applied by clicking the Apply Changes button on the page header, or you Configurations can cancel the procedure by pressing discard on the main page of the web admin interface. http://www.pepwave.com Copyright © Pepwave 2015... -
Page 22: Reboot
Use the controls on the AP tab to set the wireless SSID and AP settings, as well as wireless distribution system (WDS) settings. 7.2.1 Wireless SSID Wireless network settings, including the name of the network (SSID) and security policy, can be defined and managed in this section. http://www.pepwave.com Copyright © Pepwave 2015... - Page 23 SSID Settings Enable Check this box to enable wireless SSID. Available only on the AP One AC mini, this setting, shown below, allows you to enable or disable either of the two on-board radios. Radio Selection SSID This setting specifies the AP SSID that Wi-Fi clients will see when scanning.
- Page 24 Open (No Encryption), WEP, 802.1X, WPA2 – Personal, WPA2 – Security Policy Enterprise, WPA/WPA2 - Personal, and WPA/WPA2 – Enterprise. To allow any Wi-Fi client to access your AP without authentication, select Open (No Encryption). Details on each of the available authentication methods follow. http://www.pepwave.com Copyright © Pepwave 2015...
- Page 25 This option specifies the length of time throughout which the broadcast key remains valid. When the re-keying period expires, the broadcast key is no longer valid and Re-keying Period broadcast key renewal is required. The default is 14400 seconds (four hours). 0 disables re-keying. http://www.pepwave.com Copyright © Pepwave 2015...
- Page 26 When v2 is selected, only v2 clients can associate with 802.1X Version the access point. Most modern wireless clients support v2. For stations that do not support v2, select v1. The default is v2. http://www.pepwave.com Copyright © Pepwave 2015...
- Page 27 Allowed Domains To whitelist a domain or IP address, enter the domain name / IP address here and click / IPs . To delete an existing entry, click the button next to it. http://www.pepwave.com Copyright © Pepwave 2015...
- Page 28 None, Deny all except listed, Accept all except listed, and RADIUS MAC Authentication. Connections coming from the MAC addresses in this list will be either denied or MAC Address List accepted based on the option selected in the previous field. http://www.pepwave.com Copyright © Pepwave 2015...
- Page 29 1813. Maximum Enter the maximum number of allowed retransmissions. Retransmission RADIUS Request Enter a value in seconds to limit RADIUS request frequency. Note the initial value will Interval double on each retransmission. http://www.pepwave.com Copyright © Pepwave 2015...
- Page 30 Enter a value in kpbs to limit connected clients’ upstream bandwidth. Enter 0 to allow Limit unlimited upstream bandwidth. Client Enter a value in kpbs to limit connected clients’ downstream bandwidth. Enter 0 to allow http://www.pepwave.com Copyright © Pepwave 2015...
- Page 31 Subnet Mask subnet mask identifying the subnet to allow or deny. If you have chosen MAC Address as your firewall rule type, enter the MAC address MAC Address identifying the machine to allow or deny. http://www.pepwave.com Copyright © Pepwave 2015...
-
Page 32: Settings
AP Settings Choose 802.11ng or 802.11na as your access point’s Wi-Fi protocol. The AP One AC mini provides the 802.11ng protocol for the 2.4 GHz band and the 802.11ac protocol for the 5GHz band, as shown below. Protocol This drop-down menu specifies the national / regional regulations the AP should follow. - Page 33 Channel The AP One AC mini allows setting channels on the 2.4GHz and 5GHz bands, as shown below. This drop-down menu determines the power at which your access point will broadcast.
- Page 34 Click Custom Schedule to specify radio availability schedule options or select Always Availability On to make the radio continuously available. This checkbox enables Wi-Fi Multimedia (WMM), also known as Wireless Multimedia Extensions (WME), on your access point. The default is enabled. http://www.pepwave.com Copyright © Pepwave 2015...
-
Page 35: Wds
Check this box to enable WDS. MAC Address Enter the MAC address of the access point with which to form a WDS link. Select AES to enable encryption for WDS peer connections. Selecting None disables Encryption encryption. http://www.pepwave.com Copyright © Pepwave 2015... -
Page 36: Network
(192.168.0.3) on the Ethernet segment Default Gateway Enter the IP address of the default gateway to the internet. DNS Server Enter the DNS server address that your access point will use to resolve host names. http://www.pepwave.com Copyright © Pepwave 2015... - Page 37 Your access point can act as a bridge or as a router, depending on your selection here. AP Mode When Router is selected, you can additionally select whether the access point will function in NAT or IP Forwarding mode. http://www.pepwave.com Copyright © Pepwave 2015...
-
Page 38: Lan
IP Settings IP Address Enter the LAN IP address and subnet mask to assign to your access point on the LAN. http://www.pepwave.com Copyright © Pepwave 2015... - Page 39 To reserve certain addresses for specific clients, such as network printers, enter the DHCP device’s MAC Address and a static IP to be assigned to the device. Click to add Reservation the DHCP reservation. To delete a DHCP reservation, click http://www.pepwave.com Copyright © Pepwave 2015...
- Page 40 The Port setting specifies the port(s) that correspond to the service, and can be configured to behave in one of the following manners: Port Single Port, Port Range, Port Mapping http://www.pepwave.com Copyright © Pepwave 2015...
-
Page 41: Pepvpn
Server IP Enter the LAN IP address of the server that handles requests for the forwarded service. Address 7.3.3 PepVPN PepVPN securely connects one or more remote sites to the site running your access point. http://www.pepwave.com Copyright © Pepwave 2015... - Page 42 ID or serial number here. Authentication Select By Remote ID Only or Preshared Key to specify the method your access point will use to authenticate peers. When selecting By Remote ID Only, be sure to enter a http://www.pepwave.com Copyright © Pepwave 2015...
- Page 43 4500 will be used by default. Port 32015 will be used if port 4500 is Data Port unavailable. If Custom is selected, you can input a custom outgoing port number between 1 and 65535. http://www.pepwave.com Copyright © Pepwave 2015...
-
Page 44: Tools
The ping test tool tests connectivity pinging the specified destination IP address. The ping utility is located at System>Tools>Ping. Traceroute The traceroute test tool traces the routing path to the specified IP address. The traceroute test utility is located at System>Tools>Traceroute. http://www.pepwave.com Copyright © Pepwave 2015... -
Page 45: Nslookup
User Manual Nslookup The nslookup tool is used to test DNS name servers. The nslookup utility can be found at System>Tools>Nslookup. http://www.pepwave.com Copyright © Pepwave 2015... -
Page 46: Monitoring Device Status
MAC addresses. To download a diagnostic report, click the Download link. To activate remote assistance, click Turn on. Client List The Client List displays all currently connected clients. Use the Expand and Collapse buttons to control the amount of data displayed. http://www.pepwave.com Copyright © Pepwave 2015... -
Page 47: Wds Info
WDS Info Here you can monitor the status of your wireless distribution system (WDS) and track activity by MAC address. If you’re using the AP One AC mini, this section will display information for both the 2.4GHz and 5GHz radios. -
Page 48: Rogue Ap
This section displays a list of nearby suspected rogue access points. Event Log The Event Log displays a list of all events associated with your access point. Check Auto Refresh to refresh log entries automatically. Click the Clear Log button to clear the log. http://www.pepwave.com Copyright © Pepwave 2015... -
Page 49: Restoring Factory Defaults
Wait for one minute or until the status LED turns green, upon which the settings of the device will have been restored to the factory defaults. By default, the unit will acquire an IP address from a DHCP server. 10.1 AP One AC mini http://www.pepwave.com Copyright ©... -
Page 50: Appendix
This transmitter must not be co-located or operating in conjunction with any other antenna or transmitter. The availability of some specific channels and/or operational frequency bands is country dependent and is firmware programmed at the factory to match the intended destination. http://www.pepwave.com Copyright © Pepwave 2015... - Page 51 Address: Contact Us: Hong Kong Office Sales A5, 5/F, HKSIB Phase 6, http://www.pepwave.com/contact/sales/ 481 Castle Peak Road Support Cheung Sha Wan http://www.pepwave.com/contact/ Hong Kong Business Development and Partnerships Tel: +852 2990 7600 Fax: +852 3007 0588 http://www.pepwave.com/partners/channel- partner-program/...
Need help?
Do you have a question about the AP One and is the answer not in the manual?
Questions and answers