Pepwave AP One Enterprise User Manual
802.11b/g/n wi-fi access points
Hide thumbs
Also See for AP One Enterprise:
- User manual (68 pages) ,
- User manual (60 pages) ,
- User manual (58 pages)
Table of Contents
Advertisement
Pepwave AP One Series:
AP One Enterprise / AP One AC mini / AP One In-Wall / AP One Rugged /
AP One Flex
Pepwave AP Pro Series:
AP Pro / AP Pro 300M / AP Pro Duo
August 2016
C
& T
OPYRIGHT
RADEMARKS
Specifications are subject to change without notice. Copyright © 2016 Pepwave Ltd. All Rights Reserved. Pepwave and the
Pepwave logo are trademarks of Pepwave Ltd. Other brands or products mentioned may be trademarks or registered trademarks of
their respective owners.
Advertisement
Table of Contents

Subscribe to Our Youtube Channel
Related Manuals for Pepwave AP One Enterprise


Summary of Contents for Pepwave AP One Enterprise
- Page 1 Specifications are subject to change without notice. Copyright © 2016 Pepwave Ltd. All Rights Reserved. Pepwave and the Pepwave logo are trademarks of Pepwave Ltd. Other brands or products mentioned may be trademarks or registered trademarks of their respective owners.
-
Page 3: Table Of Contents
Table of Contents Introduction and Scope ..................5 Package Contents ....................6 AP One Enterprise ....................6 AP One AC mini ....................6 AP One In-Wall ....................6 AP One Rugged ....................6 AP One Flex ......................6 AP Pro / AP Pro 300M / AP Pro Duo ..............6 Hardware Overview .................... - Page 4 6.1.7 Configuration ....................28 6.1.8 Reboot......................29 AP ........................29 6.2.1 Wireless SSID ....................29 6.2.2 Settings ......................39 6.2.3 WDS ....................... 43 Network ......................44 6.3.1 WAN ....................... 44 6.3.2 LAN ........................ 46 6.3.3 PepVPN ......................49 Tools ........................52 Ping ........................
-
Page 5: Introduction And Scope
Introduction and Scope Our AP Series of enterprise-grade 802.11b/g/n Wi-Fi access points is engineered to provide fast, dependable, and flexible operation in a variety of environments, all controlled by an easy-to-use centralized management system. From the small but powerful AP One AC mini to the top-of-the-line AP One 300M our AP Series offers wireless networking solutions to suit any business need, and every access point is loaded with essential features such as multiple SSIDs, VLAN, WDS, and Guest Protect. -
Page 6: Package Contents
Package Contents AP One Enterprise 1x AP One Enterprise 1 x Instruction sheet AP One AC mini 1 x AP One mini 1 x Omni-directional antenna 1 x Power supply 1 x Instruction sheet AP One In-Wall 1 x AP One In-Wall... - Page 7 1 x AP Pro / AP Pro 300M / AP Pro Duo 1 x Instruction sheet 1 x Installation guide...
-
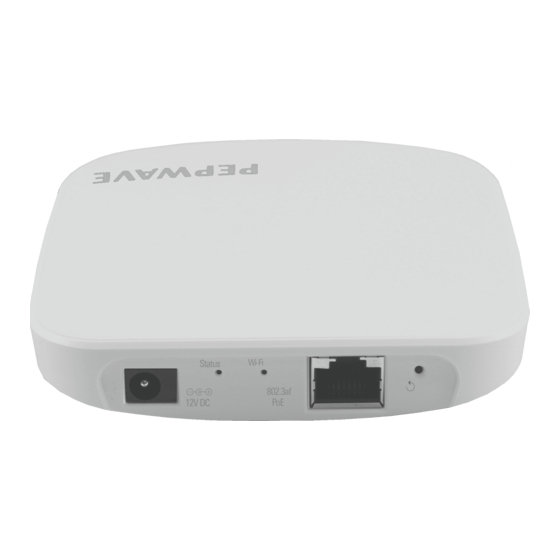
Page 8: Hardware Overview
Hardware Overview AP One Enterprise Bottom View Top View Front View LED Indicators RED – Access point initializing Status GREEN – Access point ready OFF – No device connected to Ethernet port BLINKING – Ethernet port sending/receiving data LAN 1 ON –... -
Page 9: Ap One Ac Mini
AP One AC mini Front View Rear Panel View LED Indicators RED – Access point initializing Status GREEN – Access point ready OFF – 2.4/5GHz Wi-Fi radio off BLINKING – AP sending/receiving data Wi-Fi GREEN – 2.4/5GHz Wi-Fi radio on Note that this model includes a 2.4GHz Wi-Fi radio and a 5GHz Wi-Fi radio that can operate simultaneously to increase speed and reduce interference. -
Page 10: Ap One In-Wall
AP One In-Wall Front View (US) Front View (International) Rear Panel View Top View LED Indicators RED – Access point initializing Status GREEN – Access point ready OFF – 2.4/5GHz Wi-Fi radio off BLINKING – AP sending/receiving data GREEN – 2.4/5GHz Wi-Fi radio on WLAN 1/2 Note that this model includes a 2.4GHz Wi-Fi radio and a 5GHz Wi-Fi radio that can operate simultaneously to increase speed and reduce interference. -
Page 11: Ap One Rugged
OFF – No device connected to Ethernet port BLINKING – Ethernet port sending/receiving data LAN 1-5 ON – Powered-on device connected to Ethernet port Note that LAN 5 displays the status of the uplink connection AP One Rugged Front View Rear Panel View LED Indicators On –... -
Page 12: Ap One Flex
AP One Flex LED Indicators RED – Access point initializing Status GREEN – Access point ready OFF – No device connected to Ethernet port BLINKING – Ethernet port sending/receiving data ON – Powered-on device connected to Ethernet port Number of connected clients (1-10, 11-20, 21-30, 31-40) -
Page 13: Ap Pro / Ap Pro 300M / Ap Pro Duo
AP Pro / AP Pro 300M / AP Pro Duo Front/Top View Rear Panel View... -
Page 14: Installation
Installation Your access point acts as a bridge between wireless and wired Ethernet interfaces. A typical setup follows:... -
Page 15: Installation Procedures
Installation Procedures 1. Connect the Ethernet port on the unit to the backbone network using an Ethernet cable. The port should auto sense whether the cable is straight- through or crossover. 2. Connect the power adapter to the power connector of the unit. Plug the power adapter into a power source. -
Page 16: Using The Dashboard
Using the Dashboard The Dashboard section contains a number of displays to keep you up-to-date on your access point’s status and operation. Remote assistance can also be enabled here. General This section contains WAN status and general device information. When your access point is connected to a WAN, this field displays the WAN IP address. -
Page 17: Device Information
Device Information Model This field displays your access point’s model number. Firmware The firmware version currently running on your access point appears here. Uptime This field displays your access point’s uptime since the last reboot or shutdown. - Page 18 This section displays a variety of information about your wireless network. AP Status...
-
Page 19: Wireless Network
Wireless Network This field displays your access point’s SSID. SSID The radio frequency currently used by your access point appears here. If you’re using Radio the AP One AC mini or the AP One In-Wall and have configured both radios, this displays both radios in use. -
Page 20: Configuration
Configuration System The options on the System tab control login and security settings, firmware upgrades, SNMP settings, and other settings. 6.1.1 Admin Security... - Page 21 The Admin Security section allows you to set up your access point’s name, password, security settings, and other options. Admin Security AP Name Enter a name to identify your access point. This name can be retrieved via SNMP. Enter a name to identify the location of your access point. This name can be retrieved Location via SNMP.
-
Page 22: Firmware
This field allows you to restrict access to the web admin to only defined IP subnets. Any - Allow web admin accesses from anywhere, without IP address restrictions. Allow access from the following IP subnets only – Restricts the ability to access web admin to only defined IP subnets. -
Page 23: Time
To check for new firmware, click the Check for Firmware button. If new firmware is available, your access point will automatically download and install it. To upgrade your access point using a firmware file on your network, click Choose File to select the firmware file. -
Page 24: Snmp
Event Log Remote Syslog Check this box to turn on remote system logging. Remote Syslog Enter the IP address or hostname of the remote syslog server, as well as the port Host number. 6.1.5 SNMP SNMP, or simple network management protocol, is an open standard that can be used to collect information about your access point. - Page 25 SNMP Settings SNMP Device This field shows the AP name defined at System>Admin Security. Name SNMP Port This option specifies the port which SNMP will use. The default port is 161. SNMPv1 This option allows you to enable SNMP version 1. SNMPv2c This option allows you to enable SNMP version 2c.
- Page 26 button in the Community Name table, which displays the following screen: SNMP Community Settings Community Name Enter a name for the SNMP community. IP Address/IP These settings specify a subnet from which access to the SNMP server is allowed. Enter the subnet address here (e.g., 192.168.1.0) and select the appropriate subnet Mask mask.
-
Page 27: Controller
Select None or CBC-DES as the SNMPv3 privacy protocol. When CBC-DES is Privacy Protocol selected, an entry field will appear for the password. Access Mode Select Read Only or Read and Write as the SNMPv3 access mode. Status Use these controls to enable or disable SNMPv3 access. 6.1.6 Controller In the Controller section, you can set up Peplink InControl or AP Controller remote management. -
Page 28: Configuration
6.1.7 Configuration In section, you can manage and backup access point configurations, as well as reset your access point to its factory configuration. Backing up your access point’s settings immediately after successful initial setup is strongly recommended. Configuration The Restore Factory Settings button resets the configuration to factory default Restore settings. -
Page 29: Reboot
6.1.8 Reboot This section provides a reboot button for restarting the system. For maximum reliability, your access point can equip with two copies of firmware, and each copy can be a different version. You can select the firmware version you would like to reboot the device with. - Page 30 Click New SSID to create a new network profile, or click the existing network profile to modify its settings. SSID Settings Enable Check this box to enable wireless SSID. Available only on the AP One AC mini, this setting, shown below, allows you to enable or disable either of the two on-board radios.
- Page 31 This setting specifies the transmit rate to be used for sending multicast network Multicast Rate traffic. IGMP Snooping To allow your access point to convert multicast traffic to unicast traffic for associated clients, select this option. To set your access point as a DHCP server or relay, select Server or Relay. DHCP Setting Otherwise, select None.
- Page 32 Key Size Select 40 bits (64-bit WEP) or 104 bits (128-bit WEP). Choose ASCII or Hex format for the WEP key. ASCII can be applied only to encryption Key Format keys that are manually entered. Hex can be applied to encryption keys that are manually entered or automatically generated.
- Page 33 Choose v1 or v2 of the 802.1x EAPOL. When v1 is selected, both v1 and v2 clients can associate with the access point. When v2 is selected, only v2 clients can associate with 802.1X Version the access point. Most modern wireless clients support v2. For stations that do not support v2, select v1.
- Page 34 Web Portal Login Web Portal Select Enable to turn on your access point’s built-in web portal functionality. Authentication Choose Open Access to allow users to connect without authentication or RADIUS to require authentication. If RADIUS is selected, you’ll be given the opportunity to select a Method RADIUS security method in the next field.
- Page 35 If your web portal will use a splash page, choose HTTP or HTTPS and enter the splash Splash Page page’s URL. Landing Page If your web portal will use a landing page, check this box. Landing Page If you have checked Landing Page, enter your landing page’s URL here. Concurrent Login Check this box to allow users to have more than one logged in session active at a time.
- Page 36 RADIUS Server Settings Enter the IP address of the primary RADIUS server and, if applicable, the secondary Host RADIUS server. Secret Enter the RADIUS shared secret for the primary server and, if applicable, the secondary RADIUS server. Authentication Enter the UDP authentication port(s) used by your RADIUS server(s) or click the Port Default button to enter 1812.
- Page 37 Guest Protect Block LAN Check this box to block access from the LAN. Access To specify a subnet to block, enter the IP address and choose a subnet mask from the Custom Subnet drop-down menu. To add the blocked subnet, click .
- Page 38 Bandwidth Management Bandwidth Check this box to enable bandwidth management. Management Enter a value in kpbs to limit the wireless network’s upstream bandwidth. Enter 0 to Upstream Limit allow unlimited upstream bandwidth. Enter a value in kpbs to limit the wireless network’s downstream bandwidth. Enter 0 to Downstream Limit allow unlimited downstream bandwidth.
-
Page 39: Settings
Firewall Rule Name Enter a descriptive name for the firewall rule in this field. Choose Port, Domain, IP Address, or MAC Address to allow or deny traffic from any Type of those identifiers. Depending on the option chosen, the following fields will vary. Choose TCP or UDP from the Protocol drop-down menu to allow or deny traffic using either of those protocols. - Page 40 Basic access point operation settings, such as the protocol and channels used, as well as scanning interval and other advanced settings, can be defined and managed in this section. AP Settings Choose 802.11ng or 802.11na as your access point’s Wi-Fi protocol. The AP One AC mini provides the 802.11ng protocol for the 2.4 GHz band and the 802.11ac protocol for the 5GHz band, as shown below.
- Page 41 as shown below. In addition to 20 MHz, 40 MHz, and 20/40 MHz, the 5Ghz band offers 80Mhz, which is the default setting. This drop-down menu selects the 5GHz 802.11 channel to be used. If Auto is set, the system will perform channel scanning based on the scheduled time set and choose the most suitable channel automatically.
- Page 42 Aggregation This field is only available when Frame Aggregation is enabled. It specifies the frame Length length for frame aggregation. By default, it is set to 50000. Max number of Enter the maximum clients that can simultaneously connect to your access point or set Clients the value to 0 to allow unlimited clients.
-
Page 43: Wds
6.2.3 WDS A wireless distribution system (WDS) provides a way to link access points when wires are not feasible or desirable. A WDS can also extend wireless network coverage for wireless clients. Note that your access point’s channel setting should not be set to Auto when using WDS. -
Page 44: Network
Network The settings on the AP tab control WAN and LAN settings, as well as allow you to set up PepVPN profiles. 6.3.1 WAN This section provides basic and advanced WAN settings. Basic Keep Default IP When enabled, this option maintains 192.168.0.3 as your access point’s IP address. - Page 45 IP Address Mode options are Automatic and Manual. In Automatic mode, the IP address of your access point is acquired from a DHCP server on the Ethernet segment. IP Address Mode In Manual mode, a user-specified IP address is used for your access point, as described below.
-
Page 46: Lan
Your access point can act as a bridge or as a router, depending on your selection here. AP Mode When Router is selected, you can additionally select whether the access point will function in NAT or IP Forwarding mode. 6.3.2 LAN This section offers a variety of settings that affect your access point’s operation on the LAN, such as settings for DHCP, DMZ, and port forwarding. - Page 47 IP Settings IP Address Enter the LAN IP address and subnet mask to assign to your access point on the LAN. DHCP Server Settings Check to enable the DHCP server feature of your access point. Enabling DHCP is the DHCP Server best option for most users.
- Page 48 entire LAN segment. The default value is 192.168.1.255. Address Enter the default gateway address that DHCP clients will use to access the internet. By Gateway default, this address will be the same as your access point’s IP address on the LAN. In DNS 1, enter the IP address of the primary DNS server offered to DNS clients or accept the default of 192.168.1.1, which is your access point’s address on the LAN.
-
Page 49: Pepvpn
Forwarding section. Port Forwarding Service Name Enter a name for the new port forwarding rule. Valid values for this setting consist of alphanumeric and underscore “_” characters only. The IP Protocol setting, along with the Port setting, specifies the protocol of the service as TCP, UDP, ICMP, or IP. - Page 50 PepVPN securely connects one or more remote sites to the site running your access point. To set up PepVPN, first give your site a local PepVPN ID. To modify an existing local ID, click...
- Page 51 Once you’ve specified a local ID, click the New Profile button to configure PepVPN. PepVPN Profile Settings Enable Check this box to enable PepVPN. Enter a name to represent this profile. The name can be any combination of Name alphanumeric characters (0-9, A-Z, a-z), underscores (_), dashes (-), and/or non- leading/trailing spaces ( ).
-
Page 52: Tools
point will wait for connection from the remote peer. Therefore, at least one of the two VPN peers must specify this value. Otherwise, VPN connections cannot be established. When this check box is unchecked, traffic between local and remote networks will be IP forwarded. -
Page 53: Traceroute
The ping test tool tests connectivity pinging the specified destination IP address. The ping utility is located at System>Tools>Ping. Traceroute The traceroute test tool traces the routing path to the specified IP address. The traceroute test utility is located at System>Tools>Traceroute. -
Page 54: Nslookup
Nslookup The nslookup tool is used to test DNS name servers. The nslookup utility can be found at System>Tools>Nslookup. -
Page 55: Monitoring Device Status
Monitoring Device Status The displays available on the Status tab help you monitor device data, client activity, rogue device access, and more. Device Here you can access a variety of data about your access point, download a diagnostic report, and check MAC addresses. To download a diagnostic report, click the Download link. -
Page 56: Wds Info
WDS Info Here you can monitor the status of your wireless distribution system (WDS) and track activity by MAC address. If you’re using the AP One AC mini, this section will display information for both the 2.4GHz and 5GHz radios. Portal If you’ve turned on your access point’s captive portal, client connection data will appear here. -
Page 57: Rogue Ap
Rogue AP This section displays a list of nearby suspected rogue access points. -
Page 58: Event Log
Event Log The Event Log displays a list of all events associated with your access point. Check Auto Refresh to refresh log entries automatically. Click the Clear Log button to clear the log. Restoring Factory Defaults The following procedure restores the settings of your access point to factory defaults: ... -
Page 59: Appendix
10 Appendix Federal Communication Commission Interference Statement This equipment has been tested and found to comply with the limits for a Class A digital device, pursuant to part 15 of the FCC Rules. These limits are designed to provide reasonable protection against harmful interference when the equipment is operated in a commercial environment. - Page 60 NCC Statement for Pepwave Access Points For AP One AC Mini WLAN [警語] 「電磁波曝露量 MPE 標準值 1mW/cm2,本產品使用時建議應距離人體 20 cm」 For AP One Enterprise WLAN [警語] 「電磁波曝露量 MPE 標準值 1mW/cm2,本產品使用時建議應距離人體 28 cm」 [警語內容] (1) 電磁波警語標示:「減少電磁波影響,請妥適使用」。 標示方式:必須標示於設備 本體適當位置及設備外包裝及使用說明書上。 低功率電波輻射性電機管理辦法 第十二條 經型式認證合格之低功率射頻電機,非經許可,公司、商號或使用者均不得擅 自變更頻率、加大功率或變更原設計之特性及功能。...
- Page 61 Contact Us: Sales http://www.pepwave.com/contact/sales/ Support http://www.pepwave.com/contact/ Business Development and Partnerships http://www.pepwave.com/partners/channel- partner-program/...
Need help?
Do you have a question about the AP One Enterprise and is the answer not in the manual?
Questions and answers