Table of Contents
Advertisement
Advertisement
Table of Contents

Related Manuals for Cybernet iOne-H19 Series


Summary of Contents for Cybernet iOne-H19 Series
- Page 1 LCD-PC iOne-H19 Series User Guide...
-
Page 2: Trademarks
FCC-B Radio Frequency Interference Statement This equipment has been tested and found to comply with the limits for a class B digital device, pursuant to part 15 of the FCC rules. These limits are designed to provide reasonable protection against harmful interference in a residential installation. -
Page 3: Safety Instructions
Safety Instructions Always read the safety instructions carefully. Keep this equipment away from humidity. Lay this equipment on a reliable flat surface before setting it up. The openings on the enclosure are for air convection hence protect the equipment from overheating. DO NOT COVER THE OPENINGS. Confirm the voltage of the power source and adjust accordingly to 110/220V before connecting the equipment to the power inlet. -
Page 4: Weee Statement
WEEE Statement (Waste Electrical and Electronic Equipment) The WEEE directive places an obligation on EU-based manufacturers, distributors, retailers and importers to take-back electronics products at the end of their useful life. A sister Directive, ROHS (Restriction of Hazardous Substances) compliments the WEEE Directive by banning the presence of specific hazardous substances in the products at the design phase. -
Page 5: Table Of Contents
Safety Instructions ......................ii WEEE Statement ......................iii Introduction ........................1 iOne-H19 Series Specifications ................... 1 Processor Support ........................1 Chipset ............................1 Memory Support ........................1 Networking ..........................1 Audio ............................1 Hard Disk Drive ........................2 ... - Page 6 Installing the Memory Module DDR3 SO-DIMM ..............20 Installing the Hard Disk Drive ....................21 Installing the Optical Disk Drive ................... 22 Installing the Cover ....................... 25 Cybernet E-Recycling SOP…………………………………………………………………………………27 Figures Figure 1: Front View with Optional Webcam .............. 6 ...
-
Page 7: Introduction
Slim LCD PC choice. With the fantastic appearance and small form factor, it can easily be set anywhere. The feature packed platform also gives you an exciting PC experience. iOne-H19 Series Specifications Processor Support The 2nd generation Intel® Core™ i3, i5 and Core™ i7 in the 1155 package up to 65W. -
Page 8: Hard Disk Drive
DC Output: 19V, 9.5A only / 120 Watt Power Adapter, AC input: 100~240V AC, 47Hz to 63 Hz. DC Output: 19V, 6.32A only. Dimensions 47.5cm (H) x 43cm (W) x 25.5cm (D) (with stand) Cybernet iOne-H19 Product Orientation Page 2... -
Page 9: Power Management
Power Management in Windows OS [Power Options] in Windows OS allow you to control the power management features of your display and hard drive. Go to [Start] > [Control Panel]. Then click on the [Power Options] link. Cybernet iOne-H19 Product Orientation Page 3... - Page 10 Select a power plan that suits your personal needs. You may also fine-tune the settings by clicking [Change plan settings]. The Shut Down LCD-PC Menu presents the options of Sleep (S3) & Shut Down (S5) for rapid and easy management of your system power. Cybernet iOne-H19 Product Orientation Page 4...
-
Page 11: Waking The System Up
• Install power saving software to manage your PC’s energy consumption. • Always disconnect the AC power cord or switch the wall socket off if your LCD- PC would be left unused for a certain time to achieve zero energy consumption. Cybernet iOne-H19 Product Orientation Page 5... -
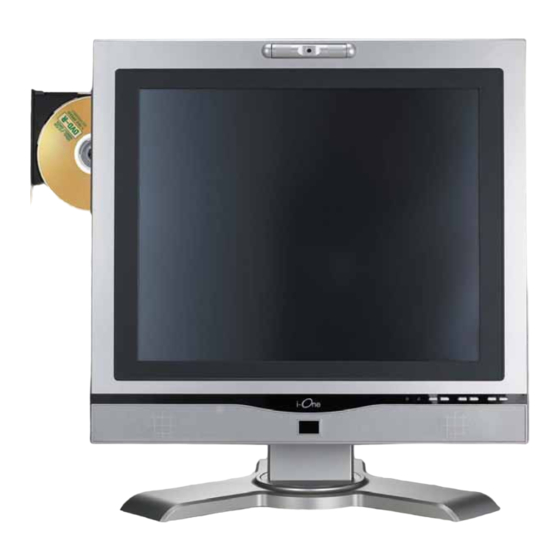
Page 12: Ione-H19 Series Overview
Series Overview Figure 1: Front View with Optional Webcam Cybernet iOne-H19 Product Orientation Page 6... -
Page 13: On Screen Display Icons
Figure 2: Left side view with Optical Drive Cybernet iOne-H19 Product Orientation Page 7... -
Page 14: Figure 3: Power Button And Usb Ports
Figure 3: Power Button and USB Ports Figure 4: Touch Panel Figure 5: IrDA Receiver for TV Tuner Cybernet iOne-H19 Product Orientation Page 8... -
Page 15: On Screen Display Buttons
Also functions as Exit button in the Menu Mode. Menu/Enter Press once to get to On-Screen display Mode to allow various adjustments as listed below. Also functions as the Enter or Select button in Menu Mode. Cybernet iOne-H19 Product Orientation Page 9... -
Page 16: On Screen Display Usage
Screen Horizontal and Vertical adjustment, OSD display time setup. Select to toggle through the languages offered. Select to reset all LCD Display settings OSD Firmware EEPROM version information. Screen mode selection for 16:9 or 4:3 Cybernet iOne-H19 Product Orientation Page 10... -
Page 17: Figure 6: Back View
Figure 6: Back view Figure 7: Bottom Panel I/O Ports Cybernet iOne-H19 Product Orientation Page 11... -
Page 18: Figure 8: System Ventilation Fan
Figure 8: System Ventilation Fan Figure 9: Heat Sink Ventilation, System Ventilation and Stand Cybernet iOne-H19 Product Orientation Page 12... -
Page 19: System Assembly
Forceps/tweezers can be used to pick up tiny screws or set up the jumpers. Rubber gloves can prevent injury from static charge. Electric screwdriver can be used to secure all screws more quickly. Cybernet iOne-H19 Product Orientation Page 13... -
Page 20: Orientation Of Key Parts
Figure 10:System Fan and Ventilation, HDD and Optical Drive, Heat Sink, Memory Modules, Mini-PCIe and Touch Panel Control. System Fan and Ventilation HDD and Optical Drive Heat Sink Memory Modules Mini-PCIe Card and Touch Panel Control Cybernet iOne-H19 Product Orientation Page 14... -
Page 21: Ione-H19 Disassembly
First lift the metal shield and slide it to the right clearing the optical drive door (at the top right) then disconnect the system fan cable connector from the motherboard at FAN2 next to the top right corner of the CPU. Cybernet iOne-H19 Product Orientation Page 15... -
Page 22: Figure 11: Open System
Figure 11: Open system with GPU Cybernet iOne-H19 Product Orientation Page 16... - Page 23 Figure 12: Open system without GPU Cybernet iOne-H19 Product Orientation Page 17...
-
Page 24: Installing The Cpu
4. Close the cover and the lever to complete installation. Replace the heat sink. NOTE: Any violation of the correct installation procedures may cause permanent damage to your mainboard. Cybernet iOne-H19 Product Orientation Page 18... -
Page 25: Installing The Cpu Heat Sink
3. Secure the two screws at the opposite end near the top edge of the bezel. 4. Connect the power cable to CPU Fan on the Mainboard labeled FAN 1 CPU FAN. Cybernet iOne-H19 Product Orientation Page 19... -
Page 26: Installing The Memory Module Ddr3 So-Dimm
DIMM slot. 3. Press the memory module down and the metal clip at each side of the DIMM slot will automatically close. 4. Repeat the steps to install another memory module to meet your needs. Cybernet iOne-H19 Product Orientation Page 20... -
Page 27: Installing The Hard Disk Drive
Hard Disk Drive as shown. 4. Replace the Optical Disk Drive securing the four screws (two screws on the top, two screws on the side) to secure the HDD and complete the installation. Power Cable SATA Cable Cybernet iOne-H19 Product Orientation Page 21... -
Page 28: Installing The Optical Disk Drive
Optical Disk Drive frame as indicated in Installing the Hard Disk Drive. 2. Put the ODD on the ODD frame and line up the four screw holes accordingly. 4. Secure the four screws on the ODD frame. Cybernet iOne-H19 Product Orientation Page 22... - Page 29 Hard Disk Drive slot. 8. Secure the four screws to fix the ODD frame and complete the installation. Cybernet iOne-H19 Product Orientation Page 23...
- Page 30 45° angle. Then push it in until the golden finger on the mini-PCIe card is deeply inserted in the mini-PCIe slot. 2. Press down the mini-PCIe card and secure the screw to complete the installation. Cybernet iOne-H19 Product Orientation Page 24...
-
Page 31: Installing The Cover
1. Connect the power cable to System Fan on the mainboard before securing the metal cover with seventeen screws. 2. Secure the plastic cover with eleven screws. 3. Secure the stand with four screws. Cybernet iOne-H19 Product Orientation Page 25... - Page 32 Cybernet iOne-H19 Product Orientation Page 26...
-
Page 33: Cybernet E-Recycling Sop
Cybernet e-recycling SOP Cybernet has an e-recycling program that is very easy to use. Just follow the steps explained below or go to our website at www.cybernetman.com. 1. Request an RMA via phone, email or support request. 2. We will arrange a call tag to have the product picked up. Just have it packed and ready to ship.
Need help?
Do you have a question about the iOne-H19 Series and is the answer not in the manual?
Questions and answers