Table of Contents
Advertisement
Advertisement
Table of Contents

Related Manuals for Inter-m PMU-360N


Summary of Contents for Inter-m PMU-360N
- Page 1 Operation anual Mixing mplifier P U-360N/480N/600N...
- Page 2 MIXING MPLIFIER Welcome Welcome personal welcome to you from the management and employees of Inter-M ll of the co-workers here at Inter-M are dedicated to providing excellent products with inherently good value, and we are delighted you have purchased one of our products. We sincerely trust this product will provide years of satisfactory service, but if anything is not to your complete satisfaction, we will endeavor to make things right.
-
Page 3: Table Of Contents
7. Log View ..........................20 8. Upgrade...........................21 9. Rebooting ..........................22 10. Factory Setting ........................22 11. Password Setting ........................23 Speaker Connection ........................24 System Connection ........................26 Block Diagram ..........................27 Specifications ..........................28 Service Procedures............................30 Schematic .............................30 Parts List ............................30 Variations and Options .......................30 Warranty ............................30 PMU-360N/480N/600N... -
Page 4: Unpacking
MIXING MPLIFIER Unpacking Unpacking lthough your PMU-360N/480N/600N is neither complicated nor difficult to operate, we recommend you take a few minutes to read this brief manual and familiarize yourself with the important information regarding product features, setup and operation. s with most electronic devices, we strongly recommend you retain the original packaging. In the unlikely event the product must be returned for servicing, the original packaging (or reasonable equivalent) is required. -
Page 5: Features
5. Use input level control for corresponding to desired mixing volume levels and set the output level with master volume control. 6. Use the Treble/Bass tone controls to change the tone of the output source. PMU-360N/480N/600N... -
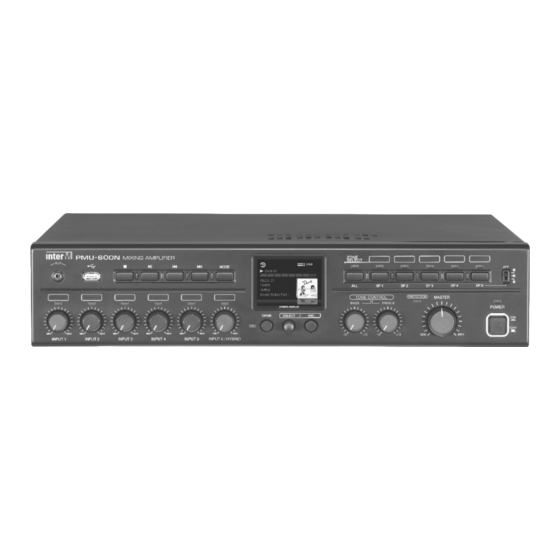
Page 6: Front Panel
It used to return to the OPER TION MODE from the MENU MODE 5. TONE CONTROL Controls the bass (100Hz) and treble (10kHz) tones of the main amplifier output. 6. PROTECTION MODE INDIC TOR Indicated that the amplifier is in failure protection mode. PMU-360N/480N/600N... - Page 7 - Menu selection screen will be shown by pressing and holding the select button, choose the menu by turning the select knob to the right or left then select the desired menu by pressing select button briefly. USB PL YB CK MODE USB Memory Playback, USB udio Stream PMU-360N/480N/600N...
- Page 8 ※Caution : Downloaded sound source through some unclear path might not be able to support seamless playback. Illegal distribution of sound file such as MP3 is prohibited by the law. Please use the sound source that downloaded through the legal path. PMU-360N/480N/600N...
- Page 9 ※ The internet radio station will be set through web page and you may not be able to receive the broadcast when the station is no loger in service or doesn't exist. To set the internet radio, please refer to section of web setting '4. internet radio setting'. PMU-360N/480N/600N...
- Page 10 Dispay the connection status of OE Displays the output level Displays the server address of OE-212N, The server setting can be changed through web page. ※ OE setting : Please refer to the section of web setting ‘5. oe Stream’. PMU-360N/480N/600N...
- Page 11 → all song random play → all song randomly repeat → single song play → single song repeat → folder play → folder random play → folder random repeat → ll song repeat. 14. UX INPUT 3.5mm Tip Ring Sleeve (TRS) jack on the front panel. PMU-360N/480N/600N...
-
Page 12: Rear Panel
※ Make sure not to set the main volume control to minimum level. - Connection of remote volume control Remote Volume Volume Control 10KΩ ※Note : Negative terminal should not be grounded. Never connect it to the unit's chassis or other circuit ground. PMU-360N/480N/600N... - Page 13 This is an RJ45 network terminal. It connects the amplifier to the internet using an Ethernet switch, router or PC. The network port supports 10/100Mbps and uto MDIX. 12. EXT IN This line-level input connects an external mixer to the amplifier expanding input channels. PMU-360N/480N/600N...
- Page 14 MIXING MPLIFIER 13. MIX OUT This line-level output connects the amplifier to an external processing unit or recorder. 14. SPE KER OUTPUT TERMIN L PMU-360N 54V/8 100V/28 70V/14 PMU-480N 62V/8 100V/21 70V/11 PMU-600N 70V/8 100V/16 70V/8 ※ Please note that SP 1~5 terminal will be controlled by speaker selector switch of front panel.
-
Page 15: Web Setting
This is network setting page. The host name is used for each of identification when multiple unit is in auto searching mode. ※IP address : Network information automatically set by DHCP (Dynamic IP address) or can be set as Static IP address. PMU-360N/480N/600N... -
Page 16: Operation Mode Setting
IP address or network setting , the reconnection must be applied with a reconfigured IP. 3. Operation Mode Setting One of three different modes can be set. (USB Player/Internet Radio/ OE Stream Receiver) Dedicated setting page will be shown according to operating mode setting. PMU-360N/480N/600N... -
Page 17: Internet Radio Setting
The channel list consists of two different catagoties which are Fixed channel and User defined channel. Fixed channel consists with 36 preset channels and User defined channel can be strored up to 20 channels. PMU-360N/480N/600N... - Page 18 MIXING MPLIFIER The station that user create as a preset can be selected in User defined channel. Please refer to next page for how to create and save a desired station list in the User definded channel. PMU-360N/480N/600N...
- Page 19 The following window will be shown by clicking the user define button. Type the title and URL of desired station then click the set button to finish. Up to 20 channels can be added or deleted randomly by user. PMU-360N/480N/600N...
-
Page 20: Oe Stream Setting
※Caution : If OE-212N is set with DHCP, the IP addess may be changed when OE-212N is turned on after power was turned off. When PMU-N is not connected with OE-212N, make sure to check the correct IP address of OE-212N. PMU-360N/480N/600N... -
Page 21: Time Setting
It can be set to Time zone and current time and the current time can be set manually or automatically. When the current time is set as automatic time synchronization, the server address must be typed (default: time.bora.net) and unit must be connected with internet. PMU-360N/480N/600N... -
Page 22: Log View
It displays the log information of unit setting and history of modification with time. If time has not been set, the log information will be shown with jan/ 1/ 1970 as default. Refresh: identify the recent changed log info Clear Log: clear the history of log info PMU-360N/480N/600N... -
Page 23: Upgrade
PC then find and select upgrade file by clicking […] button then starts the upgrade by clicking the set button. The screen will be off when upgrade is fully processed then manually turn on the power of unit to finish the upgrade. PMU-360N/480N/600N... -
Page 24: Rebooting
MIXING MPLIFIER 9. Rebooting Reboot the unit. Reboot process takes about 30 second. 10. Factory Setting The network and time setting will be reset to default setting. PMU-360N/480N/600N... -
Page 25: Password Setting
When the unit is reset to factory setting, the password will be reset to the default password. The default Password is “1” ※ ONLY P SSWORD can be changed. ※ Caution : Please make a note to keep the changed password. PMU-360N/480N/600N... -
Page 26: Speaker Connection
MIXING MPLIFIER Speaker Connection Speaker Connection Before connecting speakers to the unit, be sure to disconnect the C power cable. Make certain that the total impedance is not less than the rated impedance indicated. Impedance - High Impedance PMU-360N/480N/600N... - Page 27 TTENU TOR function, and a recommended speaker is lower than 50W(total impedance is upper than 200 ). Please be careful of connecting the speakers. Low Impedance (100V) (70V) PMU-360N PMU-480N PMU-600N Please do not use a 8 and SP1~SP5 terminal at the same time.
-
Page 28: System Connection
MIXING MPLIFIER System Connection System Connection PMU-360N/480N/600N... -
Page 29: Block Diagram
MIXING MPLIFIER Block Diagram Block Diagram PMU-360N/480N/600N... -
Page 30: Specifications
MIXING MPLIFIER Specifications Specifications PMU-360N PMU-480N PMU-600N Rated Output Power 360W 480W 600W Frequency Response (SP OUT/1W output) 80Hz~15kHz T.H.D (Rated Output, 1kHz) Less than 0.5% S/N (Rated Output) More than 78dB Tone Control (100Hz, 10kHz) ±10dB Input Sensitivity/ Input 1~5... - Page 31 MIXING MPLIFIER ※ DIMENSIONS PMU-360N/480N/600N...
-
Page 32: Service
To obtain specific warranty information and available service locations contact Inter-M directly or the authorized Inter-M Distributor for your specific country or region. PMU-360N/480N/600N... - Page 33 NOTE PMU-360N/480N/600N...
- Page 34 NOTE PMU-360N/480N/600N...
- Page 35 Inter-M, Ltd. (Korea) began operations in 1983. Since then, Inter-M has grown to become one of the largest manufacturers of professional audio and commercial sound electronics equipment in the world. Inter-M has gained worldwide recognition for its own branded products, as well as private label manufacturing of electronics sold under other names (OEM).
Need help?
Do you have a question about the PMU-360N and is the answer not in the manual?
Questions and answers