Table of Contents
Advertisement
Advertisement
Table of Contents

Related Manuals for Avaya B169


Summary of Contents for Avaya B169
- Page 1 Avaya B169 Conference Phone User Guide ENGLISH Issue 1 June 2014...
- Page 2 Avaya does not guarantee that these links will work all the time and has no control over the availability of the linked pages.
- Page 3 User Guide the Software at any given time. A “Unit” means the unit on which Avaya, at its sole discretion, bases the pricing of its licenses and can be, without limitation, an agent, port or user, an e-mail or voice mail account in the name of a person or corporate function (e.g., webmaster or helpdesk), or a directory entry in the...
- Page 4 VoIP calls, and an equalizer allows you to adjust the sound to suit the room’s acoustics. Warning! Do not expose the Avaya B169, charging stand or batteries to water or moisture. Warning! Do not open the casing of the Avaya B169.
-
Page 5: Table Of Contents
Managing recordings ......27 Select connectivity option ......9 Adjusting the recording indicator .... 27 Using a computer ........9 Displaying recording feature status ..27 Switching of Avaya B169 ......10 Recharging batteries ......11 Settings Connect to a DECT system DECT........... 28 Apperance ........... -
Page 6: Description
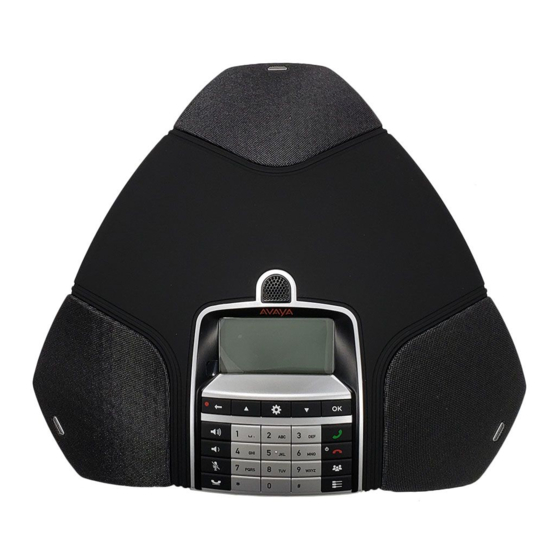
DESCRIPTION GENERAL The Avaya B169 is a battery powered, wireless conference phone that can be connected to the DECT base station included in the package, to a mobile phone, or to a PC. The conference phone has a host of innovative features: •... - Page 7 Avaya B169 Conference Phone User Guide DESCRIPTION Speaker Microphone Display screen Keypad LEDs SD memory card port LEDs Flashing blue Incoming call Steady blue light Call in progress Flashing red Hold, microphone and speaker turned off Steady red light Mute, microphone turned off...
-
Page 8: Keypad
Avaya B169 Conference Phone User Guide DESCRIPTION KEYPAD Navigation in menus Menu Navigation in menus Display of call list Settings Display of call list No/end/back Start/stop Yes/confirm choice recording Answer/connect calls During a call: Press to call a Increase volume... -
Page 9: Display Screen
Avaya B169 Conference Phone User Guide DESCRIPTION DISPLAY SCREEN On Hook Signal strength DECT Date Mains connected Time Fully charged Battery charging < 1 hr talk time Off Hook Call duration Recording indicator Connectivity menu Press to switch to and from this menu. -
Page 10: Navigation And Selection In Menus
Avaya B169 Conference Phone User Guide DESCRIPTION NAVIGATION AND SELECTION IN MENUS Press Select the option you want from the menu using the arrow buttons. Confirm by pressing OK to select the marked option. Cancel the setting or go back one level in the menu by pressing ... -
Page 11: General
• The Avaya B169 conference phone • Battery • Charging cradle • 7.5 metre power cable for charging cradle/Avaya B169 • AC adapter • 1.5 metre USB cable Packages with base station also include: • Avaya DECT Base station •... -
Page 12: Connecting And Installing The Unit
Avaya B169 Conference Phone User Guide GENERAL CONNECTING AND INSTALLING THE UNIT Open the battery cover and insert the battery as illustrated. Connect to a DECT system (see page 12), a mobile phone or a computer as illus- trated. -
Page 13: Select Connectivity Option
(Avaya B169 USB Audio). The computer only activates the microphone in the Avaya B169 if there is a program running that uses the microphone. This means that the Avaya B169 usually acts as a... -
Page 14: Switching Of Avaya B169
Avaya B169 microphone is also activated. OmniSound is now handling full duplex ® and echo cancellation. The blue LEDS on the Avaya B169 also light up at the same time. Note that you might need to turn off the automatic audio processing in some VoIP software. -
Page 15: Recharging Batteries
GENERAL RECHARGING BATTERIES The Avaya B169 lets you know when the battery’s remaining capacity is less than one hour of talk time. An audible signal is emitted and the LEDs flash three times. The battery recharging symbol on the display screen will also start flashing. -
Page 16: Connect To A Dect System
Select base (1–4). Four base stations can be registered in the Avaya B169. If no base station has been programmed, choose no. 1. Numbers being used are indicated by a filled box. Enter the base station’s security code (PIN code). -
Page 17: Configuring Analog Extensions
User Guide CONNECT TO A DECT SYSTEM The Avaya B169 is now in registration mode and is searching for a base station in registration mode. Wait until you receive confirmation that registration has been completed. (The base station has to be in registration mode.) ... -
Page 18: Answering And Making Calls
Avaya B169 Conference Phone User Guide ANSWERING AND MAKING CALLS ANSWERING CALLS A ring tone is heard and the blue LEDs start flashing. Press to answer. The LEDs show a steady blue light. The duration of the call is shown on the display screen. -
Page 19: Making Three-Way Calls (Dect)
(e.g. web meeting software or OneX Communicator) is running, that the Avaya B169 is ® connected via the USB cable to the computer and that Avaya B169 is selected as the sound device in the computer’s settings. Making VoIP calls ... - Page 20 Avaya B169. Dial the number on the mobile phone as you normally would. The Avaya B169 now functions as a speaker and microphone for the mobile phone. The LEDs show a steady blue light. Ending calls ...
-
Page 21: During A Call
Avaya B169 Conference Phone User Guide DURING A CALL ADJUSTING THE SPEAKER VOLUME Adjust the speaker volume using the buttons Adjusting the speaker volume when multiple connections are connected If you have selected multiple connections, you can adjust the volume level for each connection. -
Page 22: Switching Connections During Calls
If you selected USB or MOBILE, this connection will open. You then connect the call via the computer or mobile phone. If you selected DECT, you will hear a dialling tone. You then dial the number on the Avaya B169 or use the Phonebook. -
Page 23: Conference Guide
You can now call the participants in a meeting by simply pressing a few buttons. You may need to adjust some settings in your Avaya B169 to make it compatible with your PBX. Please turn to page 22 in this user guide for more details. -
Page 24: Making A Temporary Conference Group Call (Multi-Party Call) Using The Instant Guide
Avaya B169 Conference Phone User Guide CONFERENCE GUIDE If you don’t get an answer Press if one of the persons you are trying to call does not answer. The conference guide will ask you if you want to redial that person. -
Page 25: Editing Conference Groups
Avaya B169 Conference Phone User Guide CONFERENCE GUIDE EDITING CONFERENCE GROUPS Select > CONF GUIDE > EDIT GROUP. Here, you can change the name of a conference group, add or delete a person from a group and change a person’s name and phone number. -
Page 26: Conference Guide Settings
Avaya B169 Conference Phone User Guide CONFERENCE GUIDE CONFERENCE GUIDE SETTINGS When a multi-party call is going to be connected, a special signal (called flash or R-pulse) is produced which transmits the command (enquiry, conference and return) to the PBX. It may be necessary to change the type of signal if calls are connected via a PBX. -
Page 27: Phonebook
Avaya B169 Conference Phone User Guide PHONEBOOK The Avaya B169 has a phonebook that holds up to 200 entries. See page 14 for making calls via the phonebook. Entering text with the keypad Please turn to page 4 for instructions on using the keypad to enter text. -
Page 28: Deleting Contacts
Avaya B169 Conference Phone User Guide PHONEBOOK DELETING CONTACTS Select > PHONE BOOK > ERASE CONTACT. Mark the contact you want to delete and press OK. Confirm that you really want to delete the contact by pressing OK or cancel the ... -
Page 29: Recording
It is possible to record a phone conference on an SD (Secure Digital) memory card so you can listen to it later on. It is possible to record a call in progress and use the Avaya B169 as a dictaphone. Avaya B169 supports SD and SDHC cards and the recording capacity is 35 hours per GB. -
Page 30: Listening To A Recording
RECORDING LISTENING TO A RECORDING You can listen to a recorded phone conference on your Avaya B169 or a computer using an SD memory card reader. Recordings are saved in .wav format and can be played back on your choice of media player. -
Page 31: Managing Recordings
Avaya B169 Conference Phone User Guide RECORDING MANAGING RECORDINGS Editing the name of a recording The recording is named by default with the time at which the recording started. Select > RECORDING > EDIT FILE. Mark the folder you want and press OK to confirm. -
Page 32: Settings
> SETTINGS > DECT > DE-REGISTER. The Avaya B169 retrieves a list of the handsets that have been registered with that particular Avaya DECT base station. There is a filled box in front of the name of the handset that you are using (Avaya B169). -
Page 33: Apperance
Select the language you want and press OK to confirm. Changing text on the display screen The text on the display screen can be changed when the Avaya B169 is on hook. Select > SETTINGS > APPERANCE > SCREEN TEXT. -
Page 34: Sound
Select your choice and press OK to confirm. Adjusting microphone volume with mobile phone connected The Avaya B169 microphone has seven volume settings, so if the volume of calls via Mobile phones is too soft or too loud, you can easily adjust it to the right level. -
Page 35: Sleep Mode
> SETTINGS > SLEEP MODE. SOFTWARE Upgrading This menu option restarts the Avaya B169 in upgrade mode. See page 32. Resetting This resets all settings to the default. Please note that this also deletes all contacts in the phonebook and all groups saved in the conference guide. -
Page 36: Upgrading Software
The Avaya B169 is continually being developed with smart features and the software can be upgraded to ensure the unit is always running the latest software version. You will first need to install Avaya Upgrade Utility on your computer before you can upgrade your Avaya B169. Find out more at www.avaya.com/support. -
Page 37: Technical Specifications
Anti-theft protection Kensington security slot Memory Support for SD and SDHC memory cards (Recording capacity 35h/GB) Upgrades The Avaya Upgrade utility upgrades Avaya B169 software via the USB connection Connectivity Wireless DECT / DECT 6.0 PC connection USB 2.0 Mini B... -
Page 38: Avaya Dect Base Station
A Avaya DECT base station can be connected to analogue lines or any PBX equipped with an analogue extension. Up to 7 DECT units can be connected to a Avaya DECT base station, EU version Up to 4 DECT units can be connected to a Avaya DECT base...
Need help?
Do you have a question about the B169 and is the answer not in the manual?
Questions and answers