
Related Manuals for Godex MX20


Summary of Contents for Godex MX20
-
Page 1: User Manual
MX20/MX30/MX30i MOBILE PRINTER USER MANUAL User Manual : MX20/MX30/MX30i series Version : Rev. 1.1 Issue Date : 2015.06 Ver. 2.0 : 920-015211-00... -
Page 2: Table Of Contents
MX20/MX30/MX30i USER MANUAL CONTENTS Mobile Printer Box Content Getting to Know Your Printer Printer Setup Battery Installation Paper Installation Battery Charging Belt Strap & Shoulder Strap Usage Wizard CD Standard Installation Wizard CD Other Choice Installation Setting and Control for Operation Panel... - Page 3 MX20/MX30/MX30i USER MANUAL FCC COMPLIANCE STATEMENT FOR AMERICAN USERS Federal Communication Commission Interference Statement This equipment has been tested and found to comply with the limits for a Class B digital device, pursuant to Part 15 of the FCC Rules. These limits are designed to provide reasonable protection against harmful interference in a residential installation.
- Page 4 Do not directly connect the battery to an electrical power outlet not specified by GoDEX or an automobile’s cigarette lighter jack. Doing so may result in overheating, combustion and/or explosion of the battery by over-current and/or over-voltage.
-
Page 5: Mobile Printer
Mobile Printer Box Content Please check that all of the following items are included with your printer. Charge the battery for at least 3 hours before use. MX20 / MX30 / MX30i Mobile Printer MX20 MX30 MX30i Thermal Paper... -
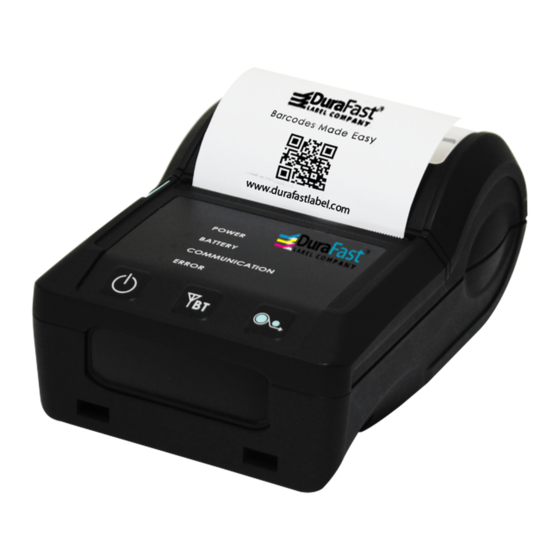
Page 6: Getting To Know Your Printer
Getting to Know Your Printer Device Overview Front View (Take MX30i as an example) Window Top Cover Membrane Panel Open Button LCD Membrane Panel Interface Cap Rear View Battery Belt Strap Holes Shoulder Strap Holes MX20 Series MX30 Series... - Page 7 Mobile Printer The Internal View of the Printer (Take MX30i as an example) Platen Roller Label roll guide Tear BAR Power Jack RS232+USB This RS232 & USB Port Port only support signal transmission, no charge function. Top Cover Hooks Thermal Print Head Top Cover Hooks...
-
Page 8: Printer Setup 004
Printer Setup Battery Installation Make sure to charge the battery for at least 3 hours prior to first use. Insert the battery on the rear side of the printer, aligning the battery hook properly. Push the battery into the slot until you hear a clicking sound. -
Page 9: Paper Installation 005
Printer Setup Paper Installation The printer is set to Direct thermal transfer so no ribbon is required. Place the printer on a flat surface and press the button. Top cover opened. Label roll guide can be adjusted according to label roll width. - Page 10 Printer Setup Insert the paper as shown in the image. Pull the paper out and close the paper cover. Tear off any excess paper in the direction of the side of the printer. Note * When you move label roll guide, try to force near its bottom.
-
Page 11: Battery Charging 007
Printer Setup Battery Charging Please make sure that the printer is switched off. Connect the jack of the power adapter to the printer and connect the plug of the power adapter to the socket of the wall. Turn on the printer. The operator panel should now light up. Open the external interface cap. -
Page 12: Belt Strap & Shoulder Strap Usage 008
Printer Setup Belt Strap & Shoulder Strap Usage MX20 Series Use a coin to tighten the belt strap screw. MX30 Series Connect the clips of the shoulder strap to the printer. -
Page 13: Wizard Cd Standard Installation 009
Printer Setup Wizard CD Standard Installation Insert the Super Wizard CD in the CD/DVD drive of the host computer and the installation program should pop up automatically. You will see the Welcome screen first. On the Welcome screen, choose “STANDARD INSTALLATION”. The wizard will then ask you to make sure your USB and power cables are connected and that the power is turned on. - Page 14 Printer Setup As the printer driver and GoLabel are installing, a screen will display a progress bar. While downloading completed you will see Installation completed. Click “NEXT” to continue. You can also print a test label. If don’t print a test label, the screen display as step 6. Note If you need more resources, tools or reference documents, you can also find them on Super Wizard CD.
- Page 15 Printer Setup Once the installation is complete, you can start to make and print labels with GoLabel or through the printer driver.
-
Page 16: Wizard Cd Other Choice Installation 012
Printer Setup Printer Setup Wizard CD Other Choice Installation Click “OTHER CHOICES” to next screen and select “PRINTER DRIVERS”. Click “INSTALL SEAGULL SCIENTIFIC WINDOWS DRIVER” to next screen, and click “NEXT”. Select “I accept the terms in the license agreement”, and click ”Next”,then click ”Finish” to step 4. - Page 17 Printer Setup 4. The Driver Wizard will guide you through the installation procedure. Select "Install printer drivers" and click “Next”. With a USB connection, search models such as the right diagram printer device. Specify your printer model and click ”Next”. Enter the printer name (you can use default), then click "Next"...
- Page 18 Printer Setup 7. Driver installation completed.
-
Page 19: Setting And Control For Operation Panel 015
Press the POWER button to turn on the printer, and the POWER LED signal lights appears. While hear one “Beep sound” , the LCD screen should display the message “GoDEX“ Logo on the screen. When printer is turned on, hold and press down the POWER button for 3 second will turn the printer off. - Page 20 Setting and Control for Operation Panel 4 dual-color LED - Power On, Battery Capacity, Status Information (Wireless) , Status Information (Media): POWER BATTERY COMMUNICATION ERROR Turn off POWER Turn on Without battery Power off Battery power supply as normal Recharge finished BATTERY Standby Mode (5 sec flash one time) Battery is recharging...
-
Page 21: Lcd Interface Introduction 017
Turn on the power After the printer starts, GoDEX Logo will appear on the LCD screen, which means that the printer is ready to print in the state. Use the printer's user interface can perform various operation, such action is set on... - Page 22 Setting and Control for Operation Panel Operations on Setting Page On GoDEX page, press Enter Button, you will enter the SETTING PAGES for the function. Darkness Enter Button Press Enter Button to enter the SETTING PAGES On SETTING PAGES, press to select the setting items,you will enter the SETTING VALUE PAGES for the function.
-
Page 23: Setting Items In Setting Mode
Setting and Control for Operation Panel Setting Items in Setting Mode Activate Self Test Darkness 0-19 ADJUST STOP POSITION 0-10 Reflective SENSOR Media Type See-Through Auto English 簡體中文 繁體中文 Español LCD Language Italiano Deutsch Français T ürkçe 日本語 Code Page Windows 1250 Windows 1251 Windows 1252... -
Page 24: Label Calibration And Self Test 020
Setting and Control for Operation Panel Label Calibration and Self Test Label Calibration The printer can automatically detect and store label height. That means the host computer does not need to transmit the label height to the printer. Self Test Self-test function lets you check whether the printer is functioning normally. -
Page 25: Active / Sleep / Shutdown / Charge Mode 021
Setting and Control for Operation Panel Active / Sleep / Shutdown / Charge Mode Sleep Mode = LED active. Power saving model. Active Mode: All functions active. On active mode, receiving a print job. Go to Sleep mode if no operation over 30~3600 seconds in Active mode. -
Page 26: Bluetooth Connection Terminal 022
Setting and Control for Operation Panel Bluetooth Connection Terminal The printer can be connected to devices equipped with Bluetooth communication capability. Press power button to turn on the printer. Press Bluetooth button, bluetooth function is turned. So that the printer can be searched. Terminal Equipment (Bluetooth function of the device must be turned on) Pair with another Bluetooth device. -
Page 27: Netsetting For Ethernet
NetSetting for Ethernet Installing the NetSetting software The NetSetting software is used to manage the network configurations when connecting the printer via Ethernet port. It is available on product CD or can be downloaded from official website. To install the NetSetting, please follow below steps. - Page 28 NetSetting for Ethernet Once the installation is completed, you will see the NetSetting icon on your desktop as right diagram. NetSetting...
-
Page 29: The Interface Of Netsetting 025
The Interface of NetSetting GoDEX printer can also be used through a network connection (as a remote network printer), make sure the printer connected to the Internet and the power cord, you can use the Interface of NetSetting to search connected network printers. - Page 30 NetSetting for Ethernet IP Setting The IP Setting tab can change the printer name, Port number, Gateway setting and the password for configuring theprinter. You can also set the printer’s IP address ether by DHCP or by Static IP. You can press “Set” button to apply the settings and “ReGet” button to refresh the setting values. Note * To fully benefit from the NetSetting software, you should be familiar with basic networking principles.
- Page 31 NetSetting for Ethernet Alert Path Setting NetSetting will send the alert messages to designated mail account when the error happened on printer. The alertmessages are sent by SMTP (Simple Mail Transfer Protocol) or SNMP (Simple Network Management Protocol). You can set or change the configurations of SMTP and SNMP on this “Alert Path Setting” tab. You can press “Set”...
- Page 32 NetSetting for Ethernet Alert Message Setting For the alert message notification function, you can decide which error cases need to be sent out to the operator. Moreover, the alert messages can be set to be sent by SMTP, SNMP or both. You can press “Set”...
- Page 33 NetSetting for Ethernet Printer Configuration Set or change the configurations of connected printer. Most of key settings for the printer operation can be done by this setting page. You can press “Set” button to apply the settings and “ReGet” button to refresh the setting values.
- Page 34 NetSetting for Ethernet User Command The “User Command” tab provides a communication interface for operator to control the printer. Input printer commands in "Input Command" window and press “Send Command” button, the commands will be sent to the printer. For some commands that will return response message, the message will be displayed in "Output Message" window. You can press “Send Command”...
- Page 35 NetSetting for Ethernet Firmware Download On “Firmware Download” tab, the current version of printer firmware will be showed on the screen. If you need to update the printer firmware, just specify the file location of firmware file and press “Start Download Firmware” button.
-
Page 36: Accessories Charger
Insert the battery into the Charger as shown in the figure the below. Gently slide the battery until it reaches the bottom of the charger. Charging starts as soon as the battery is completely inserted. MX30 Series MX20 Series Light Charge Status Charge Time... -
Page 37: Car Charger And Rs-232 Cable 033
Accessories Car Charger and RS-232 Cable Please make sure that the printer is switched off. (Connect the car charger to your car’s cigarette lighter jack.) Open the external interface protection cap. Connect the mini USB cable(battery charger) to the power connector. Power Connector This RS232 &... -
Page 38: Protective Case 034
Accessories Protective Case Unzip to open up the protective case and insert your printer into the protective case as shown in the figure on the below. Open the paper discharger when using the printer. Connect the clips of the leather case with the shoulder strap. - Page 39 Maintenance and AdjustmentS Cleaning the Thermal Print Head Dirt on the print head, or glue residue from the label stock may result in inadequate print quality. The printer cover must therefore always be closed during printing. Keeping dirt and dust away from the paper or labels ensures a good print quality and a longer lifespan of the print head.
-
Page 40: Maintenance And Adjustment 035
Maintenance and Adjustment Troubleshooting Problem Solution ♦ Check if the battery is full charged. The printer is switched on but the LED does not light up. Check the software settings (driver settings) or command codes. ♦ Look for the error alert in the table in Section Error Alerts. ♦... -
Page 41: Appendix
** Minimum print height and maximum print speed specification compliance can be dependent on non variables such as label type, thickness, spacing, liner construction, etc. Godex is pleased to test non minimum print height and maximum print speed capability. - Page 42 ** Minimum print height and maximum print speed specification compliance can be dependent on non variables such as label type, thickness, spacing, liner construction, etc. Godex is pleased to test non minimum print height and maximum print speed capability.
-
Page 43: Interface
MX20/MX30/MX30i USER MANUAL APPENDIX INTERFACE Pinout Description USB Port (mini-B Type) Pin No. Function VBUS... -
Page 44: Mx30/30I Wifi Setting
MX20/MX30/MX30i USER MANUAL Appendix MX 30/30i WiFi Setting Checkt the Checkt the Access Point Setting Value Access Point Setting Value Wireless Wireless Connect MX30/30i Wireless Module to Wireless Access Point, Connect MX30/30i Wireless Module to Wireless Access Point, and then connect the Module to the Mobile phones or computers and then connect the Module to the Mobile phones or computers through network. - Page 45 MX20/MX30/MX30i USER MANUAL Appendix MX 30/30i WiFi Setting Set up MX 30/30i Wireless Network through Godex WiFi tool Step 1. Connect MX 30/30i and computer by USB cable Step 2. Turn on MX 30/30i Step 3. Start Golabel Step 4. Select printer model to MX30/30i (see the screenshot below)
- Page 46 MX20/MX30/MX30i USER MANUAL Appendix MX 30/30i WiFi Setting parameter s of (see the screenshot below) Step 6. Input wireless access point Step 7. Click “Set Data”icon, and the printer will reboot SSID Select Security PRE-SHARED KEY PS : If printer doesn’t reboot after a few seconds and 3 beeps are not heard, please repeat the steps from chapter 1.2)
- Page 47 Activate DHCP function for MX30/30i First of all, configure DHCP function through USB Steps : Click “Generic” Click“Printer Setup” Select “USB port/GoDEX MX30/30i” Click “Save ” Obtain the printer IP address through WiFi Setting (Please refer to the screenshot below)
Need help?
Do you have a question about the MX20 and is the answer not in the manual?
Questions and answers