Table of Contents
Advertisement
Advertisement
Table of Contents
Troubleshooting

Subscribe to Our Youtube Channel
Related Manuals for Henny Penny PFG-690


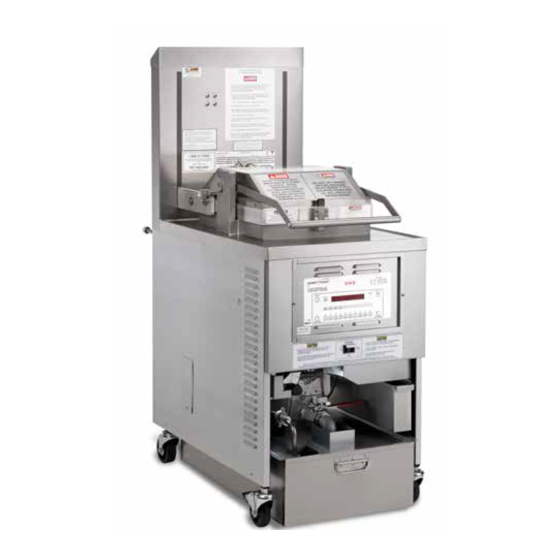
Summary of Contents for Henny Penny PFG-690
- Page 1 Henny Penny Pressure Fryer Model PFG-690 TECHNICAL MANUAL...
-
Page 3: Section 2. Maintenance
Do not obstruct the flow of combustion and ventilation air. Adequate clearance must be left all around appliance for sufficient air to the combustion chamber. The Model PFG-690 pressure fryer is equipped with a continuous pilot. But fryer cannot be operated without electric power. Fryer will automatically return to normal operation when power is restored. -
Page 4: Specifications
Model 690 HENNY PENNY 8 HEAD GAS PRESSURE FRYER SPECIFICATIONS Height 61” (155 cm) Width 24” (61 cm) Depth 41¾” ( 106 cm) Floor Space Approximately 7 sq. ft. (0.65 sq. m.) Pot Capacity 8 Head of chicken (32 lbs.) (14.4 kg.) 130 lbs. -
Page 5: Table Of Contents
High Temperature Limit Control ..............2-2 2-5. Power/Pump Switch ..................2-4 2-6. Temperature Probe Replacement ..............2-5 2-7. Complete Control Panel - Henny Penny ............2-6 2-8. Pressure Regulation ..................2-7 2-9. Tilting the Lid Upright ................... 2-7 2-10. Reversing the Lid Gasket ................2-8 2-11. - Page 6 Model 690 TABLE OF CONTENTS (Continued) Section Page Section 2 MAINTENANCE (Continued) 230 Volt Ladder Diagram (AP0803002 & BELOW) ........2-37 230 Volt Ladder Diagram (AP0803003 & ABOVE) ........2-38 100-120 Volt FAST Wiring Diagram (AP0803002 & BELOW) ....2-39 100-120 Volt FAST Wiring Diagram (AP0803003 &...
-
Page 7: Troubleshooting
Model 690 SECTION 1. TROUBLESHOOTING 1-1. INTRODUCTION This section provides troubleshooting information in the form of an easy-to-read table. If a problem occurs during the first operation of a new fryer, recheck the installation per the Installation section of the Operator’s Manual. -
Page 8: Troubleshooting
Model 690 1-3. TROUBLESHOOTING To isolate a malfunction, proceed as follows: Clearly define the problem (or symptom) and when it occurs. Locate the problem in the Troubleshooting table. Review all possible causes. Then, one at a time, work through the list of corrections until the problem is solved. Refer to the maintenance procedures in the Maintenance section to safely and properly make the checkout and re- pair needed. - Page 9 Model 690 1-3. TROUBLESHOOTING (Continued) Problem Cause Correction COOKING SECTION Product Color Not Correct: A. Too Dark • Temperature too high • Check temperature setting in the program mode; see Programming section of Operator’s Manual • Faulty temperature probe • Remove and replace tempera- ture probe •...
- Page 10 Model 690 1-3. TROUBLESHOOTING (Continued) Problem Cause Correction COOKING SECTION (Continued) • • D. Spotted Improper separation of the Load product into basket Product product properly • • Breading not uniform on Sift breading regularly • the product Separate product during breading •...
- Page 11 Model 690 1-3. TROUBLESHOOTING (Continued) Problem Cause Correction COOKING SECTION (Continued) • • D. Rancid Taste Shortening too old Replace shortening and follow recommended care and use of shortening • • Infrequent filtering Replace shortening and follow recommended care and use of shortening •...
- Page 12 Model 690 1-3. TROUBLESHOOTING (Continued) Problem Cause Correction POWER SECTION • • With switch in Open circuit Check to see that unit is POWER position, plugged in • the fryer is com- Check the breaker or fuse pletely inoperative at supply box •...
- Page 13 Model 690 1-3. TROUBLESHOOTING (Continued) Problem Cause Correction PRESSURE SECTION (Continued) • • Pressure does not Not enough product in fryer Place proper quantity of build or product not fresh fresh product within frypot to generate steam • • Metal shipping spacer not Remove shipping spacer;...
- Page 14 Model 690 1-3. TROUBLESHOOTING (Continued) Problem Cause Correction HEATING OF SHORTENING SECTION Shortening will not heat • Gas valve knob turned to the OFF • Make sure the gas valve knob is position turned to the ON position • • Blown fuse or tripped Reset breaker or replace fuse circuit breaker at supply...
- Page 15 Model 690 1-3. TROUBLESHOOTING (Continued) Problem Cause Correction HEATING OF SHORTENING SECTION (Continued) • • Heating of Supply line too small - low Increase supply line size; shortening too gas volume refer to installation slow instructions • • Improper ventilation Refer to installation system instructions...
- Page 16 Model 690 1-3. TROUBLESHOOTING (Continued) Problem Cause Correction SHORTENING FOAMING/DRAINING SECTION • • Foaming or boil- Water in shortening At end of a cook cycle, ing over of drain shortening and clean shortening frypot; add fresh shortening • • Condensation line stopped up Remove and clean conden- sation line •...
-
Page 17: Error Codes
Model 690 1-4. ERROR CODES In the event of a control system failure, the digital display shows an error message. These messages are coded: “E-4”, “E-5”, “E-6”, “E-32”, “E-41” and “E-71”. A constant tone is heard when an error code is displayed, and to silence this tone, press any of the product buttons. - Page 18 “E-15,” check the drain microswitch per section 2-22 “E-20A” Air Pressure Press the Timer button to try the ignition process again; Switch Failure if “E-20A” persists, call Henny Penny’s Service Depart- (stuck closed) ment “E-20B” Draft Fan or Press the Timer button to try the ignition process again; if Air Pressure “E-20B”...
-
Page 19: Maintenance
Model 690 SECTION 2. MAINTENANCE 2-1. INTRODUCTION This section provides checkout and replacement procedures for various parts of the fryer. Before replacing any parts, refer to the Troubleshooting section to aid you in finding the cause of the malfunction. 2-2. MAINTENANCE HINTS 1. -
Page 20: High Temperature Limit Control
Model 690 2-4. HIGH TEMPERATURE LIMIT CONTROL This high temperature control is a safety, manual reset control, which senses the temperature of the shortening. If the shorten- ing temperature exceeds 425°F (218°C), this switch opens and shuts off the heat to the frypot. When the temperature of the shortening drops to a safe operation limit (15-20 minutes), manually reset by pressing the red reset button. - Page 21 Model 690 2-4. HIGH TEMPERATURE LIMIT CONTROL (Continued) Replacement To avoid electrical shock or property damage, move the power switch to OFF and disconnect main circuit breaker, or unplug cord at wall receptacle. 1. If the tube is broken or cracked, the control will open, shutting off electrical power.
-
Page 22: Power/Pump Switch
Model 690 2-4. HIGH TEMPERATURE 11. Pull all excess capillary line from the frypot and tighten nut LIMIT CONTROL into frypot wall. (Continued) Be sure capillary bulb of high limit is positioned so it does not interfere with the carrier or get damages when clean- ing the frypot. -
Page 23: Temperature Probe Replacement
Model 690 2-5. POWER/PUMP SWITCH (Continued) Replacement 1. With control panel removed, and wires off the switch, push in on tabs on the switch to remove from the panel. 2. Replace with new switch, and reconnect wires to switch following the wiring diagram. 3. -
Page 24: Complete Control Panel - Henny Penny
10. Turn power ON and check out fryer. Figure 2-2 2-7. COMPLETE CONTROL Should the Control Panel become inoperative, follow these PANEL - HENNY PENNY instructions for replacing the board. 1. Remove electrical power supplied to the fryer. To avoid electrical shock or property damage, move the power switch to OFF and disconnect main circuit breaker, or unplug cord at wall receptacle. -
Page 25: Pressure Regulation
Model 690 2-8. PRESSURE REGULATION The Henny Penny Fryer uses pressure as one of the compo- nents of the cooking process. Once the lid is sealed to the frypot and the solenoid valve closes, a deadweight valve maintains the correct pressure in the frypot. -
Page 26: Reversing The Lid Gasket
Model 690 2-10. REVERSING THE LID The gray rubber gasket surrounding the inside of the lid is GASKET designed to be reversed. Because of heat expansion and the pressure used for the cook ing process, the gasket is constantly under extreme stress. Reversing the lid gasket will help to ensure that the fryer will not lose pressure through leakage. -
Page 27: Lid Counterweight Cables
Model 690 2-11. LID COUNTERWEIGHT The Lid Counterweight in the back of the fryer balances the CABLES weight of the lid system to allow easier opening and closing of the lid. The weight has two cables attached to it, and weighs about 150 lbs. -
Page 28: Pressure Pad
Model 690 2-12. PRESSURE PAD The pressure pads are plastic strips that the lid cam presses against to seal the lid. 1. Raise the lid. 2. Remove the four screws securing the lid cover and remove cover. 3. Push the lid cam back, off the pressure pads. 4. -
Page 29: Lid Adjustment
Fryer should be operating at 12 psi (827 mbar), or serious burns could result. 2-14. CLEAN THE NYLATRONS 1. Spray Henny Penny biodegradable, food safe, foaming degreaser (part no. 12226) on Nylatrons. 2. Raise lid up and down several times to spread degreaser. -
Page 30: Solenoid Valve
Model 690 2-15. SOLENOID VALVE This is an electromechanical device that causes pressure to be held in the frypot. The solenoid valve closes at the beginning of the cook cycle and opens automatically at the end of the cook cycle. If this valve should become dirty, or the Teflon seat nicked, pressure will not build up. - Page 31 Model 690 2-15. SOLENOID VALVE 5. If the core-disc assembly is sticking due to buildup of (Continued) shortening, breading, and food particles, proceed with the following steps: a. Unscrew the solenoid bonnet assembly from solenoid valve body. b. Remove the solenoid bonnet assembly and bonnet gasket.
-
Page 32: Deadweight Valve
Model 690 2-15. SOLENOID VALVE 13. Wet O-ring around seat with water and insert O-ring (Continued) assembly (flat side first) in valve through “IN” side of body. Use an eraser end of pencil and press in the Teflon seal until it snaps into place. BE CAREFUL NOT TO MAR OR NICK THE SEAT. -
Page 33: Removal & Cleaning Of Safety Relief Valve
Model 690 2-16. DEADWEIGHT VALVE (Continued) DO NOT PULL THE RING ON SAFETY RELIEF VALVE. HOT STEAM WILL BE RELEASED AND SEVERE BURNS WILL RESULT. 1. AT THE END OF EACH DAY’S USAGE OF THE FRYER, THE DEADWEIGHT VALVE MUST BE CLEANED. -
Page 34: Pressure Gauge
Model 690 2-17. REMOVAL & CLEANING 2. Use a wrench to loosen the valve from the pipe tee; turn OF SAFETY RELIEF VALVE counterclockwise to remove. (Continued) 3. Clean the inside of the pipe tee with hot water. Turn the safety relief valve towards the rear of fryer when reinstalling safety relief valve. -
Page 35: Gas Control Valve
Model 690 2-19. GAS CONTROL VALVE The gas control valve sends regulated gas to burners when the controller calls for heat. The control valve can be turned on or off. In ON position, and power switch ON, a spark ignitor lights a standing pilot, and when the control calls for heat, the valve is opened and the burners are ignited. - Page 36 Model 690 2-19. GAS CONTROL VALVE (Continued) 4. Remove left side panel. 5. Remove control panel. 6. Unscrew nut from inlet line from the control valve. 7. Remove the bracket from behind the control valve. 8. Remove pilot light tube from control valve. 9.
-
Page 37: Blower Assembly
Model 690 2-20. BLOWER ASSEMBLY The blower motor circulates air into the burner area to create the correct heat for the fryer. If the blower fails, a sensor will shut the power control valve down. 1. Make sure unit is off, and close and lock the lid. Lid should be in locked down position. -
Page 38: Transformer
Model 690 2-21. TRANSFORMER The transformer reduces the voltage down to accommodate those components with low voltage. 1. Remove electrical power supplied to the unit. To avoid electrical shock or property damage, move the power switch to OFF and disconnect main circuit breaker, or unplug cord at wall receptacle. -
Page 39: Airflow Switch
Model 690 2-22. AIRFLOW SWITCH The airflow switch senses the flow of air coming from the blower. If the airflow is reduced below a set amount, the switch will cut power to the control valve, which shuts the burners down. Replacement 1. -
Page 40: Drain Microswitch
Model 690 2-23. DRAIN MICROSWITCH Upon pulling out on the drain handle, the microswitch should be activated and the unit will not heat, but when the handle is pushed back, the unit should operate properly. The bracket on the microswitch is slotted so it can be adjusted backward or `forward. -
Page 41: Drain Valve And Extension
Model 690 2-24. DRAIN VALVE The drain valve opens when drain valve handle is pulled out AND EXTENSION and drains the shortening out of the pot. 1. Using a 3/8” socket, remove the nuts securing the drain switch bracket, and pull the bracket from the studs. 2. -
Page 42: Air Valve
Model 690 2-25. AIR VALVE The air valve allows circulation of the shortening in the frypot to keep the shortening at a uniform temperature. 1. Remove electrical power supplied to the unit. To avoid electrical shock or property damage, move the power switch to OFF and disconnect main circuit breaker, or unplug cord at wall receptacle. -
Page 43: Cleaning The Dilution Box
Model 690 2-26. CLEANING THE Clean the dilution box annually to ensure the unit operates DILUTION BOX efficiently and with few failures. 1. Make sure unit is off, and close and lock the lid. Lid should be in locked down position. Failure to do so could result in personal injury. -
Page 44: Ignition Modules
Model 690 2-28. IGNITION MODULES Sends 24 volts to the ignitors and gas control valve. LED Indication 3 different modules are in the field. The White Rogers and Fenwall modules have a red LED, and the Robertshaw modules have a green LED. These LEDs help to identify a failure. For White Rogers &... -
Page 45: Ignitor Assembly
Model 690 2-29. IGNITOR ASSEMBLY The 690 Model has electronic spark ignition that lights a standing pilot. Replacement 1. Remove electrical power supplied to the unit. To avoid electrical shock or property damage, move the power switch to OFF and disconnect main circuit breaker, or unplug cord at wall receptacle. -
Page 46: Flame Sensor Assembly
Model 690 2-30. FLAME SENSOR The flame sensor should glow a bright red when pilot is lit and ASSEMBLY allows the gas control valve to open. If it does not sense a flame, it will shut the gas control valve down. Replacement 1. -
Page 47: Nylatron Strips Replacement
Model 690 2-32. NYLATRON STRIPS REPLACEMENT 1. Raise the lid and remove the retention ring from one end of the lid pin. 2. Slide the lid pin from unit. 3. Lift the lid from unit. The lid weighs 80 lbs (36 kg). Take care when lifting lid to prevent personal injury. -
Page 48: Lubricating Lid Rollers
Model 690 2-32. NYLATRON STRIPS REPLACEMENT (CONTD) 9. Lift the front shroud up and out, over the arm of the lid. 10. Thread the new nylatron strip through the track in the front shroud. 11. Lining up the holes in the strips, fit the front shroud back over the lid arms. - Page 49 Model 690 aP0803002 & below June 2008 2-31...
- Page 50 Model 690 aP0803003 & above June 2008 2-32...
- Page 51 Model 690 June 2008 2-33...
- Page 52 Model 690 aP0803003 & above June 2008 2-34...
- Page 53 Model 690 aP0803002 & below June 2008 2-35...
- Page 54 Model 690 aP0803003 & above Aug. 2006 2-36...
- Page 55 Model 690 aP0803002 & below June 2008 2-37...
- Page 56 Model 690 aP0803003 & above Aug.2006 2-38...
-
Page 57: Volt Fast Wiring Diagram Ap0803002 & Below
Model 690 100-120 volt FaSt wiring Diagram aP0803002 & below June 2008 2-39... - Page 58 Model 690 aP0803003 & above June 2008 2-40...
-
Page 59: Volt Fast Wiring Diagram Ap0803002 & Below
Model 690 230 volt FaSt wiring Diagram aP0803002 & below June 2008 2-41... - Page 60 Model 690 aP0803003 & above June 2008 2-42...
-
Page 61: Volt Fast Wiring Diagram Ap0803002 & Below
Model 690 220-240 volt FaSt wiring Diagram aP0803002 & below June 2008 2-43... - Page 62 Model 690 aP0803003 & above June 2008 2-44...
- Page 63 During this time, any frypot that fails due to manufacturing or workmanship issues will be replaced at no charge for parts, labor, or freight. Henny Penny will either install a new frypot at no cost or provide a new or reconditioned replacement fryer at no cost.
- Page 64 Model 690...
-
Page 65: Section 3. Parts Information
This section lists the replaceable parts of the Henny Penny Model 690 Fryer. 3-2. GENUINE PARTS Use only genuine Henny Penny parts in your fryer. Using a part of lesser quality or substitute design may result in damage to the unit or personal injury. - Page 66 Model 690 FiGURe 3-0. FRaMe & COveR aSSeMBlY Oct. 2002...
- Page 67 Model 690 Figure & Item No. Part No. Description Qty. FRAME & COVER ASSEMBLY 39796 WELDMENT – CONTROL PANEL FRONT ......53669 GUARD – POWER SWITCH ........... √ 29898 SWITCH – POWER ..............70591 REAR SHROUD – ACCESS ASSEMBLY ....... 58258 .
- Page 68 Model 690 Figure & Item No. Part No. Description Qty. CONTROL PANEL √ 14418 KIT-CONTROL ASSY/AIR SWITCH MONITOR.- SMS-DOM ..√ 14245 KIT-CONVERSION TO SMS-DOM ..........√ 14427 KIT-CONTROL -240V-NON-SMS TO SMS-DOM ......√ 14749 KIT-CONTROL -AIR SWITCH MONITOR - INT’L ...... √...
- Page 69 Model 690 Figure & Item No. Part No. Description Qty. ELECTRICAL CONTROLS √ 60207 TRANSFORMER ASSY – 120V........... √ 60536 TRANSFORMER ASSY – 24V/230V........... SC03-005 SCREW ..................√ 140049 KIT - RELAY - 120V - SN: AP0903010 & Below ......√...
- Page 70 Model 690 Figure & Item No. Part No. Description Qty. 3-3A FRYPOT COVERS & INSULATION 52799 ASSY-INSUL/LFT. C/CHAMBER ........... 52041 INSULATION-C/CHAMBER MOUNTIN ........52798 ASSY-INSUL/RT. C/CHAMBER ............. 52800 ASSY-INSUL/REAR C/CHAMBER ..........52038 INSULATION-LOWER CHAMBER DUC ........52040 INSULATION-REAR C/CHAMBER ..........51897 INSULATION-LOWER CHAMBER COV ........
- Page 71 Model 690 Figure & Item No. Part No. Description Qty. 3-3B INSULATION COVERS WA02-001 WASHER – INSULATION 1-1/2” DIA......... 51763 INSULATION COVER – LEFT ..........51892 INSULATION – C/CHAMBER SIDE ........51765 INSULATION COVER – RIGHT .......... 51759 INSULATION COVER – REAR..........51893 INSULATION –...
- Page 72 Model 690 FiGURe 3-4. liD & COveR aSSeMBlY July 2007...
- Page 73 Model 690 Figure & Item No. Part No. Description Qty. LID & COVER ASSEMBLY 35792 LID INSTRUCTION LABEL ..........35675 FILLER-LID ................35243 COVER-MAIN LID ............... 35413 PLATE-TRIP ................√ 52627 PRESSURE PAD ASSY............49852 . BUSHING-PRESSURE PAD ..........SC01-204 .
- Page 74 Model 690 FiGURe 3-5. DRaiN PaN & FilteR aSSeMBlY Aug. 2010 3-10...
- Page 75 Model 690 Figure & Item No. Part No. Description Qty. DRAIN PAN & FILTER ASSEMBLY 52194 CRUMB CATCHER (OPTIONAL) (REQUIRES ITEM 10) ..03204 CRUMB CATCHER BASKET W/HANDLE (OPTIONAL) ..(FITS INSIDE FRYPOT) 21010 . “COLD ZONE” CRUMB CATCHER BASKET ASSEMBLY .. 24429 .
- Page 76 Model 690 FiGURe 3-6. FilteR PUMP aSSeMBlY (BelOw SN: aP0401001) Aug. 2010 3-12...
- Page 77 Model 690 Figure & Item No. Part No. Description Qty. FILTER PUMP ASSEMBLY (BELOW SN: AP0401001) 18107 CONDUIT CONNECTOR 3/8 x 90 ..........54484 BLOWER/PUMP – FLExIBLE CONDUIT ........√ 17476 PUMP SEAL KIT ................18105 ANTI SHORT 3/8 INCH ..............18644 CONDUIT CONNECTOR 3/8 x 90 ..........
- Page 78 Model 690 FiGURe 3-7. FilteR PUMP aSSeMBlY (SN: aP0401001 & aBOve) Sept. 2005 3-14...
- Page 79 Model 690 Figure & Item No. Part No. Description Qty. FILTER PUMP ASSEMBLY (SN: AP0401001 & ABOVE) 18107 CONDUIT CONNECTOR 3/8 x 90 ..........54484 BLOWER/PUMP – FLExIBLE CONDUIT ......... √ 17476 PUMP SEAL KIT ................18105 ANTI SHORT 3/8 INCH ............... 18644 CONDUIT CONNECTOR 3/8 x 90 ..........
- Page 80 Model 690 FiGURe 3-8. GaS BURNeR aSSeMBlY Oct. 2012 3-16...
- Page 81 Model 690 Figure & Item No. Part No. Description Qty. GAS BURNER ASSEMBLY SC01-084 . SCREW #10-32 X 3/8 HEX HD S ..........NS02-001 . NUT HEX KEPS #10-32 C ............√ 88254 FLAME SENSOR- (AP1101001 & After) ........assembly’s listed below do not include flame sensor √...
- Page 82 Model 690 FiGURe 3-9. GaS PiPiNG & CONtROlS April 2012 3-18...
- Page 83 Model 690 Figure & Item No. Part No. Description Qty. GAS PIPING & CONTROLS FP01-117 ELBOW ..................... FP05-010 FITTING 3/8 TUBE TO 1/4 NP ............65173 MANIFOLD TUBE – LEFT ............. 65173 MANIFOLD TUBE – RIGHT ............FP01-115 NIPPLE – 3/8 to 1/2 NP..............FP01-112 1/2 NPT FEMALE PIPE TEE B.I.
- Page 84 Model 690 Figure & Item No. Part No. Description Qty. 3-10 BURNER TUBES 54480 BRACKET ASSY – HIGH LIMIT SENSING BULB ....62051 CLIP – SPREADER – HEAT TUBE ..........53670 SPACER – HIGH LIMIT ............... √ 16738 450 HIGH LIMIT – NON CE ............√...
- Page 85 Model 690 Figure & Item No. Part No. Description Qty. 3-11 CARRIER & RACKS 62183 CARRIER ASSY ................44782 RACK HALF SIZE – 8 HEAD FRYER ........35308 WELMENT - RACK HANDLE ............ Dec. 2009 3-21...
- Page 86 Model 690 Figure & Item No. Part No. Description Qty. 3-12 VACUUM SWITCH 60202 TUBE-VACUUM SWITCH ..............√ 14240 KIT - VACUUM SWITCH - VERITCAL ........... √ 72514 VACUUM SWITCH – VERTICAL (Included in 14240 Kit) ....√ 72515 VACUUM SWITCH–VERTICAL-CE (SN: AP0802029 & ABOVE) (SN: AP0802028 &...
- Page 87 Model 690 3-13. DeaDweiGHt & SOleNOiD aSSeMBlY (SN: aP082029 & aBOve) Aug. 2010 3-23...
- Page 88 Model 690 Figure & Item No. Part No. Description Qty. 3-13 DEADWEIGHT & SOLENOID ASSY (SN: AP082029 & ABOVE) √ 1 16910 PRESSURE GAUGE ............√ 2 59742 RELIEF VALVE ASSY............FP01-127 ELBOW, STREET, ½ x ½, 90 DEGREE ......FP01-063 REDUCER, ½...
- Page 89 Model 690 Figure & Item No. Part No. Description Qty. 3-14A STEAM BOx & HOSE ASSY (SN: AP082029 & UP) 35686 TUBE, DW TO ExHAUST STACK SS ......MS01-297 HOSE CLAMP, SS - .500 – 1.062 DID ......70569 TUBE, ExHAUST CONNECT ......... 35696 WELDMENT, STEAM ExHAUST BOx LID ....
- Page 90 Model 690 FiGURe 3-14B. SteaM BOx & HOSe aSSeMBlY SN: aP0802028 & BelOw Aug. 2010 3-26...
- Page 91 Model 690 Figure & Item No. Part No. Description Qty. 3-14B STEAM BOx & HOSE ASSEMBLY (SN: AP0802028 & BELOW) 56335 BRACKET – CONDENSATE BOx ........... 21878 TUBING – STEAM ExHAUST ............42508 TUBING – STEAM ExHAUST-UNITS BUILT BEFORE 8/98 ..51748 CONDENSATE DRAIN HOSE ............
- Page 92 Model 690 FiGURe 3-15. FlUe aSSeMBlY & BlOweR SN: AP0802028 & BELOW July. 2008 3-28...
- Page 93 Model 690 Figure & Item No. Part No. Description Qty. 3-15 FLUE ASSEMBLY & BLOWER (SN: AP0802028 & BELOW) 55681 FLUE ASSY – WELDMENT ............55783 BRACKET – FLUE RETAINING ..........SC03-005 SCREW SD #8 X 1/2 PH PHD ............√...
- Page 94 Model 690 FiGURe 3-16. FlUe aSSeMBlY & BlOweR SN: AP0802029 & ABOVE Aug. 2010 3-30...
- Page 95 Model 690 Figure & Item No. Part No. Description Qty. 3-16 FLUE ASSEMBLY & BLOWER (SN: AP0802029 & ABOVE) 70582 FLUE ASSY – WELDMENT ............SC02-041 #8-32 x 7/16 PH IND xTRNL TRx ..........NS02-002 NUT KEPS 1/4-20 C ..............√...
- Page 96 Model 690 FiGURe 3-17. SOleNOiD valve aSSeMBlY Sept. 2005 3-32...
- Page 97 Model 690 Figure & Item No. Part No. Description Qty. 3-17 SOLENOID VALVE ASSEMBLY 17121 VALVE, SOLENOID 120V, 60 Hz ..........18721 VALVE, SOLENOID 208-240V, 60 Hz ......... 18724 VALVE, SOLENOID 208-240V, 50 Hz ......... √ 17120 . KIT, SOLENOID VALVE REPAIR ..........17101 .
- Page 98 Model 690 FiGURe 3-18. FRYPOt & DRaiN PiPiNG Oct. 2008 3-34...
- Page 99 Model 690 Figure & Item No. Part No. Description Qty. 3-18 FRYPOT & DRAIN PIPING √ 14330 PROBE ASSY – DOMESTIC ............√ 14266 KIT-CE PROBE CONNECTOR RETROFIT (probe not included) .. (CE units built prior to NOV. 1, 1999) 16226 NIPPLE 1/2 x 3-1/2 ................
- Page 100 Model 690 FiGURe 3-19. liFt BeaM & SHROUDS SN: AP0802028 & BELOW July 2008 3-36...
- Page 101 Model 690 Figure & Item No. Part No. Description Qty. 3-19 LIFT BEAM & SHROUDS (SN: AP0802028 & BELOW) 55678 ASSY – I-BEAM/LIFT FRAME ........... 51548 . LIFT I-BEAM ................55677 . LIFT FRAME ASSY – WELDMENT ........NS02-008 . . NUT ................... SC01-212 .
- Page 102 Model 690 FiGURe 3-20. COUNteRweiGHt & PUlleY SYSteM (SN: AP0802028 & BELOW) July 2008 3-38...
- Page 103 Model 690 Figure & Item No. Part No. Description Qty. 3-20 COUNTERWEIGHT & PULLEY SYSTEM (SN: AP0802028 & BELOW) 51677 PULLEY PLATE ................35962 BRACKET/WHEEL ASSY ............√ 140225 KIT-CABLE (2 CABLES) ............. SC01-022 SCREW 1/4-20 X 3/4 HEX HD C ..........NS02-002 NUT KEPS 1/4-20 C ..............
- Page 104 Model 690 Figure & Item No. Part No. Description Qty. 3-21 COUNTERWEIGHT SYSTEM (SN: AP0802029 & ABOVE) 35026 ARM, LID SUPPORT ............√ 2 140225 KIT-CABLE (2 CABLES) ..........NS01-025 NUT, HEX 5/16-18 SS ............LW01-010 WASHER, 3/8 SPLIT RING SS......... 35092 CARRIAGE ...............
- Page 105 Model 690 Figure 3-22. FaSt Ready Parts Oct. 2004 3-41...
- Page 106 Model 690 Figure & Item No. Part No. Description Qty. 3-22 FAST READY PARTS 66287 ASSY - 392/692 - 120V FAST HEADER ....66288 ASSY - 392/692 - 230V FAST HEADER - CE ..66385 ASSY - 392/692 - 220-240V FAST HEADER ... 66241 STUD ASSY - 392/692 CONTROL PNL ....
Need help?
Do you have a question about the PFG-690 and is the answer not in the manual?
Questions and answers