Advertisement
English version
Introduction
• Do not expose the Sweex Wireless Broadband Router 300 Mbps to extreme temperatures. Do not place the device in direct sunlight or in the
direct vicinity of heating elements.
• Do not use the Sweex Wireless Broadband Router 300 Mbps in extremely dusty or moist surroundings.
• Protect the device against powerful shocks or jolts - they may damage the internal electronics.
• Never attempt to open the device yourself - it will cause the warranty to lapse.
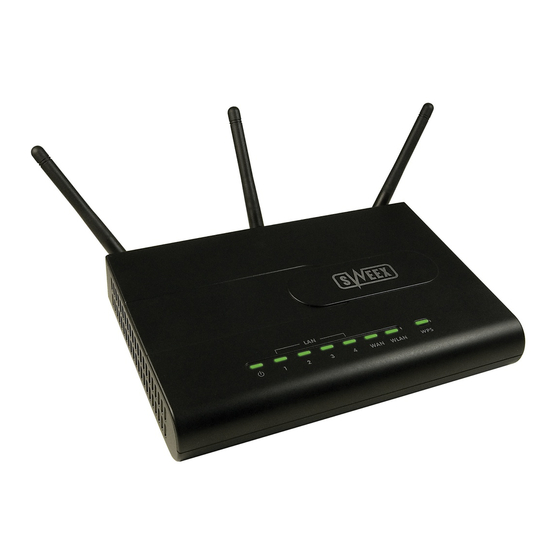
Front or top view of the modem
LED indicators
Power
1 - 4
1 - 4
WAN
WAN
WLAN
WLAN
WPS
WPS
LW300/LW300UK Sweex Wireless Broadband Router 300 Mbps
Status
Meaning
On
Indicates that the modem is switched on.
On
Indicates that a computer is connected to the relevant port.
Blinking
Indicates activity between the relevant computer and the router
On
The connection with the Internet modem is ok.
Blinking
Indicates activity between the router and the modem.
On
Indicates activity between the router and the modem.
Blinking
Indicates activity between the wireless computer(s) and the router.
On
There is a connection with a wireless adapter with WPS (WiFi Protected Setup).
Blinking
A WPS connection is being established.
Advertisement
Table of Contents

Subscribe to Our Youtube Channel
Related Manuals for SWEEX LW300


Summary of Contents for SWEEX LW300
- Page 1 LW300/LW300UK Sweex Wireless Broadband Router 300 Mbps Introduction • Do not expose the Sweex Wireless Broadband Router 300 Mbps to extreme temperatures. Do not place the device in direct sunlight or in the direct vicinity of heating elements. • Do not use the Sweex Wireless Broadband Router 300 Mbps in extremely dusty or moist surroundings.
- Page 2 3. Switch on the modem* again. Note: Here we do not refer to the Sweex router. Connect the modem to the rear of the router using a network cable (RJ-45 UTP). Do this via the WAN port The WAN light at the front of the router will light up. In the event the light fails to light up, check whether the network cable is properly connected to the router and the modem.
- Page 3 English version Configuring the computer to connect to the router Windows Vista In the bottom left of your screen, go to “Start” (Start) “Control Panel” (Control Panel). Click on “View network status and tasks” (View network status and tasks). Left in the column, click on “Manage network connections” (Manage network connections).
- Page 4 English version Right-click “LAN Connection” (LAN Connection) or “Wireless Network connection” (Wireless Network connection) and select “Properties” (Properties). The following screen appears: Now select “Internet Protocol Version 4 (TCP/IPv4)” and click “Properties” (Properties). Select the options “Obtain an IP address automatically” (Obtain an IP address automatically) and “Obtain DNS server address automatically” (Obtain DNS server address automatically).
-
Page 5: Windows 2000
English version Under the tab “General” select TCP/IP and click “Properties” Select the options “Obtain an IP address automatically” and “Obtain DNS server address automatically”. Confirm the settings by clicking “OK”. The network settings for Windows XP have now been configured correctly. The correct settings for the Internet browser will be discussed later in this manual. - Page 6 English version Now select “Internet Protocol (TCP/IP)” and click “Properties” Select the options “Obtain an IP address automatically” and “Obtain DNS server address automatically”. Click “OK” twice. The network settings for Windows 2000 have now been configured correctly. The correct settings for the Internet browser will be discussed later in this manual.
- Page 7 English version Under the tab “IP Address”, select the option “Obtain an IP address automatically”. Under the tab “Gateway”, the list of “Installed gateways” must be empty. If so required, select each gateway and click “Remove”. Under the tab “DNS Configuration”, select the option “Disable DNS”. Click “OK” twice. The network settings for Windows 98SE have now been configured correctly.
-
Page 8: Setting The Wireless Network
Right-click “LAN Connection” or “Wireless Network Connection” and select “View Available Wireless Networks”. Always click “Refresh network list” top left in this window first, to obtain the most recent listing. Select the name (also referred to as SSID) “Sweex LW300” by clicking it once. Now click “Connect”. - Page 9 We recommend securing the wireless part of the router. How to do this is described further down in this manual. Once secured, the network will show as “Sweex LW300” with a message below detailing “Security-enabled wireless network”. When connecting to this secured network, you will be prompted for the “Network key”.
-
Page 10: Wireless Settings And Security
Setting the Internet Provider (ISP) Prior to setting the provider, make sure that the Internet connection is active without the Sweex Broadband Router. If the modem without the router does not have an Internet connection, setting the router would be pointless. After all, the modem establishes the Internet connection and the Sweex Broadband Router forwards this existing Internet connection to one or more computers in your network. -
Page 11: Securing The Wireless Network
English version The default SSID is “Sweex LW300”. We recommend not changing this so you can always recognise the router. Here you can also find other options such as “Channel” and “Mode”. We again recommend maintaining the default values. You can enable or disable the wireless part under “Disabled Wireless LAN Interface”. - Page 12 English version WPS (WiFi Protected Setup) You can protect your wireless network in a quick and simple manner by means of WPS. This feature only works with computers that use a wireless card or USB dongle that supports WPS. 1. The WPS feature is enabled by pressing the WPS button at the top of the router. The light will start to blink. 2.
- Page 13 English version 1. Under “Security Type” select “WPA-PSK/WPA2-PSK”. 2. Under “WPA Passphrase”, enter your network key. You can create your own and it may contain 8 to 63 numbers and letters. 3. Click “Apply Changes” to save the settings. The router is now secured. Reconnect your wireless computer. Opening ports in the router (Port Forwarding and DMZ) The built-in firewall in this router cannot be disabled.
- Page 14 English version By clicking “Port Forwarding” left in the column the port settings can be changed. 1. Tick 1 in order to activate Port Forwarding. 2. Under 2, enter the IP address of the computer, server or game console for which you want to open the ports. In most cases, the IP address will start with 192.168.3…...
-
Page 15: Lan Settings
English version 1. Tick “Enable”. 2. Under 2, enter the IP address of the computer, server or game console for which you want to open the ports. In most cases, the IP address will start with 192.168.3… LAN settings The network settings of the router can be changed as follows. Left in the column, click “Advanced Config". Under “IP Address”, the IP address of the router (192.168.3.1) is stated. -
Page 16: Warranty
Now click “Browse” (Browse) and select the extracted firmware file. In most cases the name of this file will start with “Sweex_Firmware_ LW300…”. In order to start the firmware upgrade, click “Upload”. Do not interrupt this procedure. This may harm the router. Wait for the upgrade to be completed confirmed by a message.
Need help?
Do you have a question about the LW300 and is the answer not in the manual?
Questions and answers