Table of Contents
Advertisement
Quick Links
Advertisement
Table of Contents

Related Manuals for Ransomes Highway 3


Summary of Contents for Ransomes Highway 3
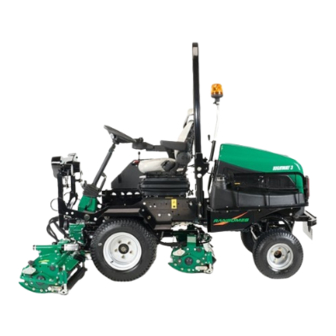
- Page 1 25057G-GB (rev.0) ® QUICK START GUIDE Ransomes Highway 3™ Ride on Reel Mower STARTING THE ENGINE SEAT ADJUSTMENT CONTROLS DRIVING MOWING VISUAL DISPLAY Refer To The Safety, Operation And Maintenance Manual For Full Operating Instructions. RJL 100 June 2013 United...
- Page 2 QUICK START GUIDE Ransomes Jacobsen Limited reserves the right to make design changes without obligation to make these changes on units previously sold and the information contained in this manual is subject to change without notice. © 2013, Ransomes Jacobsen Limited. All Rights Reserved...
-
Page 3: Starting The Engine
QUICK START GUIDE STARTING THE ENGINE BEFORE YOU OPERATE FOR THE FIRST TIME • Check and adjust tyre pressure, if necessary, see Safety, Operation and Maintenance manual. • If necessary, add diesel fuel to tank. • Check engine oil and if necessary fill. •... -
Page 4: Seat Adjustment
QUICK START GUIDE SEAT ADJUSTMENT SEAT (GRAMMER MSG85) The position of the operator weight adjust lever (C) is on the front of the seat. To Adjustments to the seat can be made for leg change the operator weight setting pull the reach, backrest angle and operator weight to lever out. -
Page 5: Steering Wheel Adjustment
QUICK START GUIDE STEERING WHEEL ADJUSTMENT STEERING TILT CONTROL When the operators seat is in the correct position to operate the traction pedal comfortably. Push the small foot pedal (A) at the base of the steering column. Tilt the column backward or forward to the correct position. - Page 6 QUICK START GUIDE CONTROLS CONTROL PANEL AND POD (ROPS) Starter Key Switch Right hand Unit Lift/Lower Throttle Control Lever Centre Unit Lift/Lower Parking Brake Switch M. Left hand Unit Lift/Lower Hazard Warning Switch PTO engaged Cutter Switch Right hand cutting unit in cutting position.
-
Page 7: Starter Key Switch
QUICK START GUIDE CONTROLS STARTER KEY SWITCH PARKING BRAKE SWITCH When the engine is in operation, the Parking brake is applied by depressing the switch and holding for about 5 seconds. Turn the starter key to the right to start the When the engine is not in operation, or the engine. -
Page 8: Backlap Switch
QUICK START GUIDE CONTROLS CUTTER SWITCH 4 WHEEL DRIVE IN REVERSE SWITCH Engages the four wheel drive while the To start to cut make sure the speed limiter is vehicle is in reverse. The switch must be in mow position and the units are lowered. held to engage. - Page 9 QUICK START GUIDE DRIVING Release brake - Make sure the parking brake is released before you try to go forward or reverse. Forward - Carefully push the top (A) of the forward/reverse foot pedal to reach correct ground speed. Reverse - Carefully push the bottom (B) of the forward/reverse foot pedal to reach correct ground speed.
- Page 10 QUICK START GUIDE MOWING Release the transport latches (A) and lower the cutting units with the joysticks. Make sure the speed limiter is in mow position (B). (Cutting at a higher speed can be dangerous and decrease the quality of cut.) To start the reel mechanism push the lower half of cutter switch .
-
Page 11: Visual Display
QUICK START GUIDE VISUAL DISPLAY The display is activated when the ignition is START UP SLOPE WARNING SCREEN turned on. START UP SCREEN 19° 1234.5 16° When the ignition switch is turned to crank one of the following screens will be shown. When first turned on,this screen is shown. -
Page 12: Main Run Screen
QUICK START GUIDE VISUAL DISPLAY If the temperature increases to 108°C, the MAIN RUN SCREEN RED LEDs (A) will flash at a rate of two flashes every four seconds. The warning buzzer will sound at the same rate and the “CLEAR BUGSCREEN”... - Page 13 QUICK START GUIDE VISUAL DISPLAY SLOPE WARNING SCREENS If the slope angle reaches 22º the screen will display this warning that indicates that at 22deg the centre and upper unit will be raised 4"- 6” above the ground to improve 16°...
-
Page 14: Data Logging Menu
QUICK START GUIDE VISUAL DISPLAY unless the button is held. If held for one The first service is at 50 hours, after the first second the unit increases at a rate of three service the interval is 250 hours. units per second. Pressing the checkmark will move the line to the next unit to be DATA LOGGING MENU adjusted. -
Page 15: Language Menu
QUICK START GUIDE VISUAL DISPLAY LANGUAGE MENU Language Menu English Deutsch Francais Danish Swedish Dutch When you access the language selection page, the checkmark appears next to the selected language. When the checkmark is moved up and down, the language does not change until button four is used to select and store the language. - Page 16 Europe & Rest of The World Except North & South America Ransomes Jacobsen Limited West Road, Ransomes Europark, Ipswich, IP3 9TT English Company Registration No. 1070731 www.ransomesjacobsen.com North & South America Jacobsen, A Textron Company 11108 Quality Drive, Charlotte, NC 28273, USA...
Need help?
Do you have a question about the Highway 3 and is the answer not in the manual?
Questions and answers