
Related Manuals for Chef's Choice PizzellePro Toscano 834


Summary of Contents for Chef's Choice PizzellePro Toscano 834
- Page 1 International ® PizzellePro English Français Instructions & Recipes for Model 834 Instructions et recettes pour le modèle 834 © 2010 EdgeCraft Corp.
-
Page 2: Important Safeguards
IMPORTANT SAFEGUARDS When using electrical appliances, basic safety precautions should always be followed including the following: ® ™ 1. Read all instructions before using the PizzellePro Toscano 2. Do not touch hot surfaces. Always use plastic handle on lid and do not touch stainless cover when hot. - Page 3 YOU MADE A GOOD CHOICE ® ™ he PizzellePro Toscano Model 834 comes to you from ® ® Chef’sChoice , known for the unique electronic WafflePro Series of waffle makers and as the supplier of the world’s finest professional household gourmet products. You will find that the ®...
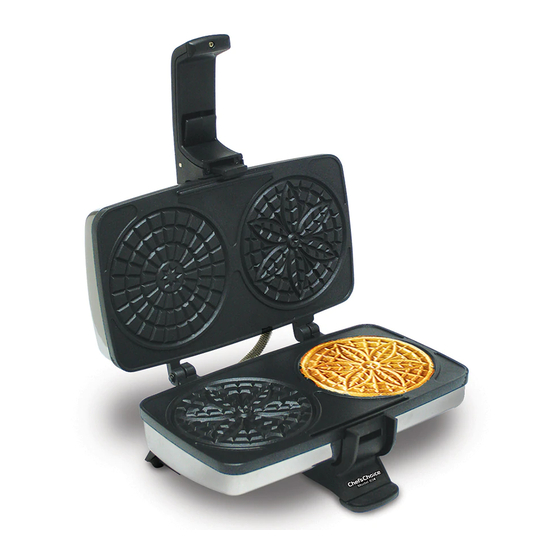
- Page 4 ® GETTING TO KNOW THE PIZZELLEPRO TOSCANO™ ® Take a minute to identify the key features and controls of the PizzellePro , (Figure 1). To open the lid, release the locking latch (Figure 2) and lift the insulated front plastic handle. Note the red light on the handle (Figure 1), which is “on”...
- Page 5 ® PREPARING THE PIZZELLEPRO FOR BAKING ® Insert the PizzellePro power cord into a grounded 120 volt, 60 cycle outlet and close the cover. The red light will turn on immediately, indicating the pizzelle plates are heating. As you close the lid, the latching mechanism under the lid handle should snap securely, locking down the lid.
- Page 6 4. When the pizzelles are done, release the latch and open the lid. Lift and remove the pizzelles with a plastic fork or small plastic spatula in order to minimize scratching of the non-stick surface. After removing the pizzelles, you can immediately spoon the new batter and repeat ®...
- Page 7 You can adjust the amount of baking powder slightly in any recipe. It is necessary to use just enough to ensure that the two pizzelles fill out completely during the baking cycle. More than that will do little for the texture and increase the likelihood that the pizzelles will spread beyond the design borders of the patterns.
- Page 8 Chocolate Pizzelles For a special treat try our chocolate flavored pizzelles. Using Catarina Casola’s pizzelle recipe above (based on 6 eggs) mix and completely blend all ingredients as described above. Then melt 6 ounces of semi-sweet chocolate placed in a small bowl in the microwave or in a small saucepan warmed over a very low heat.
- Page 9 delicious cannoli recipes, kindly provided by Caterina Casola of Buffalo, New York and Marie Doria of Chicago, Illinois. Traditional Italian Cannoli Filling (Mrs. Caterina Casola) Another recipe from the Casola family refined over generations in Italy. 1 lb. Ricotta cheese ⁄...
- Page 10 Maria Doria’s Optional Cannoli Filling Recipe This is an American variation adding cream for a smoother filling. 1 pound Ricotta cheese 2 tablespoons heavy cream ⁄ cup granulated sugar 3 tablespoons orange liquor 2 ounces finely chopped semisweet chocolate 3 tablespoons chopped mixed candied fruits Fills 6-8 cannoli shells.
-
Page 11: Cleaning And Storage
CORD SAFETY A short power supply cord is provided with this appliance to reduce the risk of someone ® becoming entangled in or tripping over a longer cord and causing the PizzellePro to overturn, spilling its hot contents. While EdgeCraft does not recommend it, extension cords are available and may be used if care is exercised in their use. - Page 12 Limited Warranty: Used with normal care, this EdgeCraft product is guaranteed against defective material and workmanship for a period of one (1) year from the date of original purchase (“Warranty Period”). We will repair or replace, at our option, any product or part that is defective in material or workmanship without charge if the product is returned to us postage prepaid with dated proof of purchase within the Warranty Period.
Need help?
Do you have a question about the PizzellePro Toscano 834 and is the answer not in the manual?
Questions and answers