Lincoln Electric ASPECT 300 Operator's Manual
Hide thumbs
Also See for ASPECT 300:
- Operator's manual (29 pages) ,
- Service manual (95 pages) ,
- Operator's manual (28 pages)

Related Manuals for Lincoln Electric ASPECT 300


Summary of Contents for Lincoln Electric ASPECT 300
- Page 1 IM2051 07/2014 REV01 ASPECT™ 300 OPERATOR’S MANUAL ENGLISH Lincoln Electric Bester Sp. z o.o. ul. Jana III Sobieskiego 19A, 58-263 Bielawa, Poland www.lincolnelectric.eu...
-
Page 2: Declaration Of Conformity
EN 60974-1:2005, EN 60974-10:2007, EN 55011:2007 (Class A), EN 61000-3-12:2011, EN 61000-3-3:2008, EN 61000-3-11:2000 24.10.2013 Paweł Lipiński Operations Director Lincoln Electric Bester Sp. z o.o., ul. Jana III Sobieskiego 19A, 58-263 Bielawa, Poland 12/05 English English... -
Page 3: Table Of Contents
12/05 THANKS! For having choosen the QUALITY of the Lincoln Electric products. Please Examine Package and Equipment for Damage. Claims for material damaged in shipment must be notified immediately to the dealer. For future reference record in the table below your equipment identification information. Model Name, Code &... -
Page 4: Technical Specifications
Technical Specifications INPUT Input Voltage U EMC Class Frequency 230 - 400Vac ± 15% 50/60 Hz Input Line Mode 100% Input Amperes I PFmax 1max STICK 10.3kW 8.8 kW TIG DC 8.8kW 6.4 kW 4.8kW 230Vac 27.4 A 0.94 STICK AC 9.6kW 8.3kW 6.9kW... -
Page 5: Electromagnetic Compatibility (Emc)
Lincoln Electric. The Class A equipment is not intended for use in residential locations where the electrical power is provided by the public low-voltage supply system. -
Page 6: Safety
Failure to follow the instructions in this manual could cause serious personal injury, loss of life, or damage to this equipment. Read and understand the following explanations of the warning symbols. Lincoln Electric is not responsible for damages caused by improper installation, improper care or abnormal operation. -
Page 7: Installation And Operator Instructions
SAFETY MARK: This equipment is suitable for supplying power for welding operations carried out in an environment with increased hazard of electric shock. EQUIPMENT WEIGHT OVER 30kg: Move this equipment with care and with the help of another person. Lifting may be dangerous for your physical health. CYLINDER MAY EXPLODE IF DAMAGED: Use only compressed gas cylinders containing the correct shielding gas for the process used and properly operating regulators designed for the gas and pressure used. -
Page 8: Output Connections
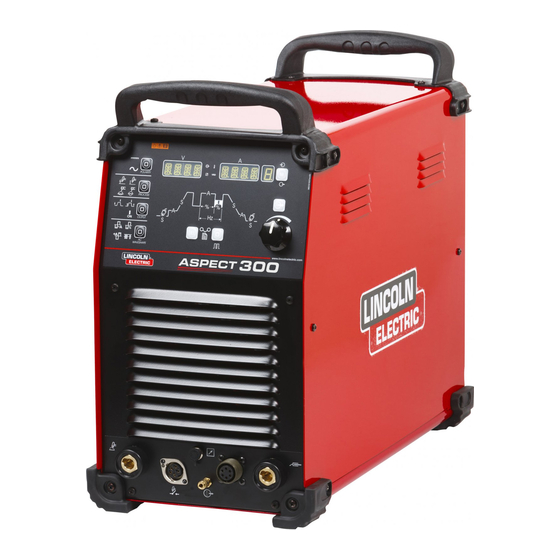
Vac frequency: in the range of 50 and 60Hz Connect the torch cable RMS voltage of the AC waveform: 230Vac ± 15% to the torch terminal of the machine and the It is important to check these conditions because many work clamp to the work engine driven generators produce high voltage spikes. - Page 9 Rear Panel Controls and Operational Features Power Switch: It Machine Start-Up: turns ON / OFF the When the machine is turned ON an auto-test is input power to the executed. machine. The Machine is ready to operate when on the Front Control Panel lights up the “Power ON”...
- Page 10 NOTE: Pressing the button assigned to process TIG mode: in Local and remote mode the POLARITY will toggle the illumination of the icon output of the machine is OFF. A Trigger is between DC & AC polarity. necessary to enable the output. Process: The Output Current range selectable from the Remote command depends by the Machine’s user...
- Page 11 To enable Expert mode: Operating Amperage: Sets the Push the AC WAVESHAPE button twice: The amperage for all welding process permitted. AUTO icon will start to blink and the display will show the message AUTO ON. Turn the encoder to select AUTO OFF Final Slope: Sets the time in ...
- Page 12 This knob is also a multi-purpose command: see the OPERATION: “Operating Instruction” section for a description of how to use this command for parameter selection. 1.) Press Memory button to highlight “Memory Save” icon; Displays: 2.) Turn Control Knob to Select memory location; 3.) Press and hold memory button for 3 seconds.
- Page 13 Operating Instruction For default the polarity is DC+. To change in DC- see menu operation section. DC Stick (SMAW) Welding See menu B to change value of hot start and arc force. To start DC Stick welding process: AC Stick Welding 1.) Set polarity 2.) To select Stick welding: To start AC Stick welding process:...
- Page 14 will remain on for 3 seconds; if the arc is not started in this time limit, the trigger sequence must be restarted. Tig Welding Sequences Without welding operation at each pressure of SEL push NOTE: The HF start strength is adjusted to the button, it’s possible to flow through sequencer and set tungstensize and type, which can be selected in menu A.
- Page 15 If the torch trigger is released during the upslope Release the TIG torch trigger to start the time the arc will stop immediately and the output of downslope. During this time press and hold the TIG the machine is turned OFF. torch trigger to restart welding.
- Page 16 As shown here, after As shown here, after the TIG torch trigger is the TIG torch trigger is quickly pressed and quickly pressed and released from step 3A, released from step 3A, it is possible to press it is possible to press and hold the TIG torch and hold the TIG torch trigger another time to...
- Page 17 List of parameters and Factory stored programs Displayed parameter Displayed value Selectable Value Range name Function Factory Configuration Default Current Preflow 0 - 25s (step 0.1s) selected value Current STRT Starting Current 10 – 200 % (step 1%) selected value Current Initial slope 0 –...
- Page 18 Advance menu Menu A To enter into Menu A see section Menu, described above Menu A Displayed Displayed parameter value name Selectable Value Range Function Factory Configuration Default 0.5mm (0.02”) 1mm (0.04”) Current 1.6mm (1/16”) Tungsten Size 2.4mm (3/32“) selected value 2.4mm (3/32”) (mm) 3.2mm (1/8”)
- Page 19 Menu B To enter into Menu B see section Menu, descriped above Menu B Displayed Displayed parameter name value Selectable Value Range Function Factory Configuration Default Current SOFT: 35% 0 – 75% (step 1%) FRCE Arc Force selected value CRISP: 75% 75 –...
- Page 20 Menu C To enter into Menu C see section Menu, descriped above Menu C Displayed Displayed value parameter name Selectable Value Range Function Factory Configuration Default Current UNIT Units mm / INCH selected value Current HOUR Arc Time 105 hours selected value (hour) Current...
- Page 21 If an error occurs, turn Off the machine, wait for a few seconds, then turn ON again. If the error remains, a maintenance is required. Please contact the nearest technical service center or Lincoln Electric and report the error code displayed on the meter of the Front Panel. Error code table Input voltage too low LED is blinking.
- Page 22 Maintenance WARNING For any maintenance or repair operations it is recommended to contact the nearest technical service center or Lincoln Electric. Maintenance or repairs performed by unauthorized service centers or personnel will null and void the manufacturers warranty. The frequency of the maintenance operations may vary in accordance with the working environment.
-
Page 23: Weee
12/05 Part List reading instructions Do not use this part list for a machine if its code number is not listed. Contact the Lincoln Electric Service Department for any code number not listed. Use the illustration of assembly page and the table below to determine where the part is located for your particular code machine.
Need help?
Do you have a question about the ASPECT 300 and is the answer not in the manual?
Questions and answers