Lexicon Lambda Owner's Manual
Lexicon lambda desktop recording studio
Hide thumbs
Also See for Lambda:
- Owner's manual (33 pages) ,
- Software installation manual (6 pages) ,
- Setup manual (2 pages)
Table of Contents
Advertisement
Quick Links
Advertisement
Table of Contents

Related Manuals for Lexicon Lambda


Summary of Contents for Lexicon Lambda
- Page 1 Owner’s Manual Complete reCording solution...
-
Page 2: Important Safety Instructions
IMPORTANT SAFETY INSTRUCTIONS WARNING FOR YOUR PROTECTION READ THESE INSTRUCTIONS: KEEP THESE INSTRUCTIONS HEED ALL WARNINGS FOLLOW ALL INSTRUCTIONS The symbols shown above are internationally accepted symbols DO NOT USE THIS APPARATUS NEAR WATER that warn of potential hazards with electrical products. The THE APPARATUS SHALL NOT bE ExPOSED TO DRIPPING OR SPLASHING lightning flash with arrowpoint in an equilateral triangle means LIqUID AND NO ObjECT FILLED WITH LIqUID, SUCH AS vASES, SHALL... -
Page 3: Electromagnetic Compatibility
Specifications noted on the Declaration Sandy, UT 84070, USA of Conformity. Operation is subject Declares that the product: to the following two conditions: Product name: Lexicon Lambda™ this device may not cause harmful • Note: Product name may be interference, and suffixed by the letters-EU. -
Page 4: Service Info
Be prepared to accurately describe the problem. Know the serial number of your unit, found on a sticker attached to the bottom of the Lambda Studio™. If you have not already taken the time to fill out your warranty registration card and send it in, please do so now. -
Page 5: Table Of Contents
Left/Right Line Outputs ..................12 MIDI In and Out ....................12 +48V Phantom Power Switch ................13 USB Port ........................ 13 CONNECTINg TO ThE lAMbdA STUdIO ..13 MONITORING CONNECTIONS ...........13 Connecting Headphones..................13 Connecting to Monitor Speakers ................13 Connecting to a Home Stereo ................ - Page 6 USINg ThE lExICON lAMbdA STUdIO™ ... 18 ® Section I – Recording audio With the Lambda Studio™ ........18 A. Recording using the Microphone/line Input ..........18 B. Recording a Guitar using the Instrument input ........25 Section II – Recording MIDI with the Lambda Studio ........26 Section III –...
-
Page 8: Introduction
MIDI synthesizers, the Lambda Studio hardware provides the professional-quality inputs and outputs, metering, and level controls that computer sound cards or built-in audio connections lack. So you can make full use of the Lambda Studio right away, we’ve included the popular Steinberg ®... -
Page 9: Unpacking The Lambda Studio
RAM than the minimum will allow you to do more processing and improve per- formance, and more disk space will allow you to record more tracks for a longer time. See the Lambda Studio Software Installation Guide and the Cubase LE 4 manual on the DVD for more information. -
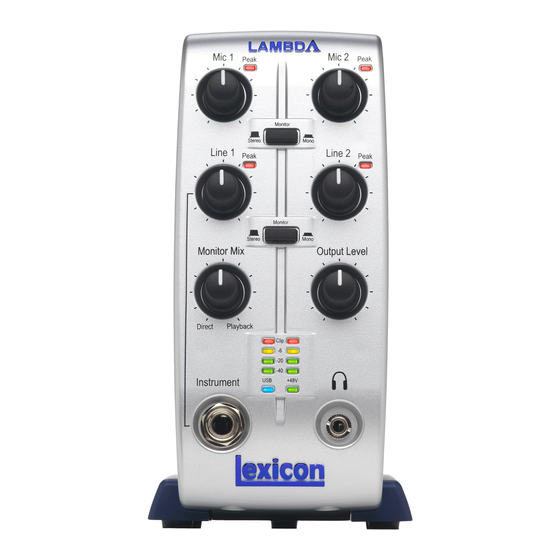
Page 10: The Front Panel
-6 on the Input Bargraph Meter, but never ThE FRONT PANEl lights the Clip LED The Lambda Studio™ front panel offers the following features: on the loudest sound you’ll be MIC 1-2 GAIN recording. If you These knobs adjust the input gain levels of the Mic 1 and Mic 2 inputs. -
Page 11: Monitor Mix Control
Adjust the gain with the Mic and Line knobs so that the -6 dB LED flashes only occa- sionally. USB LED When the blue USB LED is on, it shows the Lambda Studio is powered and communi- cating with your computer via USB, and audio and MIDI signals can pass in and out of the system. -
Page 12: The Rear Panel
MIDI USB Port ThE REAR PANEl The Lambda Studio™ rear panel offers the following features: LINE IN 1-2 These ¼" inputs can accept both balanced (3-conductor TRS) and unbalanced (2- conductor TS or instrument) audio sources. Each input gain is adjusted individually using the Line 1-2 gain knobs on the front panel. -
Page 13: Phantom Power Switch
STUdIO ™ The Lambda Studio is both a 4 x 2 x 2 mixer and a USB audio/MIDI interface that can be used in a variety of audio setups. This section describes how to make basic connec- tions for the following applications: •... -
Page 14: Connecting To A Home Stereo
CONNECTING TO A HOME STEREO Connect the Line Out 1-2 jacks on the rear panel of the Lambda Studio™ to the appropriate inputs on your stereo, typically the Tape In or Aux In jacks, using a ¼" to male phono (RCA) connector or adapter. Keep the Output Level knob on the Lambda Studio low at first, raising it slowly to match the level of other units connected to the stereo. -
Page 15: To Connect A Line Level Source
For the cleanest Plug a ¼" TS (unbalanced) or TRS (balanced) cable directly from the line level source into the desired Line In jack on the rear panel of Lambda Studio. Line level recording, adjust the sources include keyboards, drum machines, CD and cassette players, or external... -
Page 16: Mixing Within Cubase ® Le 4
Follow the on-screen instructions to install the USB drivers. WINDOWS vISTA AND xP You must install the USBdrivers after you’ve made the connection between your computer’s USB port and the USB port of the Lambda Studio™. -
Page 17: Macintosh Software Setup
Lambda Studio is connected to the USB port before the computer is turned on. The simplest way to avoid problems is to connect the Lambda Studio to the USB port after... -
Page 18: Using The Lexicon Lambda Studio
Plug your microphone cable into the Mic 1 XLR jack or line level audio source to the Line 1 ¼" jack on the back of the Lambda Studio. If the mic needs phantom power, engage the +48 V switch (on the back of the Lambda Studio). - Page 19 Recording Using the Microphone/Line Input 3. Select default and click OK. 4. Select a location to store the project (or use the default location) and click OK. You may want to create a new folder for every new project.
- Page 20 Recording Using the Microphone/Line Input To set the input of the track to record: 1. Click the Project menu and select Add Track > Audio. When the Add Audio Track dialog appears, make sure the Configuration is set to Mono and click OK. 2.
- Page 21 Recording Using the Microphone/Line Input 3. In the Inspector, click the Left - Stereo In box and select Stereo In - Left for the track input source. (Stereo In - Left relates to Line 1/Inst/Mic 1, Stereo In - Right relates to Line 2/Mic 2 inputs.) 4.
- Page 22 Recording Using the Microphone/Line Input 5. In the Audio 01 window, make sure the Input Monitoring button is not lit.
-
Page 23: Stop Button
Recording Using the Microphone/Line Input To check the input level from the microphone or Line Input: 1. If you are using a mic and have connected the Lambda Studio™ to some moni- tors, turn them down or off to avoid feedback. - Page 24 5. In the Audio 02 window, make sure the Input Monitoring button is not lit. To set monitor levels for a comfortable listening level: 1. On the front of the Lambda Studio hardware, locate the Monitor Mix knob. Input Louder Playback Louder...
-
Page 25: Recording A Guitar Using The Instrument Input
The Instrument input uses the same recording channel as the Line 1 input; anything plugged into the ¼" Line 1 input jack on the back of the Lambda Studio will not be recorded when a cable is connected to the ¼" Instrument input jack on the front panel. -
Page 26: Section Ii - Recording Midi With The Lambda Studio
7. Click the Play button to listen to the track you have just recorded. Play Button SECTION II - RECORDING MIDI WITH THE LAMBDA STUDIO™ The Lambda Studio™ also functions as a MIDI interface. This allows you to record MIDI data into a MIDI track of Cubase ®... - Page 27 ® 1. To record MIDI data into the computer, connect the MIDI out from the keyboard to the MIDI In on the Lambda Studio. Connect the MIDI Out from the Lambda Studio hardware to the MIDI in on the keyboard.
-
Page 28: Section Iii - Using Software Input Monitoring
ASIO control panel. See page 30 for more information about adjusting buffer set- tings. 1. When using Cubase LE 4’s input software monitoring with the Lambda Studio, you will want to set the Monitor Mix knob all the way to the Playback side. - Page 29 Using Software Input Monitoring 4. Left click on an Insert space and select Earlier VST Plug-ins, Lexicon ®, Pantheon™. 5. Select Lexicon and Pantheon™. ®...
-
Page 30: Section Iv - Adjusting The Buffer Settings
Using Software Input Monitoring 6. Because this is an insert effect, move the Mix slider to 50% (see the Pantheon manual for more details). 7. Change the level to about -52dB. Now you will record with the Lexicon ® Pantheon Reverb on your track. -
Page 31: Adjusting The Buffers In Windows ® Xp
1. Open Cubase ® 2. Under VST Audio System, click on Lambda ASIO. 3. Click the Control Panel button. You will now see the ASIO control panel. Move the slider left (More CPU) to decrease latency but increase the chance of pops and clicks, or right (Less CPU) to increase latency but decrease the chance of pops and clicks. -
Page 32: Specifications
95 dB typical, A-weighted, 20 Hz - 20 kHz Power Requirements: USB powered Dimensions: 6.5 x 6.7 x 3.4 Weight: 1.92 lbs. Lexicon engineers are constantly working to improve the quality of our products.Specifications are therefore subject to change without notice. -
Page 33: Signal Routing Diagram
Lexicon Lambda Studio™ Signal Routing Diagram ®... - Page 36 Lambda Desktop Recording Studio™ Harman Music Group Questions or comments? 8760 South Sandy Parkway | Sandy, Utah 84070 U.S.A. Email us at: customer@lexiconpro.com Phone: (801)-568-7660 | Fax: (801)-568-7662 or visit our World Wide Web home page at: www.lexiconpro.com Copyright 2007 Lexicon Professional Part Number: 18-0350V-D ®...
Need help?
Do you have a question about the Lambda and is the answer not in the manual?
Questions and answers