Table of Contents
Advertisement
Advertisement
Table of Contents

Related Manuals for Simmons SD 100


Summary of Contents for Simmons SD 100
- Page 1 Electronic Drum Kit own er’ s m an ual www.simmonsdrums.net www.SimmonsDrums.net...
-
Page 2: Safety Instructions
SD100KIT Electronic Drum Kit owner’s manual safety instructions THE LIGHTNING FLASH WITH ARROWHEAD SYMBOL WITHIN AN EQUILATERAL TRIANGLE IS INTENDED TO ALERT THE USER TO THE PRESENCE OF UNINSULATED DANGEROUS VOLTAGE WITHIN THE PRODUCTS ENCLOSURE THAT MAY BE OF SUFFICIENT MAGNITUDE TO CONSTITUTE A RISK OF ELECTRIC SHOCK TO PERSONS. -
Page 3: Table Of Contents
www.SimmonsDrums.net Table of Contents Safety Instructions Assembled Kit Panel Controls Top Panel LED Display Rear Panel Assembly Instructions 7, 8 Connections Connecting the Pads Connecting the Power Supply Connecting CD/MP3 Player Connecting USB MIDI Connecting Headphones Getting Started Switching Power On Setting the Volume Selecting Drum Kits The [KIT] Button... -
Page 4: Assembled Kit
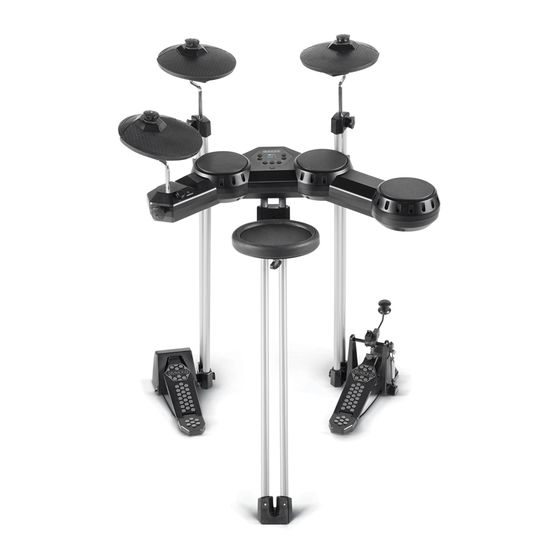
SD100KIT Electronic Drum Kit owner’s manual ASSEMBLED KIT... -
Page 5: Panel Controls
www.SimmonsDrums.net PANEL CONTROLS Top Panel [+] / [–] Value Control Buttons [REC/PLAY] Button Use these buttons to navigate through the 10 drum kits, switch Gives you the option to record or play back your menu selections, or change parameter values. own performance. -
Page 6: Rear Panel
SD100KIT Electronic Drum Kit owner’s manual PANEL CONTROLS Rear Panel Pad Connection Line In Control cable connects the pads and the pedals to You can connect the output of an external audio device to this the module. jack. (stereo 3.5mm). This is convenient for playing along with music from a CD or MP3 player. -
Page 7: Assembly Instructions
www.SimmonsDrums.net Assembly instructions Step 1: Step 2: Remove the pad/module from the packing. Attach the front steel Insert the back steel drum legs into the pad/module securely as tube unit to the pad/module with 2 provided screws and tighten. shown, and tighten each with the provided screws. (For better leverage and visibility, you may want to compete this step with module/pad turned upside down). - Page 8 SD100KIT Electronic Drum Kit owner’s manual Assembly instructions Step 6: Step 5: Locate the kick drum pedal and insert into bottom of right leg. Assemble hi-hat, crash and ride cymbal pads as shown and tighten Tighten with hex wingnut screw. the hex wingnuts.
-
Page 9: Connections
www.SimmonsDrums.net connections Connecting the Pads With the drum kit set up correctly, next connect the multi-pin cable into the pad connection port on back panel of module as shown. Then connect each of the labeled cables into their respective inputs. (Each cable is labeled as the cables can vary in length and type.) -
Page 10: Connecting The Power Supply
SD100KIT Electronic Drum Kit owner’s manual connections Connecting the Power Supply Connect the AC power adapter to a wall socket as shown at right. Connecting CD/MP3 Player The audio output from a CD/MP3 player connected to the LINE-IN jack on the rear panel can be mixed with the sound of the drum module. This is ideal if you want to play along with songs or follow an audio drum tutorial. -
Page 11: Getting Started
www.SimmonsDrums.net getting started Switching the Power On Locate the ON/OFF power button on the drum module and switch the power ON. The drum module is ready to operate when the display shown to the right appears. This is the location from which you select the drum kit you want to play or edit. -
Page 12: Selecting A Voice
SD100KIT Electronic Drum Kit owner’s manual getting started Selecting A Voice Press the [KIT] and [REC/PLAY] buttons simultaneously, then hit a pad that you want to change the voice for and use the [+] or [-] buttons to select the voice. For example: to select a TOM1 voice, press the [KIT] and [REC/ PLAY] buttons. -
Page 13: The [Rec/Play] Button
www.SimmonsDrums.net getting started The [REC/PLAY] Button Recording Press and hold the [REC/PLAY] button for 2 seconds. Recording will start after you hear one bar of metronome hits. Press [REC/PLAY] button again to stop recording. Play Back the Recording Press the [REC/PLAY] button to play back your recording. Press the [REC/PLAY] button again to stop playback. -
Page 14: The [Tempo/Tap] Button
SD100KIT Electronic Drum Kit owner’s manual getting started Song Volume In [SONG] mode, press and hold the [SONG] button and use [+] or [-] buttons to adjust the song volume. Range:000-032. The [TEMPO/TAP] Button There are 2 ways you can adjust tempo in the SD100KIT. Press the [TEMPO/TAP] button. -
Page 15: Factory Settings
www.SimmonsDrums.net factory settings To restore your settings to the factory default, do the following: Turn off the power. Hold down the [+] and [-] buttons with one hand, then turn the power on. This will reset your module to factory setup and erase all your settings. -
Page 16: Drum Kit Presets
Kit 1 Maple Kit 2 Funk 1 Kit 3 Studio Kit 4 Hip Hop Kit 5 Metal Kit 6 Simmons Kit 7 Jazz Kit 8 Latin Percussion Kit 9 LA Funk Rock Kit 10 Techno Kit 11 User Kit Song Style List... -
Page 17: Drum Sound List
SD_Aluminum_CS TOM_Brush-Lo CYM_HH1-Closed-1 Studio CYM_HH1-Foot-0 PERC_Tumba SD_Aluminum_RS TOM_HeavyMetal-Hi Hip Hop SD_BellBrass_center TOM_HeavyMetal-Low CYM_HH1-Foot-1 PERC_Vibraslap Metal PERC_Whistle-Long SD_BellBrass_CS TOM_HeavyMetal-Mid CYM_HH1-Open-0 Simmons TOM_LAFunk_Hi CYM_HH1-Open-1 PERC_Whistle SD_BellBrass_RS Jazz SD_Brass_RS TOM_LAFunk_Low CYM_HH2-Closed PERC_Woodblock-Lo Latin Percussion CYM_HH2-Foot PERC_Woodblock SD_Brass-center TOM_LAFunk_Mid LA Funk Rock SD_Brass-CS TOM_Maple_Hi... -
Page 18: Midi Implementation Chart
SD100KIT Electronic Drum Kit owner’s manual midi implementation chart O: YES X: NO Function Transmitted Recognized Remarks Basic Default 10CH 1-16 Memorized Channel Changed 1-16 each Mode Default Mode 3 Mode 3 Messages Altered ************** Note Number True Voice 0–127 0–127 ************** 0–127... -
Page 19: Specifications
Accessories Drum sticks, two controller pedals warranty Ninety (90) Days Limited Warranty Subject to the limitations set forth below, Simmons ® hereby represents and warrants FCC Statements that the components of this product shall be free from defects in workmanship and 1.
Need help?
Do you have a question about the SD 100 and is the answer not in the manual?
Questions and answers
What are the 3cables coming out and where do they go mine are not labeled
The Simmons SD 100 uses three main cables for connection:
1. Stereo Output Cable – Sends the audio signal from the SD 100 to external devices. In the context, this connects to two line inputs of two channels on the Soundtracs Topaz console, allowing the built-in drum sounds to be monitored or recorded.
2. Insert Cable – Connects to an insert jack (e.g., on channel 8 of the Topaz console) to send and return audio between the SD 100 and the mixer’s processing path.
3. MIDI or USB Cable (implied) – Typically used for connecting to a computer or MIDI device, though not explicitly mentioned in the context, it's standard for electronic drum modules like the SD 100.
These cables allow the SD 100 to send audio to a mixer or audio interface and possibly communicate with other digital devices.
This answer is automatically generated