
Related Manuals for Simmons SD300KIT


Summary of Contents for Simmons SD300KIT
- Page 1 Electronic Drum Kit o w n er ’ s m a n u al www.simmonsdrums.net www.SimmonsDrums.net...
-
Page 2: Safety Instructions
OWNER’S MANUAL safety instructions THE LIGHTNING FLASH WITH ARROWHEAD SYMBOL WITHIN AN EQUILATERAL TRIANGLE IS INTENDED TO ALERT THE USER TO THE PRESENCE OF UNINSULATED DANGEROUS VOLTAGE WITHIN THE PRODUCT’S ENCLOSURE THAT MAY BE OF SUFFICIENT MAGNITUDE TO CONSTITUTE A RISK OF ELECTRIC SHOCK TO PERSONS. -
Page 3: Table Of Contents
www.simmonsdrums.net Table of Contents Safety Instructions Table of Contents Features Assembling Your Kit 5, 6 Connections Connecting the Pads Connecting the Power Supply Connecting External Audio Devices Connecting USB MIDI Connecting Headphones Panel Controls Top Panel LED Display Rear and Back Panels Getting Started Switching the Power On Basic Operation and Navigation... -
Page 4: Features
OWNER’S MANUAL features SD300 Sound Module General Features Polyphony Hardware Power: 9v, 600ma Voices - 32 Drum Rack and Mounts Dimensions: 37”(H) x 27”(W) x 10”(L) Kick pedal / Trigger Module Sounds Weight: 37 lbs / 16.78 kg Hi-Hat pedal Drum Voices - 170 8”... -
Page 5: Assembling Your Kit
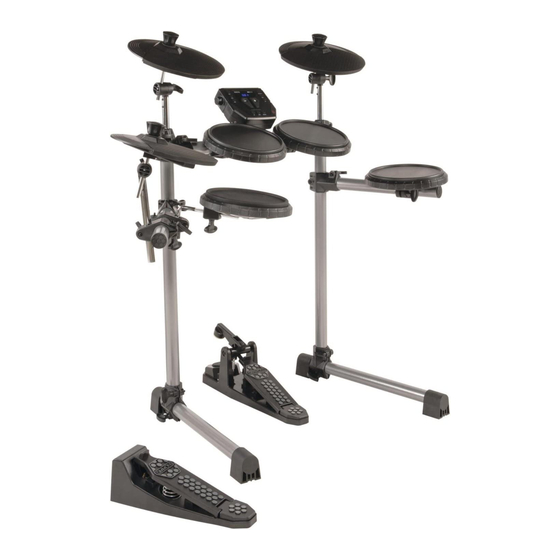
www.simmonsdrums.net Assembling your kit Inside this package - SD300 pads and hardware Before assembly, please make sure that all the items listed below are present. Cymbals Accessories Single Zone 10” Single Zone 10” Single Zone 10” AC Adaptor Multi-pin Cable Harness Hi-Hat Pad Ride Cymbal Pad Crash Cymbal Pad... - Page 6 OWNER’S MANUAL Assembling your kit Step 1 - Drum Rack Step 2 - Attach Cymbal Arms The Drum rack will be fully assembled in the box. Insert each cymbal arm into the rack clamp. Insert (Long) hi-hat arm on the left-side rack arm’s cymbal clamp. Remove the drum rack from the box and tighten the connecting clamps until the kit is stable.
-
Page 7: Connections
www.simmonsdrums.net connections CAUTION! To prevent electric shock and damage to the device, make sure the power is switched OFF on the sound module and all related devices before making any connection. Connecting the Pads From Sound Cymbal Pads Module to 7 Pads Drum Pads Sound To Crash... -
Page 8: Connecting The Power Supply
USB cable not included. Connecting Headphones Your headphones can be connected to the SD300KIT. The headphone jack is located on the front left side of module. Use the MASTER VOLUME knob to adjust the headphone volume. -
Page 9: Panel Controls
www.simmonsdrums.net panel controls Top Panel [VOLUME] Knob [SONG] Button Access to song mode. [START] Button Plays the selected song. [MUTE] Button Mutes the drum part of selected song. [TEMPO/TAP] Button Adjusts the tempo of songs and click. [CLICK] Button Turns the Click/Metronome function ON/OFF. -
Page 10: Rear And Back Panels
OWNER’S MANUAL panel controls Rear Panel Serial Connection Jack Control cable connects the pads and the pedals to the module. Back Panel AC Adapter Input Connection for the 9V DC power adapter. USB Port Used for connecting the SD300 module to a computer. AUX Input Stereo ”... -
Page 11: Getting Started
Listening to the Demo Song The demo song helps to show you the capabilities and sounds of the SD300KIT module. There is one demo in the module. The demo song is a medley that has several patterns combined to show the different genres of music that the module can play. -
Page 12: Selecting A Kit
OWNER’S MANUAL getting started Selecting a Kit Entering KIT Mode 1. Press the [KIT] button. The LCD displays the current Kit number. 2. Press the [–] / [+] buttons to select a preset or user kit. Selecting a Song 1. Press the [SONG] button. The LCD displays the current Song Number. -
Page 13: Advanced Operations
www.simmonsdrums.net advanced operations Kit Mode Editing a Kit The drum kits of the module can be modified from the factory presets. However to save them you will have to save them to User memory locations. See the steps below on how to change the parameters for each pad input. -
Page 14: Utility Mode
OWNER’S MANUAL advanced operations Click/Metronome Click Settings The Click is the metronome. The click can be played during a song in song mode or on its own. Press [CLICK] button to start and stop the metronome. 1. To edit the Click settings press and hold the [CLICK] button for 2 seconds 2. - Page 15 Hi Hat – Open Pad MIDI Note assignments Hi Hat – Closed The MIDI output notes from the SD300KIT are preset in the module. The following list has the MIDI notes that are sent from the module Hi Hat – Pedal when the drum pads and pedals are played.
-
Page 16: Factory Reset
OWNER’S MANUAL advanced operations Factory Reset There may be occasions where you want the module to return to the factory settings. This function will return the module back to factory setup. To Reset the Module to Factory Setup 1. Power off the module 2. -
Page 17: Drum Kit Presets
Kit 1 Maple Kit 2 Funk 1 Kit 3 Studio Kit 4 Hip Hop Kit 5 Metal Kit 6 Simmons Kit 7 Jazz Kit 8 Latin Percussion Kit 9 LA Funk Rock Kit 10 Techno Kit 11 User Kit Song Style List... -
Page 18: Drum Sound List
TOM_Brush-Lo CYM_HH1-Closed-1 PERC_Tumba-Slap Studio SD_Aluminum_RS TOM_HeavyMetal-Hi CYM_HH1-Foot-0 PERC_Tumba Hip Hop PERC_Vibraslap SD_BellBrass_center TOM_HeavyMetal-Low CYM_HH1-Foot-1 Metal PERC_Whistle-Long SD_BellBrass_CS TOM_HeavyMetal-Mid CYM_HH1-Open-0 Simmons PERC_Whistle SD_BellBrass_RS TOM_LAFunk_Hi CYM_HH1-Open-1 Jazz PERC_Woodblock-Lo SD_Brass_RS TOM_LAFunk_Low CYM_HH2-Closed Latin Percussion CYM_HH2-Foot PERC_Woodblock SD_Brass-center TOM_LAFunk_Mid LA Funk Rock CYM_HH2-Open EPERC_808claps... -
Page 19: Midi Implementation Chart
www.simmonsdrums.net midi implementation chart O: YES X: NO Function Transmitted Recognized Remarks Basic Default 10CH 1-16 Memorized Channel Changed 1-16 each Mode Default Mode 3 Mode 3 Messages Altered ************** Note Number True Voice 0–127 0–127 ************** 0–127 Velocity Note ON O (99H, V=1–127) O (9nH, V=1–127) Note OFF... -
Page 20: Specifications
However, there is no guarantee that interference in equipment that is used with Simmons products. This guarantee gives you specific le- will not occur in a particular installation. If this equipment does cause gal rights.
Need help?
Do you have a question about the SD300KIT and is the answer not in the manual?
Questions and answers