
Related Manuals for Simmons SD500


Summary of Contents for Simmons SD500
- Page 1 The first name in electronic drums. ELECTRONIC DRUM KIT OWNER’S MANUAL www.simmonsdrums.net www.SimmonsDrums.net...
-
Page 2: Safety Instructions
OWNER’S MANUAL safety instructions THE LIGHTNING FLASH WITH ARROWHEAD SYMBOL WITHIN AN EQUILATERAL TRIANGLE IS INTENDED TO ALERT THE USER TO THE PRESENCE OF UNINSULATED DANGEROUS VOLTAGE WITHIN THE PRODUCT S ENCLOSURE THAT MAY BE OF SUFFICIENT MAGNITUDE TO CONSTITUTE A RISK OF ELECTRIC SHOCK TO PERSONS. THE EXCLAMATION POINT WITHIN AN EQUILATERAL TRIANGLE IS INTENDED TO ALERT THE USER TO THE PRESENCE OF IMPORTANT OPERATING AND MAINTENANCE(SERVICING) INSTRUCTIONS IN THE LITERATURE ACCOMPANYING THE PRODUCT. -
Page 3: Congratulations
Power Supply • Turn the power switch OFF when the SD500 is not in use. • The AC adapter should be unplugged from the AC outlet if the SD500 is not to be used for an extended period of time. -
Page 4: Assembled Kit
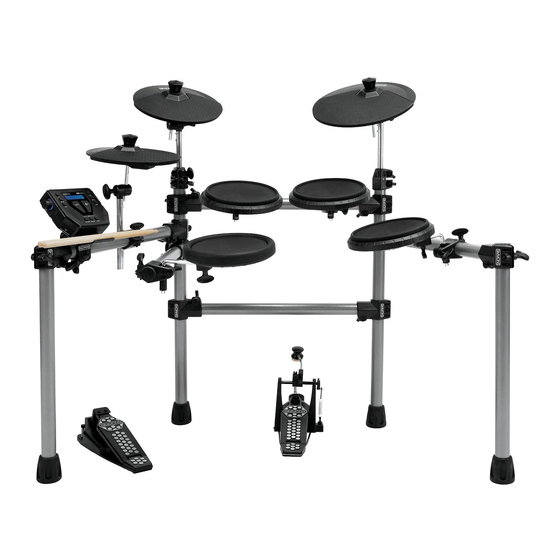
OWNER’S MANUAL ASSEMBLED KIT The first name in electronic drums. -
Page 5: Table Of Contents
............SD500 DRUM MODULE OPERATION... -
Page 6: Features
OWNER’S MANUAL features New Features of the SD500 Kit • Custom Sound Library. Completely new sample set based on the most popular classic and modern kits. • Variable Attack Response. Significantly improved playback with dynamic response according to hit velocity, combined with alternating sample playback by velocity zone. -
Page 7: Connections
www.simmonsdrums.net Connections Connecting the Sound Module and Pads CAUTION! To prevent electric shock and damage to the device, make sure the power is switched OFF on the sound module and all related devices before making any connection. The voice of the hi-hat pad is controlled by the hi-hat pedal. Plug Using the provided cables, connect the 1/4”... -
Page 8: Assembling Your Kit
Foot Controller Trigger module (S500KPD1) (S500HHC1) Drum Module User Manual The first name in electronic drums. PAGE ELECTRONIC DRUM KIT SONG TEMPO UTIL SAVE MUTE PLAY / STOP RECORD CLICK OWNER’S MANUAL (SD500) www.simmonsdrums.net www.SimmonsDrums.net The first name in electronic drums. - Page 9 Assembling your Kit The SD500 Drum Rack comes preassembled with all clamps already in place. 1. Pull rack out of box. 2. Loosen wing nuts on side arms and snare clamps so you can rotate bars. 3. Pull the side arms and snare arm out into their playing positions.
- Page 10 OWNER’S MANUAL Assembling your Kit Attaching the Cymbal Pads 1. Insert each cymbal arm into the rack clamp. 2. Insert short hi-hat arm on the left-side arm’s cymbal clamp. 3. Remove wing nut from cymbal tilter. Place cymbal pad on tilter assembly. 4.
-
Page 11: Bass Drum/Hi-Hat Pedal/Pad
www.simmonsdrums.net Assembling your Kit Bass drum, hi-hat pedal and pad connections 1. Place the hi-hat pedal on the floor and to the left, as illustrated below. 2. Connect the marked cables from the pads to their corresponding inputs on the drum module 3. -
Page 12: Connections
‘closed hi-hat’. Use cable strips to retain cable to rack. AC Adapter The SD500 module uses an external power supply called an AC Adapter. This plugs into the back of the module. Make sure the power is switched OFF on the module and connect the power adaptor with the DC IN jack on the rear panel. -
Page 13: Connecting Audio Equipment
2. The volume from the module is adjusted with the VOLUME knob. You can connect a standard pair of headphones the SD500 module to listen to your electronic drum set without disturbing others. Connect the headphones to the headphone jack located on the side panel of the drum module. -
Page 14: Connecting Midi Devices And Computers
AUX Input This input allows you to mix the input from the external audio along with the SD500 module’s internal sounds. 1. Plug the audio output of MP3 player, or other audio source into the AUX IN jack on the back panel. -
Page 15: Sd500 Drum Module Operation
SD500 Drum Module Operation Top Panel PAGE SONG TEMPO UTIL SAVE MUTE PLAY / STOP RECORD CLICK Kit Knob Record Buttons Save Used to enter the Record mode Enters the Save menu when Volume Button it is available Click... -
Page 16: Bottom Panel
Back Panel AC Adapter Input Connection for the 9V DC power adapter USB Port Used for connecting the SD500 module to a computer. AUX Input Stereo 1/8” jack to connect CD or MP3 players to the module. Output Stereo audio outputs to connect to external audio sources... -
Page 17: Quick Start Operations
UTIL SAVE www.simmonsdrums.net Quick start operations Turning the Power on the Module MUTE 1. Connect the AC Adapter to the drum module. 2. Press the power switch on the top panel to turn on the module. NOTE: There is an automatic power off function that turns off the module PLAY / STOP RECORD CLICK... -
Page 18: Listening To The Demo Songs
Quick start operations Listening to the Demo Songs The demo songs help to show you the capabilities and sounds of the SD500 module. There are two demos in the module. The first demo song is an extended drum solo that switches between various kits in the module. The second demo sound plays a long song that has several patterns combined to show the different genres of music that module can play. -
Page 19: Kit Mode - Advanced
www.simmonsdrums.net Kit Mode - Advanced Editing a Kit 1. Press the KIT button. 2. Press the PAGE button to see the screen for the current sound 3. Strike a drum pad to view the Voice currently assigned 4. Press the PAGE button to move to the first parameter to be changed on the current sound. -
Page 20: Rename A Kit
OWNER’S MANUAL Kit Mode - Advanced Renaming a Kit 1. Select a User Kit.( Preset Kits cannot not be renamed) 2. Press the -/+ buttons to choose the User kit for save. 3. Press the SAVE/ENTER button to rename the User Kit. 4. -
Page 21: Song Mode
www.simmonsdrums.net Song mode Playing a Song 1. Press PLAY/STOP to play a song. 2. Press the PLAY/STOP button to stop playback of the song. NOTE: You can temporarily change the tempo of a song while playback is in progress. The song returns to its preset tempo when a different song is selected. Muting the Drum Part 1. -
Page 22: Recording A Song
OWNER’S MANUAL Recording a Song Recording Settings There are several settings for the Record mode. To enter the setup mode press the RECORD and PAGE buttons. 1. The first page is the Track you wish to record to. The default is Drum. The other setting is Acc (accompaniment). -
Page 23: Clicking Settings
www.simmonsdrums.net RECORDING A Song To Record 1. Press the Song Button 2. Select a User Song 3. Press the Record button. You will hear the Click metronome sound count in. Begin playing the song after the count off. 4. After you record your song you can also rename the song, SONG Press SAVE/ENTER button to save and rename. -
Page 24: Utility Mode
OWNER’S MANUAL Utility Mode Utility Mode Settings The Utility mode is for the main functions of the module such as trigger setup for the pads, effects, MIDI setup and saving global settings. Trigger Settings You can set the parameters of each drum and cymbals pad in the Trigger menu. While editing the settings, you can select each trigger by hitting the corresponding trigger pad. -
Page 25: Effects
Utility Mode Effects The SD500 module has built-in Reverb and Chorus which are adjustable in the Utility Effects setup. 1. Press the UTILITY button. The first parameter is for the trigger settings. 2. Press the PAGE button until you see the screen for Reverb type 3. -
Page 26: Pad Midi Note Assignments
OWNER’S MANUAL Utility Mode Pad MIDI Note assignments The MIDI output notes from the SD500 are preset in the Module. The following list has the MIDI notes that are sent from the module when the drum pads and pedals are played. -
Page 27: Factory Reset
www.simmonsdrums.net Utility mode Factory Reset There may be occasions where you want the module to return to the factory settings. This function will return the module back to factory setup. To Reset the Module to Factory Setup 1. Press the UTILITY button. 2. -
Page 28: Appendix
OWNER’S MANUAL appendix Voice List Voice List Type Voices Type Voices BD-Gated Snare SD-ClssRkRS Bass Drum BD-ClassRok Snare SD-DepBrass Bass Drum BD-EltroFnk Snare SD-DpBrssCS Bass Drum BD-Funk 1 Snare SD-DpBrssRS Bass Drum BD-Funk 2 Snare SD-ElctFkRS Bass Drum BD-GTRKick Snare SD-ElctrFnk Bass Drum BD-HvyMtl... - Page 29 www.simmonsdrums.net appendix Voice List Voice List Type Voices Type Voices Snare SD-ShWdRS TM-LA Funk Md Snare SD-Steel1 TM-PhtFnkHi Snare SD-Steel1CS TM-MapleHi Snare SD-Steel1RS TM-PhtFnkLo Snare SD-Steel 2 TM-MapleLo Snare SD-Steel2CS TM-PhtFnkMd Snare SD-Steel2RS TM-MapleMd Snare SD-Studio TM-MetalHi Snare SD-StudioCS TM-MetalLo Snare SD-StudioRS TM-MetalMid...
- Page 30 OWNER’S MANUAL appendix Voice List Voice List Type Voices Type Voices RD-Ping PR-QuicaDwn Ride Percussion RD-Bell1 PR-QuicaHi Ride Percussion RD-Bell2 PR-Shaker Ride Percussion RD-Bow1 PR-Sleghbel Ride Percussion RD-Bow2 PR-Surdo Ride Percussion RD-RideEdg1 PR-TmbrnSlp Ride Percussion RD-Bell3 PR-Tambourn Ride Percussion RD-Bow3 PR-TimbleHi Ride Percussion...
- Page 31 www.simmonsdrums.net appendix Voice List Voice List Type Voices Type Voices Electronic Kick EK-Techno3 ES-Tech9 Electronic Snare Electronic Kick EK-Techno4 ES-Tech10 Electronic Snare Electronic Kick EK-Techno5 ES-Tech11 Electronic Snare Electronic Kick EK-Techno6 ES-HouseSnr Electronic Snare Electronic Kick EK-Techno7 ES-Kling Electronic Snare Electronic Kick EK-Techno8 ES-TekCrazy...
- Page 32 OWNER’S MANUAL appendix Voice List Voice List Type Voices Type Voices ET- Simmns1 EC-ClsdHat5 Electronic Tom Electronic Percussion ET- Simmns2 EC-ClsdHat6 Electronic Tom Electronic Percussion ET- Simmns3 EC-OpenHat1 Electronic Tom Electronic Percussion ET- Simmns4 EC-OpenHat2 Electronic Tom Electronic Percussion ET- Simmns5 EC-OpenHat3 Electronic Tom Electronic Percussion...
-
Page 33: Kit List
Techno 1 Electronic Percussion K10: EP-Kling Country Electronic Percussion K11: Electronic Percussion EP-Ping K12: Hip Hop 1 Electronic Percussion EP-Punch K13: Simmons Electronic Percussion EP-Sboing K14: Latin Perc Electronic Percussion EP-Sinetick K15: Studio Electronic Percussion SlpBasPhrse1 K16: ElectroFunk SlpBasPhrse3 Jazz... -
Page 34: Key Map
OWNER’S MANUAL appendix Key Map Key Map Manual Name Manual Name Acoustic Piano Synth 1 Electric Piano Synth 2 Clavinet Synth 3 Drawbar Organ Synth 4 Percussion Organ Synth 5 Nylon Guitar Synth 6 Steel Guitar Synth 7 Tweed Guitar Synth 8 Muted Guitar Synth 9... -
Page 35: Patterns
www.simmonsdrums.net appendix Patterns Patterns Display Name Display Name Bonz beat Ballad Rock S01: S:32 Funky D Rockin'Out S:02 S:33 Blues Beat UpBeat S:03 S:34 HeadBanger Stage Funk S:04 S:35 Black Magic Samba S:05 S:36 Funky Fly NightClub S:06 S:37 Metalhead 70's Rock S:07 S:38... -
Page 36: Midi Implementation Charts
OWNER’S MANUAL appendix MIDI Implementation Chart Function Transmitted Recognized Remarks Basic Default 10 CH Only 1-16 CH Channel Changed 1-16CH Mode Default Mode 3 Mode 3 Messages Altered ********** Note 0~127 0~127 Number: True voice ********** 0~127 Velocity Note ON O 9nH,v=1-127 O 9nH,v=1-127 Note OFF...
Need help?
Do you have a question about the SD500 and is the answer not in the manual?
Questions and answers