Table of Contents
Advertisement
Quick Links
Advertisement
Table of Contents

Related Manuals for Planet Audio P375MB


Summary of Contents for Planet Audio P375MB
-
Page 2: Table Of Contents
CONTENTS Precautions..............................1 ..........................1 Lithium Battery Cell Warnings Use Caution s ............................1 Installation ..............................2 Installation Precedures ......................... 2 Installation Opening ..........................2 Wiring Connections ..........................3 Uninstall the Main Unit ........................... 4 Control Panel Button Locations ........................5 Operation .............................. -
Page 3: Precautions
PRECAUTIONS Lithium Battery Cell Warnings • Cell leakage may cause damage to the remote control. • Do not throw cells into as this may cause an explosion. • Keep battery cells out of reach of children. Use cautions • • Some MP3/WMA files may not be playable. -
Page 4: Installation
INSTALLATION Installation Procedures First complete the electrical connections and then check for correctness. Installation Opening 2.05 inch 7.20 inch MOUNTING SLEEVE This unit can be installed in any dashboard Having an opening as shown above . Insert mounting collar into the dashboard and bend the mounting tabs out with a screwdriver. -
Page 5: Wiring Connections
INSTALLATION(CONT.) - Only use speakers with 4 ohms impedance. - Do not attach the control panel to the chassis before wiring is complete. - The maximum current of the auto antenna is 200mA. Wiring Connections WIRING DIAGRAM Purple + Fuse Rear Right Speaker Power B+ (Yellow) Purple/Black -... -
Page 6: Uninstall The Main Unit
INSTALLATION (CONT.) Uninstall the Main Unit Remove the metal strap from the main unit. Remove the plastic trim out from the main unit. Insert a bracket key into the left and right side of the main unit and draw the unit out of the mounting sleeve. -
Page 7: Control Panel Button Locations
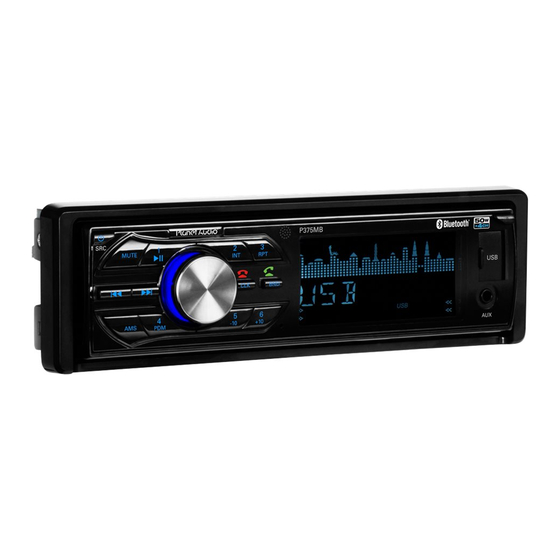
CONTROL PANEL BUTTON LOCATIONS P375MB MUTE REMOVE PANEL OPERATION 1.POWER/SRC to turn off the unit. RADIO,USB&CARD , AUX IN, BT modes (if there are USB and SD card inside the unit). radio ,Aux and BT. When the user inserts a USB Stick or SD Card, their respective logos will illuminate on the display. -
Page 8: Set The Clock (Clk)
OPERATION 8. CLK Press the CLK button once to display the real time, With time appearing on the display.Press and hold CLK button for more than 2 seconds until the time flashes. You can adjust the HOUR by pressing the button respectively;... -
Page 9: 15. Mute
OPERATION During USB or SD playback, short press the AMS button to enter track search mode, then rotate the VOL knob to track forward or backward; if no any operation in 5 seconds,it will play the current track. 15. MUTE on the LCD 19. -
Page 10: Bluetooth Operation
To begin pairing, enable BT mode on your mobile phone. When the phone the car audio system, the PLANET AUDIO name will be displayed. Choose the PLANET AUDIO from the device list to pair and connect with the car audio system. Upon the BT logo will stop... -
Page 11: Remote Control
REMOTE CONTROL(CONT.) Button Names and Locations Power button BAND or button >|| or 1 button + 10 or 6 button INT (intro) or 2 button MUTE or DEL button - 10 or 5 button RPT (repeat) or 3 button AMS (automatic music search) or 9 button LOUD (loudness) or 8 button CLK (clock) or button... -
Page 12: Troubleshooting
TROUBLESHOOTING A lot of static in broadcast Connect the battery cable to the terminal that is always live. -
Page 13: Specifications
SPECIFICATIONS General Power supply Requirement : DC 12V Maximum power output : 50W X 4CH Speaker impedance : 4 - 8 Ohm Unit Dimensions(WxHxD) : 7.0 X 2.0 X 3.8 inch Weight : 1.54 Lb (0.7 kg) Fuse : 15 A RADIO Frequency Range USA / EUROPE: 87.5 MHz - 107.9 MHz / 87.5 MHz - 108.0MHz...
Need help?
Do you have a question about the P375MB and is the answer not in the manual?
Questions and answers