Table of Contents
Advertisement
Quick Links
Advertisement
Table of Contents

Related Manuals for Planet Audio P300DVD


Summary of Contents for Planet Audio P300DVD
-
Page 2: Use This Product Safely
Use Authorized Service Centers FEATURES Do not attempt to disassemble or adjust this precision product. Please refer to Compatible with PAL DVD (Video the Service Center list included with this CD) and NTSC DVD (Video CD) product for service assistance. This player can play discs recorded in either PAL or NTSC format. -
Page 3: Table Of Contents
CONTENTS Safety Information ..................4 Disc Notes .....................5 The Player ......................6 Installation .....................7 Electric Connection ..................8 Remote Control...................10 Location and Function of Keys..............10 Preparing the Remote Control ..............12 Loading/Ejecting a disc................12 Loading a disc ..................12 Ejecting a disc ..................12 Operation .....................13 Basic Play ......................13 On-Screen Display Function.................14 Multi-audio Language Function................15... -
Page 4: Safety Information
SAFETY INFORMATION CAUTION: Region Management Information MOBILE DVD PLAYER IS A CLASS I Region Management Information: LASER PRODUCT. HOWEVER THIS This Mobile DVD Player is designed and MOBILE DVD PLAYER USES A manufactured to respond to the Region VISIBLE/INVISIBLE LASER BEAM Management Information that is recorded WHICH COULD CAUSE HAZARDOUS on a DVD disc. -
Page 5: Disc Notes
DISC NOTES Disc formats supported by this player Note these scratches are not an indication of any problem with the player. 12 cm disc Label side up (Single-sided disc only) Video CD 12 cm disc Do not touch the underside 12 cm disc of the disc 12 cm disc... -
Page 6: The Player
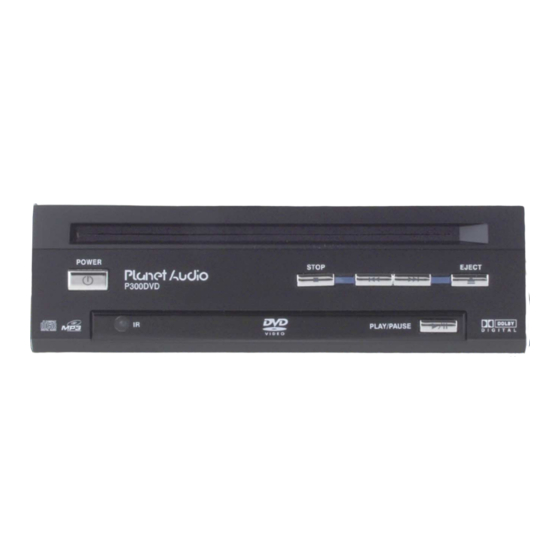
THE PLAYER FRONT VIEW POWER ( ( NEXT ) EJECT ( ( PREVIOUS ) DISC SLOT PLAY/PAUSE ( (STOP) BACK VIEW DC 12V IN Socket 12. DIGITAL AUDIO 10. DC 12V OUT Socket 13. AUDIO OUTPUT L/R 11. REMOTE Socket 14. -
Page 7: Installation
INSTALLATION SCREW M5x25 SCREWS LOCKED THE DVD MECHANISM SCREW SCREW M4x5 M4x5 Note: 1. First remove the two screws that lock the DVD mechanism, then attach the brackets on both sides of unit with screws (M4x5), last install the unit with screws (M5x25). 2. -
Page 8: Electric Connection
ELECTRIC CONNECTION METHOD A Use the conversion cable to obtain DC 12V power supply input through the AC/DC ADAPTER or the cigarette lighter according to the figure below: DVD PLAYER DC 12V IN DC 12V OUT A/V OUT DIGITAL REMOTE AUDIO VIDEO YELLOW... -
Page 9: Dvd Player
ELECTRIC CONNECTION METHOD B According to the figure below, install the unit in the car and obtain DC 12V power supply input. DVD PLAYER DC 12V IN DC 12V OUT A/V OUT DIGITAL REMOTE AUDIO VIDEO YELLOW VIDEO OUT AUDIO R OUT WHITE AUDIO L OUT FUSE (0.5A) -
Page 10: Remote Control
REMOTE CONTROL... - Page 11 REMOTE CONTROL POWER Press POWER to turn the unit ON or OFF. EJECT Press to eject the disc. MUTE Press to mute the sound. SUBTITLE Changing of the SUBTITLE language on multi-subtitle language DVD disc. ANGLE Changing of the view angle on multi-angle DVD disc. DISPLAY Display statistical disc information during playback.
-
Page 12: Preparing The Remote Control
REMOTE CONTROL Preparing the Remote Control Inserting the Batteries 1. Open the battery compartment cover. 2. Insert the new batteries. Make sure that the positive and negative terminals of the batteries are oriented indicated. 3. Close the cover Battery: Two AAA size battery. Using the Remote Control Face the remote control towards the front IR mark (remote control signal reciver). -
Page 13: Operation
BASIC OPERATION BASIC PLAY Repeat FOR DVD: Stopping Play Press the REPEAT button to select repeat - Brief press the (Stop) button to stop mode as follow. the unit playback, when press the CHAPTER REPEAT ON TITLE REPEAT ON (Play) button it can continuous normal REPEAT OFF playback. -
Page 14: On-Screen Display Function
BASIC OPERATION On-Screen Display Function GOTO -- : -- Press the DISPLAY button during 00:00:25 playback to display the contents of the current disc on the screen. Example: Use numeric buttons to input the time DVD: directly. (1) Press DISPLAY for the first time: Zoom Allows the picture to be incresed or TITLE 01/03 CHAPTER 002/025... -
Page 15: Multi-Audio Language Function
BASIC OPERATION (2) Press DISPLAY for the second time: (4) Press DISPLAY for the fourth time: TOTAL REMAIN SINGLE REMAIN 00:40:35 00:03:15 TRACK : 01 TOTAL TRACK : 14 (3) Press DISPLAY for the third time: (5) Press DISPLAY for the fifth time: The message on the screen will be cleared. -
Page 16: Menu Function
BASIC OPERATION MP3 Disc Play MONO LEFT MONO RIGHT STEREO MP3 disc is playing as the format of FOLDER. MENU Function (For DVD Only) For example: Press MENU button while the disc is playing and the disc root menu will be displayed. -
Page 17: Setup
SETUP INITIAL SETUP GENERAL SETUP SETUP MENU --- MAIN PAGE --- GENERAL PAGE --- GENERAL SETUP TV DISPLAY NORMAL/PS SPEAKER SETUP PIC MODE NORMAL/LB AUDIO SETUP ANGLE MARK WIDE PREFERENCES OSD LANG CAPTIONS SCR SAVER EXIT SETUP 1. Press SETUP in the stop mode. MAIN PAGE (Press the stop button twice to ensure the player is under STOP mode.) - Page 18 SETUP --- GENERAL PAGE --- --- GENERAL PAGE --- TV DISPLAY TV DISPLAY PIC MODE PIC MODE AUTO ANGLE MARK ANGLE MARK HI-RES ENGLISH OSD LANG OSD LANG N-FLICKER FRENCH CAPTIONS CAPTIONS GERMAN SCR SAVER SCR SAVER ITALIAN SPANISH MAIN PAGE MAIN PAGE OSD LANG type setup PIC mode setup...
-
Page 19: Speaker Setup
SETUP --- GENERAL PAGE --- AUDIO SETUP --- AUDIO SETUP --- TV DISPLAY AUDIO OUT ANALOG PIC MODE OP MODE SPDIF/RAW ANGLE MARK DYNAMIC SPDIF/PCM OSD LANG LPCM OUTPUT CAPTIONS SCR SAVER MAIN PAGE MAIN PAGE SCR SAVER setup AUDIO OUT Select the SCR SAVER ON/OFF. -
Page 20: Preferences Setup
SETUP --- AUDIO SETUP --- PREFERENCES SETUP AUDIO OUT --- PREFERENCES PAGE --- FULL OP MODE TV TYPE AUTO DYNAMIC AUDIO NTSC LPCM OUTPUT SUBTITLE DISC MENU PARENTAL PASSWORD DEFAULTS MAIN PAGE SMART NAV MAIN PAGE Dynamic Range Control Select DYNAMIC and adjust the dynamic TV type setup range of a Dobly Digital encoded This player can play discs recorded in... - Page 21 SETUP --- PREFERENCES PAGE --- --- PREFERENCES PAGE --- TV TYPE TV TYPE ENGLISH AUDIO AUDIO FRENCH SUBTITLE SUBTITLE 3 PG SPANISH DISC MENU DISC MENU 4 PG 13 CHINESE PARENTAL PARENTAL JAPANESE PASSWORD PASSWORD 6 PG-R GERMAN DEFAULTS DEFAULTS 7 NC-17 ITALIAN SMART NAV...
-
Page 22: Defaults Table
SETUP --- PREFERENCES PAGE --- DEFAULTS TABLE TV TYPE General Setup TV Display Normal/LB AUDIO PIC Mode AUTO Angle Mark SUBTITLE OSD Language English DISC MENU Captions PARENTAL SCR Saver PASSWORD Speaker Setup Downmix Stereo DEFAULTS RESET Audio Setup Audio Out SPDIF/RAW OP Mode Line Out... -
Page 23: Trouble Shooting
TROUBLE SHOOTING If it appears that your DVD unit is faulty, NO SOUND first consult this checklist. It may be that • Check audio connections. something simple has been overlooked. • If using a HIFI amplifier, try another sound source. Under no circumstances should you try to repair the player yourself, as this DISTORTED SOUND FROM HIFI... -
Page 24: Specifications
SPECIFICATIONS Supply Voltage : 12V DC (11V-15V), test voltage 14.4V, negative ground Current Consumption : Less than 2A Signal System : Compositive video 1.0Vp-p 75 Discs Played : (1) DVD-VIDEO Disc 5” (12 cm) single-sided, single-layer 5” (12 cm) single-sided, double-layer (2) Compact Disc (CD-DA/CD-R/CD-RW/MP3) (3) 5”...
Need help?
Do you have a question about the P300DVD and is the answer not in the manual?
Questions and answers