Table of Contents
Advertisement
Advertisement
Table of Contents

Related Manuals for LevelOne GNS-2000


Summary of Contents for LevelOne GNS-2000
-
Page 1: User Manual
User Manual GNS-2000 2-Bay Gigabit Network Storage Ver. 1.0... -
Page 2: Table Of Contents
Table of Contents Introduction ... 1 The NAS Server ... 1 Specifications ... 3 Getting Familiar with your NAS ... 5 LEDs ... 5 Rear Panel ... 6 Audible Warnings ... 7 Basic Installation & Setup ... 8 Installation ... 8 USB Devices ... - Page 3 Remote Management ... 77 Troubleshooting ... 78 FCC Statement ... 80 Appendix A - Licenses ... 81 Overview ... 81 BSD License ... 82 GNU General Public License ... 83 Copyright 2009. All Rights Reserved. Document Version: 1.0 All trademarks and trade names are the properties of their respective owners.
-
Page 4: Introduction
The NAS provides solid data transfer performance for multiple client connections. And you can add as many NAS Servers to your network as you like. Com- pared to using a standard PC as a File Server, GNS-2000 offers lower cost, easier management, and increased reliability. -
Page 5: Package Contents
Download function (BT, FTP and HTTP). Package Contents The following items should be included in the NAS packaging. If any of these items are damaged or missing, please contact your dealer for replacements. GNS-2000 Quick Installation Guide CD Manual / Utility ... -
Page 6: Specifications
Specifications Hardware specifications: Memory Flash HDD interface USB port RAID Switch Size Max. HDD Capacity Reset button Operating temperature Storage temperature Related humidity Power: External power supply, 12V/5A. Software specifications: System Operation system Networking Protocols File Sharing Protocols Network Clients Web browser support File System Disk Management... - Page 7 System Function Vista support DDNS Print Server support Media Function support Photo Album Backup Recycle bin FTP Server Download Manager RAID Management Disclaimer We highly recommend that you regularly backup the files on your NAS. E-mail Alert Date/Time/Daylight LLTD PnP-X Dynamic DNS, TZO Network printer sharing IPP(Internet Printing Protocol)
-
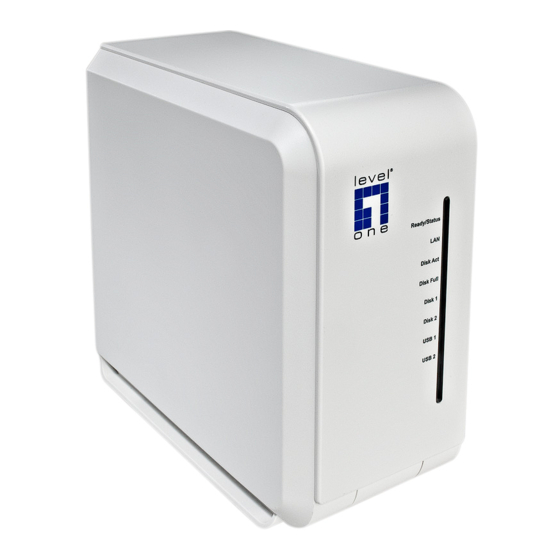
Page 8: Getting Familiar With Your Nas
Getting Familiar with your GNS-2000 LEDs Function Ready (Green) Ready/Status ON – Normal operation. OFF – No power. Blinking – This LED blinking during startup and shutdown. Status (Amber) ON – This LED will be On during the Startup self-test; it will turn Off once the self-test is completed. -
Page 9: Rear Panel
ON – Disk 1 installed. Disk 1 OFF – Disk 1 not installed. Blinking – Raid 1 Rebuilding. ON – Disk 2 installed. Disk 2 OFF – Disk 2 not installed. Blinking – Raid 1 Rebuilding. ... -
Page 10: Audible Warnings
fault (DHCP client) and it will beep once to indicate the reset has occurred If the NAS administrator’s password is lost, press and hold this button for 10 seconds. The password will then be cleared (no password), and the NAS will beep twice. USB Eject Button 1 Press and release to prepare the USB device for removal. -
Page 11: Basic Installation & Setup
Procedure 1. Connect the network cable to the GNS-2000. Connect the network cable to the LAN port on the rear of GNS-2000. Connect the oth- er end to your hub or switch. 2. Connect the USB device to USB port. - Page 12 Locate the power switch on the GNS-2000’s rear panel. Press it once to power on the NAS. 5. Self-test The GNS-2000 will run a brief self-test (2 or 3 seconds). During the self-test, all LEDs of the NAS will be illuminated or flashing.
-
Page 13: Usb Devices
Note: If the USB device is not removed, it will not be re-connected. You must remove and re- insert the USB device to have it re-connected. To share a printer, connect USB printer to this USB port. Install the driver of printer on your PC. GNS-2000 supports printer server function. -
Page 14: Configuring Your Nas
2. Click "Setup" to start the Setup Utility. The Utility will begin scanning your network for installed GNS-2000 Servers, and a screen like the following will be displayed. A list of all GNS-2000 Servers on your network will show on the left side. The right side displays details of the currently selected NAS. - Page 15 Suggested values are compatible with your LAN. Suggested IP ad- dress is currently unused. GNS-2000 will never change. You need to IP address - The utility will suggest an unused IP address within the address range used on your LAN. If you wish, you can change this, but you must ensure the address is unused.
-
Page 16: Other Configuration
Date/Time 5. Click "Next" to continue. The following screen is displayed. 6. Click "Save" to save your data to GNS-2000. On the resulting screen, click "Exit" to close the Setup Utility. GNS-2000 is now opera- tional. Other Configuration After the configuration above, all Windows users can access the NAS with "guest" access rights. -
Page 17: Client Pc Setup
Client PC Setup Overview Supported versions of Windows are: Windows 95/98/ME or later Windows NT 4.0, Windows 2000, Windows XP and Windows Vista The following items need to be checked or configured: Network Logon (Windows 95/98/ME only) ... -
Page 18: Network Logon (Windows 95/98/Me Only)
If you press ESC, or click Cancel, no network resources will be available. When you logon, you need to use a valid User Name and Password. If GNS-2000 Admin- istrator has defined users on GNS-2000, use the User Name and password they supply. -
Page 19: Using The Nas Server's Storage
3. Double click on the NAS icon. You will then see a list of shares (shared folders). You can read and write files to these shares, unless the NAS administrator has blocked access. 4. To create a shortcut to GNS-2000’s folder, drag its icon to the desktop, and accept Windows offer to create a shortcut. Network Browse... -
Page 20: Mapping A Network Drive
Mapping a Network Drive You can give a share (shared folder) on GNS-2000 a drive letter on your PC; such as "F:" This is called "mapping" the drive letter. To do this, follow this procedure: 1. Right-click on the desired share on GNS-2000. - Page 21 When you try to access a folder, you may be prompted for a password, as shown below: Network Resource Password Dialog If your Windows logon name is the same as your user name on GNS-2000, but the passwords are different, you can enter your GNS-2000 password here. ...
- Page 22 2. A list of all the NAS Servers on your network will show on the left side. The right side displays share folders of the currently selected NAS 3. Select which share folder you want to map and select a drive letter for this share folder then click “Map”...
- Page 23 You can "map" multiple folders to drive letters on your PC, as described above. You can backup your data to GNS-2000 by copying files from your PC to GNS-2000. If you have Windows ME, 2000, XP or Vista, there is a backup program supplied with Windows.
-
Page 24: Using The Nas Server's Printer
Using the NAS Server’s Printer Find out what printer is connected to the printer port on GNS-2000. Use Network Neighborhood (or My Network Places) to locate the NAS, as shown in Network Browse earlier. Double-click the NAS icon. A printer icon should be shown. -
Page 25: Using The Web File Sharing
For example, if the current port is 8080: HTTP://192.168.0.100:8080 3. The following screen will be displayed. 4. To browse the files and folders on GNS-2000, click Public Data on the home screen above. Shares (Folders) to which everyone has access are listed. You can access these folders, and files by clicking on the folder name or filename. -
Page 26: Changing Your Password
"Save Target as …". Changing your Password Although the Administrator of GNS-2000 must create your User Name and initial password, you can then change your own password whenever you wish, as follows: To change your password, click on the "Change Password"... - Page 27 User name - your login name on GNS-2000, created by the GNS-2000's adminis- trator. Existing password - your current password New password - the password you now wish to use. Confirm new password - reenter the new value to ensure it is correct.
-
Page 28: Administration
Administration Overview This Chapter describes using the Web-based Administration interface. For details on using the Windows utility, see the Basic Installation & Setup Chapter. The Web-based Administrative Interface To access the Administration interface, click the "Administration" link on the home page. You will then be prompted for a password, as shown below. - Page 29 The default password for the "admin" user is blank (no password). This should be changed. Click the User Password link on the Home Page to change the password. The "Users" screen will be displayed, as described in the following section. Use the menu tabs to select the other screens as desired.
-
Page 30: Users Screen
Users Screen This is the first screen that appears after selecting "Administration". This screen allows you to manage the Users, which exist on GNS-2000. The "guest," and "admin" users are pre-defined, and cannot be deleted. Users can be members of many user Groups. - Page 31 Comment Enter a comment if you wish. (Optional) Password Enter the user's password in these fields. Verify password These fields are also used to change an existing user's password, as follows: 1. Select the desired user 2. Clear the existing values in the password fields. 3.
- Page 32 Click the "Save" button to save your changes. Groups button To click Groups button, it will pop up following screen: This screen allows you to check which Groups this user is a member of, and to add or revoke membership. Data User Name The name of the User being modified is shown at the top of the screen.
- Page 33 To Revoke Membership Select the Group or Groups in the left-hand column, then click the ">>" of a Group Button. Multiple Groups can be selected by holding down the CTRL Key while selecting. When finished, click the "Close" Button.
-
Page 34: Status Screen
Status Screen This screen used to check the details and status of GNS-2000 Data System Server Name - Current name of the NAS. This name will be shown in "Network Neighborhood" or "My Network Places". GNS-2000 has one default server name. Server Name is restored to default one af- ter configuration restore. - Page 35 Firmware Version - Current version of the firmware in the NAS. Hardware Address - Hardware Address of the NAS. IP Address - IP Address currently used by the NAS. Date - Current date of the NAS. ...
- Page 36 Shutdown Now Shutdown the Server immediately. This will break all existing connections, including this one. Clicking this button does NOT save any data you have entered. Restart Now Restart (reboot) the Server. This will break all existing connections, including this one. The NAS Server will immediately restart, but could take a few minutes before it is available again.
-
Page 37: Network Screen
Network Screen This screen allows you to set the IP Address and related information required for TCP/IP networks. IP Address Obtain IP Address Do NOT select this unless you have a DHCP Server on your LAN. A automatically DHCP Server can provide an IP Address to PCs and other devices when (DHCP Client) they boot. - Page 38 IP Address of the DNS Server to be tried if the second server is busy. DHCP Server GNS-2000 can act as a DHCP (Dynamic Host Configuration Protocol) Server, providing IP Addresses and related data to PCs and other devices. Enable Use this to Enable/Disable the DHCP Server.
- Page 39 Jumbo Frame Frame Size The NAS support large frame, you select different frame size for your need.
-
Page 40: System Screen
System Screen This screen contains some basic information about your GNS-2000. After initial configura- tion, no changes should be required. - Page 41 Identification Server Name If you wish, you can change the name of the NAS Server. Note that punc- tuation and other special characters (e.g. * " / \ [ ] : ; | = , + ? < > ' ` ( ) # $ %) cannot be used in the name.
- Page 42 Language Language Environ- Specify the language environment for FTP clients and Download Manager. ment DDNS DDNS Service Select the desired DDNS service provider form the drop-down list and enter the required data in the following fields. The default is Disabled. E-Mail Address Enter the E-Mail address of the TZO service.
- Page 43 E-Mail Address Enter from 1 to 3 E-Mail Addresses. The messages generated by the NAS will be sent to these destinations. Note that special characters (e.g. " / \ [ ] : ; | = , + * ? < > ' `) cannot be used in them. From Address (Op- Specify one E-Mail Address that appear in the "From"...
- Page 44 If the FTP clients don't support UTF-8, please specify right Language Environment above. Allow anonymous The FTP server will prompt for a Username and Password when clients FTP login attempt to connect. If this option is Enabled, users will be able to enter "anonymous"...
-
Page 45: Media Screen
Media Screen This screen allows you to configure the settings for media functions. Photo Album Enable Photo If enabled, then the user can enjoy the photos that stored in the NAS Server. Album Content Directory Specify the location in which photos are stored. iTunes Server Enable iTunes If enabled, then the user can listen music that stored in the NAS via iTunes... - Page 46 Content Directory Specify the location in which music need be served iTunes Server. MP3 Broadcast Enable MP3 Broad- If enabled, then the NAS will broadcast MP3 in specified folder, and user can cast listen to them by music players such as WinAMP etc. This MP3 Broadcast supports files with extension .mp3.
-
Page 47: Advanced Menu
Advanced Menu Groups Screen This screen allows you to manage the User Groups that exist on GNS-2000. Data New Group Use this area to create a new group. Existing Groups This shows the list of all Groups. Two groups - "everyone" and "administrators" - always exist. These groups cannot be deleted. - Page 48 remove members. Delete Click this Button to Delete the selected Group. Note: The "administrators" and "everyone" Groups can not be deleted.
- Page 49 Access Rights Screen This screen allows you to view and modify the Groups which can access this Share. Note: The administrators group ALWAYS has Read/Write (R/W) access to ALL shares. Groups Access Rights Screen Data Group Name The name of the Group being modified is shown above the 2 lists of shares.
- Page 50 To Remove Access Rights: Select the Share or Shares in the left-hand column, then click the "No Access >>" Button. Multiple Shares can be selected by holding down the CTRL Key while selecting. When finished, click the "Close" Button.
-
Page 51: Group Members
Group Members This screen allows you to check which users are members of the group, and to add or revoke membership of this group. Note: The "everyone" Group ALWAYS contains all users. You cannot add or remove members. Data Group Name The name of the Group being modified is shown at the top of the screen. - Page 52 while selecting. When finished, click the "Close" Button.
-
Page 53: Shares Screen
Shares Screen This screen allows you to manage the Shares that exist on the NAS Server. A "Share" is a folder (directory) on the NAS Server that a User Group can access. Only the NAS Server Administrators can create Shares. However, within a Share, users who have access to that Share can create other folders (directories) as well as files. - Page 54 Delete Button Click this Button to Delete the selected Share. Deleting a Share does NOT delete its folder or any data. The folder and its data are still accessible by the "administrators" group. Properties Name The current name will be displayed. The Share Name can be changed if you wish.
-
Page 55: Share Access
Share Access This screen allows you to view and modify the Groups, which can access this share. Note: The administrators group ALWAYS has R/W access to ALL shares Data Share Name The name of the Share being modified is shown above the 2 lists of Groups. - Page 56 down the CTRL Key while selecting. To Remove Access Select the Group or Groups in the left-hand column, then click the "No Rights Access >>" Button. Multiple Groups can be selected by holding down the CTRL Key while selecting. When finished, click the "Close" Button.
-
Page 57: Backup Screen
2000 will beep three times if backup succeeds, and beep once if backup fails. Data Backup - Data files can be backed up from GNS-2000 to another network de- vice, or from another network device to the NAS. Configuration Backup Back Up Button Click this to download the configuration file and save it on your PC. -
Page 58: Usb Backup
USB Backup Storage Directory Specify the folder which data in USB disks will be backed up. Click 'Browse' button to select the desired folder. Backup Type Select the desired backup type: Full - One new folder will be created in the specific folder of the USB disk in the Storage folder, and then all files will be backed up into the new folder. - Page 59 Add Backup Job From this screen, you can add new backup jobs, which be displayed on the Backup screen. Data Name Enter a suitable name for this job. Backup Type Select the desired backup type. Full - all files will be backed up. ...
- Page 60 Use the time fields (hour, minute, am/pm) to specify when the backup job should be performed. Buttons Browse Click it to select one folder in GNS-2000. Save Click it to apply modifications in this window. Close Close the window.
-
Page 61: Disk Screen
Disk Screen This screen allows you to maintain the disks in GNS-2000 Disk Mode - Disk mode select: Separate Disk, JBOD/LVM, Raid 0 and Raid 1. Any data on the disk will be lost it if change disk mode. ... - Page 62 Data Disk Mode This indicates the current working mode of Internal Disks. It can be one following modes: Separate Disks Disk 1 and Disk 2 work separately (Recommended). JBOD/LVM Disk 1 and Disk 2 are bound into one logical volume. Total capacity is equal to the capacity of the existing drive(s).
- Page 63 can use the "View Disk Log" button to view the results. Terminated - The last Scandisk operation was cancelled by the Administrator before it was completed. Schedule Use these fields to set up a schedule to run Scandisk regularly, if desired. The available options are: ...
- Page 64 long time, and the disk is unavailable to users while the Scandisk is in progress. Stop - If a Scandisk is in progress, click this button to terminate the Scandisk immediately. S.M.A.R.T. Check - Click this button to run the S.M.A.R.T. check immediately. Save Click it to save the modifications in this window.
-
Page 65: Upgrade Screen
Upgrade Screen The Upgrade facility allows you to upgrade the software of GNS-2000. You need to obtain the upgrade file from your dealer or supplier. Note that GNS-2000 is unavailable during the upgrade process, and all connections will be lost, including this one. -
Page 66: Download Manager
Overview Download manager allow you to download file via FTP, HTTP or BT without PC. Just set on GNS-2000 and will base on your setting to download file automatically. The Web-base Download Management Interface To access the Download Manager interface, click the "Download Manager" link on the home page. - Page 67 Download Management Screen Data Manager Status Status of the Download Manager, it can be 'Enabled' or 'Disabled'. Owner Name of the user that logins the Download Manager. File Name Name of the saved file in the NAS for the task. File Size Total size of the downloaded file for the task.
- Page 68 Stop Task Stop the selected task. Delete Task Delete selected tasks. Move Up Increase the priority of the task. Move Down Decrease the priority of the task. Logout Leave the screen of Download Manager. Add New Task Open the window to add new task. Refresh Refresh the status of tasks.
- Page 69 Account Account name that is used to access the URL if necessary. Password Password that is used to access the URL if necessary.
- Page 70 Destination Share Folder Select name of the share where downloaded file will be saved. Subdirectory Select the subdirectory under the selected share where downloaded file will be saved. Action Save Save the new task. Cancel Cancel the modifications on the web page. Close Close the window.
-
Page 71: Photo Album
Photo Album Overview GNS-2000 allows you to share photos with select users on the Internet. You must enable this feature in the Media screen, then you will be able to share photos located in your pictures folder. The Web-base Photo Album Interface To access the Photo Album interface, click the "Photo Album"... - Page 72 Data Folders The number of the folders currently exists. Files The number of the files currently exists. Sort by Name Click this button to sort the files by name (A~Z). Sort by Date Click this button to sort the files by date. Click this button to sort the files by the photo’s size.
-
Page 73: Nas Via The Internet
Remote management Making the NAS available via the Internet If your LAN is connected to the Internet via a Router or Gateway, you can make GNS-2000 available from the Internet. No changes to the NAS configuration are required, unless you wish to use a port number other than the default value of 80 for Web connections. -
Page 74: Using Your Web Browser From The Internet
The default port number for Web browser connections is 80. If you prefer to use a different port number, you can specify the port number on the NAS System screen. The "Web" entry for /Port Forwarding / Virtual Server must then use the port number specified on the NAS System screen. -
Page 75: Printing Via Ipp (Internet Printing Protocol)
Printing via IPP (Internet Printing Protocol) To print to GNS-2000 via the Internet, the port used for IPP (TCP port 631) must be asso- ciated with GNS-2000. See Making the NAS available via the for details. The NAS is an IPP Server. To use IPP, your PC must be an IPP client. Windows 2000 and XP have built-in support for IPP, so there is no need to use the provided IPP client program. - Page 76 http://203.70.212.52:631/printers/LKLKG974163_p1 4. Click "Next" If the connection can be established, and the printer on that port is on-line, the follow- ing dialog will be displayed. Windows 2000: No printer driver Click "OK", and then select the printer manufacturer and model to match the printer connected to the port on the IPP Server.
- Page 77 3. Configure this screen as follows: IPP Server Enter the Internet IP address used to connect to GNS-2000, as follows. http://ip_address:631/printers/printer_name Where: ip_address represents the IP Address used to access the NAS. (As explained earlier, this may be the Internet address of a Ga- teway, rather than the NAS itself.)
- Page 78 5. Either selects an existing printer to use the new port, and click OK. a) Click the "Add New Printer" button to start the Add Printer wizard. b) Complete the Wizard, installing the desired printer as a local printer on your PC. c) When returned to this screen, select the new printer and click OK.
- Page 79 The Internet connection used by the IPP Server is down. Network congestion causes the connection attempt to time out.
-
Page 80: Remote Management
Remote Management Connection via your Web browser from the Internet is the same as connecting via the LAN. Remember: You must use the Internet IP address to connect to the NAS, NOT the LAN IP address. If the port number used by the NAS has been changed from the default (80), you must specify the correct port number when you connect. -
Page 81: Troubleshooting
Troubleshooting This chapter lists some common problems, and the solution to them. Problem 1: The NAS Utility doesn't list any NAS Servers. Solution 1: Check the following: The NAS is installed, LAN connections are OK, and it is powered ON and startup is complete. - Page 82 The logon name you used on your PC is NOT recognized by the NAS, and was converted to guest, with guest access rights. Ask the NAS Administra- tor to create a user name for you. (Use the same name as on your PC.) ...
-
Page 83: Fcc Statement
FCC Statement Federal Communications Commission Notice This equipment has been tested and found to comply with the limits for a Class B digital device, pursuant to Part 15 of the FCC Rules. These limits are designed to provide reasonable protection against harmful interference in a residential installation. -
Page 84: Appendix A - Licenses
Appendix A - Licenses Overview Many software components are covered by the GNU GPL (General Public License). Some are covered by the BSD License. The following table provides details of the various components. The text of both Licenses is below. Package Name bash bftpd... -
Page 85: Bsd License
Ucsc-smartsuite udhcp upnpsdk util-linux vixie-cron XFS patch xfsdump xfsprogs xinetd BSD License BSD License Information Copyright (c) 2002. All rights reserved. Redistribution and use in source and binary forms, with or without modification, are permit- ted provided that the following conditions are met: ... -
Page 86: Gnu General Public License
OR OTHERWISE) ARISING IN ANY WAY OUT OF THE USE OF THIS SOFTWARE, EVEN IF ADVISED OF THE POSSIBILITY OF SUCH DAMAGE. GNU General Public License GNU GENERAL PUBLIC LICENSE Version 2, June 1991 Copyright (C) 1989, 1991 Free Software Foundation, Inc. 59 Temple Place, Suite 330, Boston, MA 02111-1307 USA Everyone is permitted to copy and distribute verbatim copies of this license document, but changing it is not allowed. - Page 87 Also, for each author's protection and ours, we want to make certain that everyone under- stands that there is no warranty for this free software. If the software is modified by someone else and passed on, we want its recipients to know that what they have is not the original, so that any problems introduced by others will not reflect on the original authors' reputations.
- Page 88 2. You may modify your copy or copies of the Program or any portion of it, thus forming a work based on the Program, and copy and distribute such modifications or work under the terms of Section 1 above, provided that you also meet all of these conditions: a) You must cause the modified files to carry prominent notices stating that you changed the files and the date of any change.
- Page 89 b) Accompany it with a written offer, valid for at least three years, to give any third party, for a charge no more than your cost of physically performing source distribution, a com- plete machine-readable copy of the corresponding source code, to be distributed under the terms of Sections 1 and 2 above on a medium customarily used for software interchange;...
- Page 90 6. Each time you redistribute the Program (or any work based on the Program), the reci- pient automatically receives a license from the original licensor to copy, distribute or modify the Program subject to these terms and conditions. You may not impose any further re- strictions on the recipients' exercise of the rights granted herein.
- Page 91 9. The Free Software Foundation may publish revised and/or new versions of the General Public License from time to time. Such new versions will be similar in spirit to the present version, but may differ in detail to address new problems or concerns. Each version is given a distinguishing version number.
- Page 92 REPAIR OR CORRECTION. 12. IN NO EVENT UNLESS REQUIRED BY APPLICABLE LAW OR AGREED TO IN WRITING WILL ANY COPYRIGHT HOLDER, OR ANY OTHER PARTY WHO MAY MODIFY AND/OR REDISTRIBUTE THE PROGRAM AS PERMITTED ABOVE, BE LIABLE TO YOU FOR DAMAGES, INCLUDING ANY GENERAL, SPECIAL, INCIDENTAL OR CONSEQUENTIAL DAMAGES ARISING OUT OF THE USE OR INABILITY TO USE THE PROGRAM (INCLUDING BUT NOT LIMITED TO LOSS OF DATA OR DATA BEING RENDERED INACCURATE OR LOSSES SUSTAINED BY YOU OR THIRD PARTIES OR...
Need help?
Do you have a question about the GNS-2000 and is the answer not in the manual?
Questions and answers