Table of Contents
Advertisement
Advertisement
Table of Contents

Related Manuals for LevelOne FNS-1020


Summary of Contents for LevelOne FNS-1020
-
Page 1: User Manual
LevelOne User Manual FNS-1020 1-Bay Simple Network Storage Ver. 1.0... -
Page 2: Table Of Contents
Table of Content INTRODUCTION ..............................3 UNPACKING AND SETUP ........................... 4 ................................... 4 EATURES ..............................4 ACKAGE ONTENTS HARDWARE INSTALLATION ..........................5 ................................5 RONT ................................. 7 HARDWARE INSTALLATION ..........................8 CONNECTING THE CABLES ..........................10 CHECK YOUR NETWORK SETTINGS (WINDOWS XP / VISTA) ..............11 CONFIGURATION INTERFACE ........................ -
Page 3: Introduction
The LevelOne FNS-1020 is designed for 3.5” IDE and Serial-ATA (SATA) hard disk drive use. This storage server is a value-adding equipment that allows you to control file-sharing within a small office/home/office (SOHO) environment. -
Page 4: Unpacking And Setup
Browser-based Interface Configuration and Management Supports Windows 2000/XP/Vista Package Contents Open the box of the FNS-1020 and carefully unpack it. The box should contain the following items: FNS-1020 1-Bay Simple Network Storage Power Adapter and Power Cord ... -
Page 5: Hardware Installation
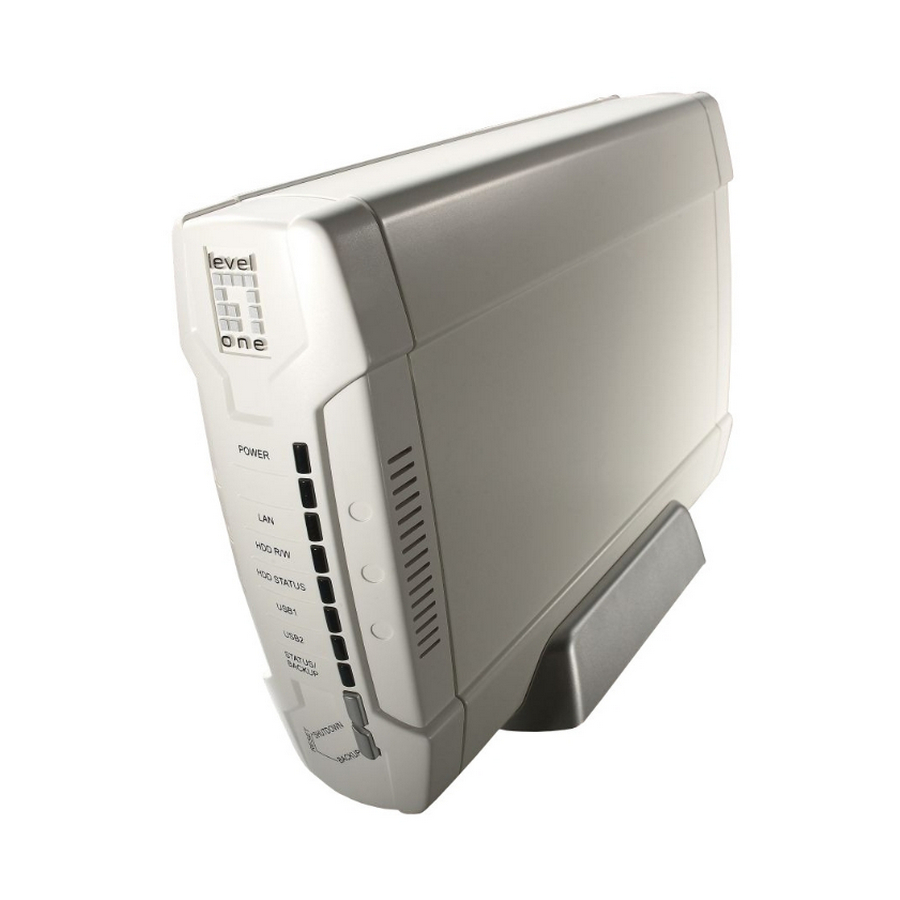
3. Hardware Installation Front View 1) Power LED Indicates power off or on 2) LAN A solid light indicates the LAN link is achieved Off indicates no LAN link LED blinks during LAN data transmission 3) HDD R/W Lights when reading or writing to the hard disk drive 4) HDD Status On –... - Page 6 5) USB 1 and 2 A solid light indicated USB device is in use 6) Shutdown Button Press for 4 seconds to prepare unit for shutdown. Do this before powering off the unit. 7) Backup Button Press for 4 seconds to copy data from attached USB device to HDD 8) Reset Press Shutdown and Backup buttons together for 6 seconds to reset system to factory defaults.
-
Page 7: Rear View
Rear View 1) LAN Port Connect Ethernet devices such as computers, switches or hubs. 2) USB 1 and 2 Connect USB storage devices such as Pen Drives, Card Readers, Portable Music Players 3) Power On/Off Button Used to turn unit on and off. 4) Power Jack Receptor for the supplied power adapter... -
Page 8: Hardware Installation
4. Hardware Installation 1. Unfasten the two screws from the rear and 2. Pull out front panel and inner tray. remove the back panel. 3. Make sure the jumper on your hard drive is 4. Install your 3.5-inch IDE or SATA hard drive set to Master and connect the data and power cables. - Page 9 Put on the front panel. The arrow on the casing indicates bottom front. Reassemble the back cover and fasten the two screws.
-
Page 10: Connecting The Cables
5. Connecting the Cables 1. Now connect the power adapter and network cable. 2. Connect the FNS-1020 to an Internet ready router. FNS-1020 Router Computer 3. Installation is now complete. You can now power on the device and begin to configure the settings. -
Page 11: Check Your Network Settings (Windows Xp / Vista)
6. Check Your Network Settings (Windows XP / Vista) 1. Click Start button and open Control Panel. Windows XP Windows Vista Windows XP, click [Network Connection] Windows Vista, click [View Network Status and Tasks] then [Manage Network Connections]... - Page 12 3. Right click on [Local Area Connection] and choose [Properties]. 4. Check the “Client for Microsoft Networks”, “File and Printer Sharing”, and “Internet Protocol (TCP/IP) is ticked. If not, please install them.
- Page 13 5. Select “Internet Protocol (TCP/IP)” and click [Properties] 6. Select these two options and click [OK].
-
Page 14: Configuration Interface
7. Configuration Interface Once all the wires are properly connected power on the FNS-1020. There are two methods to access the configuration and management interface. Utility Method 1. Insert the included CD and install the Utility. 2. Use the Utility to find your FNS-1020. -
Page 15: Web Browser Method
Web Browser Method 1. Open a web browser (Internet Explorer/Firefox/Safari) and type in the address bar FNS-1020 and press “Enter.” 2. Please enter the password (admin) Configuration Modes After login, you will be presented with the following options. Wizard: Simple step-by-step configuration to help you configure the FNS-1020. -
Page 16: Configuration Wizard
8. Configuration Wizard The Wizard allows you to quickly and easily set up and configure the FNS-1020 1-Bay Simple Network Storage. The items that will be set up includes: IP Address DHCP Mode Device Time Hard Disk... - Page 17 Step 1: If you are unsure which option to choose, just keep it as [Auto]. If you choose Server/Auto/Static modes, you will need to set further TCP/IP settings. Usually there is no need to change these settings, however if you encounter difficulty, please ask your network administrator.
- Page 18 Step 2: Here there are three ways to set the system time for your FNS-1020. 1. Sync with a Network Time Server 2. Use your computer’s time 3. Set the time manually.
- Page 19 Step 3: There are two security levels. Guest Mode: Anyone can access your storage. If Guest Mode is chosen, the system will ask if you want to initialize your disk with only one partition. If you are using a new hard disk, it is recommended you choose [Yes], as this option will format your hard disk later.
- Page 20 Authorization Mode: Only authorized users can access data in the password-protected folders. If authorization mode is chosen, it is necessary to reallocate and format your hard disk drive. Please indicate your desired capacities for public and private directories. When the capacity of one directory is assigned, the system will automatically assign the rest to the other directory.
-
Page 21: Advanced Functions
9. Advanced Functions To access the Advanced Setup, click on General at the main login page. Once in the Advanced Setup, you will be presented with the following screen. In this mode, you can change the language of the User Interface. The supported languages are English, German, Danish, Greek and Traditional Chinese. -
Page 22: Network Settings
Network Settings LAN Configurations These are the various network settings for the FNS-1020. General Settings Device IP The default IP address of FNS-1020. However if the device obtained an IP address from a DHCP server, then the IP address will be different... - Page 23 DHCP Server Settings Subnet Mask The subnet mask of your network Decide the IP address range that the FNS-1020’s DHCP IP Address Range Server will provide. Primary / This feature allows you to assign DNS Servers. Secondary DNS Gateway The gateway IP address would be the IP address of...
-
Page 24: Storage Configuration
In this section, you will learn how to use the different storage functions such as file sharing, assign user access rule and enabling media servers. Storage Sharing These settings decide how your FNS-1020 will appear in the “My Network Places” in Windows operating systems. Storage Server... -
Page 25: Ftp Server
FTP Server FTP is another method of accessing your files. By default, the FTP server is enabled so you can use any FTP client utility. An advantage to FTP service is that you can set the maximum concurrent connections (max 20). FTP Server Choose to enable or disable the FTP service Max Connection... -
Page 26: Disk Utility
You can also use the Disk Utility to change the hard disk to one partition by clicking the Disk Partition button. If you press “Format” button, the FNS-1020 will make only one partition with the total capacity of the internal hard disk, and then format that partition. -
Page 27: Access Control
These settings allow you to set the User Access security controls for your shared files and folders under Microsoft Network Places and FTP services. There are two levels of access control. Guest Mode: Anyone can access any data stored on the FNS-1020. There is no need to set any user access controls under this mode. - Page 28 To access folders in Authorization mode, find the FNS-1020 in Microsoft My Network Places. For example, we have created a User Account called user1. Anyone can access data stored in the Public and usb_disk folders. However only user1 can access data which is stored in the user1 folder.
-
Page 29: File Browser
File Browser The FNS-1020 provides a file browser to let users rename and delete folders / files easily. This is especially useful when users cannot rename or delete folders or files via FTP or Microsoft My Network Places successfully. For example, users may download from the Internet an “unrecognized” file, and may appear as random characters, such as $#$@.avi. -
Page 30: Upnp Av Media Server Settings
An UPnP Media Server allows other multimedia devices on your network to find and access media files on the FNS-1020. Using this method, a virtual folder will be created to show only the media file types decided by the user. This filtering process is done using a database of media files which is automatically updated in the background by the FNS-1020. -
Page 31: Advanced Tools
Will reboot the FNS-1020 Firmware Upgrade This enables you to upgrade to newer firmware (available to download on www.level1.com), or to restore a backup configuration. Choose the location of the file to install on the FNS-1020 and then click the “Upgrade” button. -
Page 32: Download Assistant
This function allows you to download files from the Internet without using a computer. You can queue or schedule download jobs so you can easily let the FNS-1020 do the work for you without needing any additional input. Additionally, the FNS-1020 can even send an e-mail to you to inform you that the file has finished downloading. - Page 33 Eg: ftp.level1.com/file1.avi Port Port number that the source FTP server uses. Save to Indicate which folder to save the file on the FNS-1020 hard disk drive. You can use the “Browse” button, or type in the path manually. Start Time The download job can be set to start immediately (At Once), or scheduled to start at a later time and date.
- Page 34 Number of BitTorrent jobs that can be running at one time. Listen Port The port number that the FNS-1020 will run the BitTorrent Client. You will need to set up on your broadband router, port forwarding or a virtual server to the FNS-1020 IP address for this port number.
- Page 35 Step 1: You will need to first upload the Torrent file to the FNS-1020. Use the “Browse” button to select the .torrent file.
- Page 36 File Character Set The language of the filename. If unsure, use none. Save to Indicate which folder to save the file on the FNS-1020 hard disk drive. You can use the “Browse” button, or type in the path manually. Start Time The download job can be set to start immediately (At Once), or scheduled to start at a later time and date.
-
Page 37: Email Alert Configuration
Email Alert Configuration Email Alert can send you a notification email when a download job has completed. Email Settings E-mail Address Enter the email that will be used as the sender of the email alert feature. Note: Some mail servers will refuse to process an email if there sender isn’t an account on the mail server. -
Page 38: Download Status
Download Status This page displays the status of the download jobs being processed by the FNS-1020. Running: Shows all the download jobs that are currently running. Waiting: Shows download jobs in queue and waiting to run Scheduled: Shows the download jobs that have been scheduled to run at a later time and date. -
Page 39: Miscellaneous Settings
Administrator Timeout Set how long a user can be idle when logged into the FNS-1020 User Interface. If the user remains idle for too long, then they will be automatically logged out, and they will need to enter the password again. -
Page 40: System Time
System Time Here there are three ways to set the system time for your FNS-1020. 1. Sync with a Network Time Server 2. Use your computer’s time 3. Set the time manually. System Logs Logs are useful for troubleshooting, and you can review the whole system logs here. There are four... -
Page 41: Faq
A: Please refer to question 1 above to reset setting to default. The default login password is admin. 3. When I log in to the storage directory of the FNS-1020 via My Network Places, I cannot find any files of folders even though I have installed a Hard Disk Drive in the FNS-1020. - Page 42 7. Why can’t I access the file from My Network Places after enabling Authorization mode? A: Sometimes I can’t access folders via My Network Places by using correct user name and password, such as shown below: This is because a Windows system caches the previous login records, so that user cannot use another account to login this device.
-
Page 43: Specifications
11. Specifications LAN – Interface 1x 10/100 Mbps Auto-MDIX RJ-45 Port USB-Interface 2x USB2.0 High-Speed Ports 1x Internal 3.5” IDE/SATA Hard Disk Bay HDD Bay Supports UltraDMA 133 and SATA1.0a Backup – Back up files from external USB drive to internal HDD Buttons Shutdown –... -
Page 44: Safety
Member States relating to electromagnetic compatibility. CE Marking Warning Hereby, Digital Data Communications, declares that this (Model-no. FNS-1020) is in compliance with the essential requirements and other relevant provisions of Directive 1999/5/EC. The CE-Declaration of Conformity can be downloaded at:... -
Page 45: General Public License
13. General Public License This product incorporates open source code into the software and therefore falls under the guidelines governed by the General Public License (GPL) agreement. Adhering to the GPL requirements, the open source code and open source license for the source code are available for free download at http://global.level1.com. - Page 46 GNU GENERAL PUBLIC LICENSE Version 2, June 1991 Copyright (C) 1989, 1991 Free Software Foundation, Inc. 59 Temple Place, Suite 330, Boston, MA 02111-1307 USA Everyone is permitted to copy and distribute verbatim copies of this license document, but changing it is not allowed. Preamble The licenses for most software are designed to take away your freedom to share and change it.
- Page 47 GNU GENERAL PUBLIC LICENSE TERMS AND CONDITIONS FOR COPYING, DISTRIBUTION AND MODIFICATION 0. This License applies to any program or other work which contains a notice placed by the copyright holder saying it may be distributed under the terms of this General Public License. The "Program", below, refers to any such program or work, and a "work based on the Program"...
- Page 48 3. You may copy and distribute the Program (or a work based on it, under Section 2) in object code or executable form under the terms of Sections 1 and 2 above provided that you also do one of the following: a) Accompany it with the complete corresponding machine-readable source code, which must be distributed under the terms of Sections 1 and 2 above on a medium customarily used for software interchange;...
- Page 49 This section is intended to make thoroughly clear what is believed to be a consequence of the rest of this License. 8. If the distribution and/or use of the Program is restricted in certain countries either by patents or by copyrighted interfaces, the original copyright holder who places the Program under this License may add an explicit geographical distribution limitation excluding those countries, so that distribution is permitted only in or among countries not thus excluded.
Need help?
Do you have a question about the FNS-1020 and is the answer not in the manual?
Questions and answers