Table of Contents
Advertisement
Advertisement
Table of Contents

Related Manuals for Blade nano QX


Summary of Contents for Blade nano QX
- Page 1 READY-TO-FLY...
- Page 2 NOTICE All instructions, warranties and other collateral documents are subject to change at the sole discretion of Horizon Hobby, Inc. For up-to-date product literature, visit horizonhobby.com and click on the support tab for this product. Meaning of Special Language The following terms are used throughout the product literature to indicate various levels of potential harm when operating this product: NOTICE: Procedures, which if not properly followed, create a possibility of physical property damage AND a little or no possibility of injury.
- Page 3 Safety Precautions and Warnings • Always keep a safe distance in all directions around • Never operate your model with low transmitter your model to avoid collisions or injury. This model is batteries. controlled by a radio signal subject to interference from •...
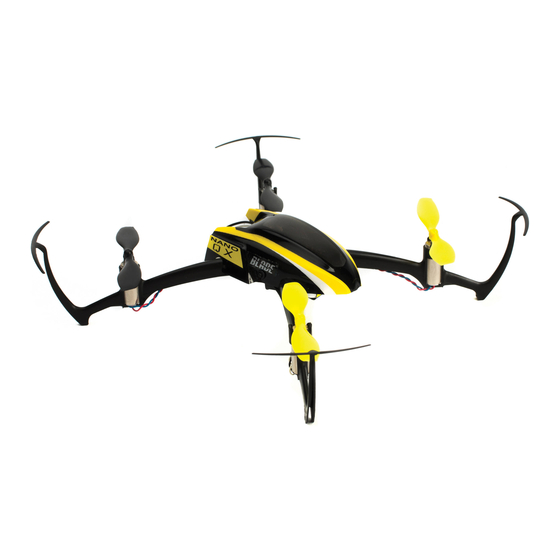
- Page 4 The nano QX is easy to manage, exciting to fl y, and durable enough to take the punishment. Built-in prop guards help prevent prop strikes so you can keep fl ying even if you bump into a wall, direct drive motors keep operation quiet and maintenance simple, and the frame is lightweight yet rigid, lending the nano QX remarkable durability.
-
Page 5: Table Of Contents
Charging Warnings ............6 4-in-1 Control Unit Function ..........15 Low Voltage Cutoff (LVC) ............ 7 Flying the nano QX ............16 Installing the Transmitter Batteries (RTF) ......7 Post-Flight Inspection and Maintenance Checklist ..... 17 Battery Charging ............... 7 Exploded View.............. -
Page 6: First Flight Preparation
First Flight Preparation Flying Checklist • Remove and inspect contents ❏ Always turn the transmitter on fi rst • Begin charging the fl ight battery ❏ Plug the fl ight battery into the lead from the • Install the fl ight battery in the quadcopter 4-in-1 control unit (once it has been fully charged) ❏... -
Page 7: Low Voltage Cutoff (Lvc)
When a Li-Po battery is discharged below 3V, the battery may become damaged and may no longer accept a charge. The nano QX 4-in-1 control unit protects the fl ight battery from over-discharge using Low Voltage Cutoff (LVC). Before the bat- tery charge decreases too much, LVC becomes active. -
Page 8: Installing The Flight Battery
4. Connect the battery cable to the 4-in-1 control unit, matching the red mark on the battery to the red mark on the connector. 5. Place the nano QX on its skids on a fl at surface and leave the aircraft still until the LED on the 4-in-1 control unit is solid blue (not blinking) CAUTION: Always disconnect the Li-Po battery from the aircraft when not fl... -
Page 9: Transmitter And Receiver Binding
If you purchased an RTF model, the transmitter is bound to the model at the factory. To bind or re-bind your nano QX to your chosen transmitter, please follow the directions below. General Binding Procedure 1. -
Page 10: Mlp4Dsm Binding Procedure
MLP4DSM Binding Procedure 1. Disconnect the fl ight battery from the quadcopter. 2. Center all trims on your transmitter. 3. Power off the transmitter and move the throttle stick to the down/off position. 4. Connect the fl ight battery in the quadcopter. The LED on the 4-in-1 control unit fl ashes red during initialization, then fl... -
Page 11: Transmitter Control
Transmitter Control Bind/ Dual rate Flight mode selection selection When pressed down, trim buttons make a sound that increases or decreases in pitch at each pressing. The middle or neutral trim position is heard as a middle tone in the pitch range of the sounds. The end of the control range is sounded by a series of beeps. -
Page 12: Flight Mode And Rate Selection (Rtf)
• Stability mode is shown by the fl ight control board on the quadcopter glowing solid blue. When fl own in stability mode, the nano QX will limit the bank angle with full control input and return the aircraft to a neutral fl ight position when you release the elevator/aileron stick. -
Page 13: Transmitter Setup Table
Transmitter Setup Table Transmiter "Model Stability to Stability to Dual Rate Aux1 High Rate Low Rate Type" Agility Switch Agility TX Setup Switch Reverse Depress Right MLP4DSM Depress Left Stick N/A Stick DX4e Trainer/Bind Rate DX5e Trainer/Bind Rate Cycle Flaps Pos In FLAPS Menu: DX6i Acro... -
Page 14: Understanding The Primary Flight Controls
Understanding the Primary Flight Controls If you are not familiar with the controls of your nano QX, take a few minutes to familiarize yourself with them before attempting your fi rst fl ight. Throttle Left Side View Left Side View... -
Page 15: 4-In-1 Control Unit Function
4-in-1 Control Unit Function The unique Control Unit installed in your nano QX is a lightweight combination of main motor electronic speed controls (ESCs), mixers, the SAFE sensor unit, and a DSM2/DSMX receiver. The 4-in-1 unit is also equipped with blue and red status indicator LEDs. -
Page 16: Flying The Nano Qx
Continue making minor trim adjustments until the machine hovers at a low altitude with very little drifting and directional control input. If the nano QX is your fi rst multicopter or helicopter, seek the help of an experienced pilot to trim the model for you before making your fi... -
Page 17: Post-Flight Inspection And Maintenance Checklist
At these higher altitudes, you will become comfortable with the fl ight characteristics of the aircraft. • Don’t be afraid to set the nano QX down on the ground quickly by lowering the throttle when approaching walls or other obstacles to help prevent propeller strikes. -
Page 18: Exploded View
Exploded View... -
Page 19: Parts Listings
Description BLH7600 Nano QX RTF 8 BLH7620G Prop, CW Rotation, Grn (2): nQ X BLH7600M1 Nano QX RTF Mode 1 9 BLH7621G Prop, CCW Rotation, Grn (2): nQ X BLH7680 Nano QX BNF 10 BLH7620Y Prop, CW Rotation, Yel (2): nQ X... -
Page 20: Troubleshooting Guide
Disconnect the flight battery and re- Nano QX will not respond to nano QX moved during initialization. initialize the nano QX while keeping the throttle. quadcopter from moving. Disconnect fl ight battery, reverse the Throttle channel is reversed. - Page 21 fl ight battery to the connecting the fl ight battery to the nano QX nano QX The nano QX is bound to a different Select the correct model memory on the LED on the receiver fl ashes model memory (ModelMatch™ trans- transmitter.
-
Page 22: Limited Warranty
Limited Warranty What this Warranty Covers BEEN ADVISED OF THE POSSIBILITY OF SUCH DAMAGES. Further, in no event shall the liability of Horizon exceed the Horizon Hobby, Inc., (Horizon) warrants to the original purchas- individual price of the Product on which liability is asserted. As er that the product purchased (the "Product") will be free from Horizon has no control over use, setup, final assembly, modi- defects in materials and workmanship at the date of purchase. - Page 23 damaged parcels, as Horizon is not responsible for merchan- Non-Warranty Service dise until it arrives and is accepted at our facility. An Online Should your service not be covered by warranty, ser- Service Request is available at http://www.horizonhobby.com/ vice will be completed and payment will be required content/_service-center_render-service-center.
-
Page 24: Warranty And Service Contact Information
Warranty and Service Contact Information Country of Horizon Hobby Contact Information Address Purchase Horizon Service Center servicecenter.horizonhobby. (Repairs and Repair Requests) com/RequestForm/ www.quickbase.com/db/ Horizon Product Support United States 4105 Fieldstone Rd bghj7ey8c?a=GenNewRecord (Product Technical Assistance) of America Champaign, Illinois, 61822 USA 888-959-2304 sales@horizonhobby.com Sales... -
Page 25: Compliance Information For The European Union
Compliance Information for the European Union Declaration of Conformity Declaration of Conformity (in accordance with ISO/IEC 17050-1) (in accordance with ISO/IEC 17050-1) No. HH2013010703 No. HH2013010704 Product(s): BLH nQX RTF Product(s): BLH nQX BNF Item Number(s): BLH7600, BLH7600M1 Item Number(s): BLH7680 Equipment class: Equipment class:...
Need help?
Do you have a question about the nano QX and is the answer not in the manual?
Questions and answers