Table of Contents
Advertisement
Advertisement
Table of Contents

Related Manuals for Blade Nano QX2 FPV


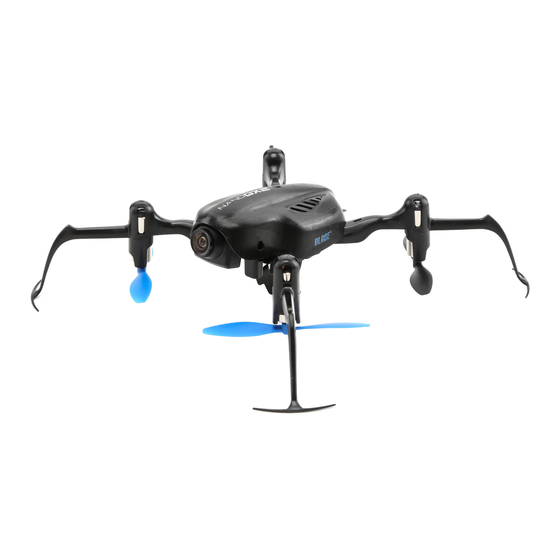
Summary of Contents for Blade Nano QX2 FPV
- Page 2 NOTICE All instructions, warranties and other collateral documents are subject to change at the sole discretion of Horizon Hobby, LLC. For up-to-date product literature, visit horizonhobby.com and click on the support tab for this product. Meaning of Special Language The following terms are used throughout the product literature to indicate various levels of potential harm when operating this product: NOTICE: Procedures, which if not properly followed, create a possibility of physical property damage AND a little or no possibility of injury.
- Page 3 Safety Precautions and Warnings • Always keep a safe distance in all directions around • Never place any portion of the model in your mouth as it your model to avoid collisions or injury. This model is could cause serious injury or even death. controlled by a radio signal subject to interference from •...
-
Page 4: Table Of Contents
Table of Contents Box Contents ..............5 Using the Micro FPV Camera ........... 14 First Flight Preparation ............6 Post-Flight Inspection and Maintenance Checklist ..... 15 Flying Checklist ..............6 Replacing the Propellers ..........15 Charging Warnings ............6 Replacing the Motors ............16 Battery Charging ............... -
Page 5: Box Contents
Box Contents ® • Blade Nano QX2 FPV Quadcopter • 25mW Micro Camera System • 500mAh 1S 3.7V 25C LiPo • 1S USB Li-Po Charger, 500mAh High Current UMX Connector... -
Page 6: First Flight Preparation
First Flight Preparation Flying Checklist • Remove and inspect contents ❏ Always turn the transmitter on fi rst • Begin charging the fl ight battery ❏ Plug the fl ight battery into the lead from the 4-in-1 • Install the fl ight battery in the quadcopter control unit (once it has been fully charged) ❏... -
Page 7: Battery Charging
Battery Charging CAUTION: Only use chargers specifi cally designed to charge the included Li-Po battery. Failure to do so could result in fi re, causing injury or property damage. CAUTION: Never exceed the recommended charge rate. The Battery Charger (EFLC1013) included with your quadcopter has been designed to safely charge the 1S 3.7V 500mAh 25C Li-Po fl... -
Page 8: Transmitter Setup
Transmitter Setup 30% exponential on aileron and elevator is recommended if it is available on your chosen transmitter. Transmiter "Model Stability to Stability to Dual Rate High Type" Agility TX Setup Agility Switch Switch Rate Rate In FLAPS Menu: Cycle Flaps Pos fi rst time DX6i Acro ELEV-AIL D/R 100% 70%... -
Page 9: Installing The Flight Battery
Installing the Flight Battery 1. Lower the throttle to the lowest setting and center all trims. 2. Power ON the transmitter. 3. Insert the battery as shown. 4. Connect the battery cable to the 4-in-1 control unit. CAUTION: Connecting the battery to the control board with reversed polarity will cause damage to the control board, the battery or both. -
Page 10: Transmitter And Receiver Binding
Transmitter and Receiver Binding To bind or re-bind your aircraft to your chosen transmitter, please follow the directions below. General Binding Procedure 1. Disconnect the fl ight battery from the quadcopter. 2. Center all trims on your transmitter. 3. Power off the transmitter and fully lower the throttle. 4. -
Page 11: Understanding The Primary Flight Controls
Understanding the Primary Flight Controls If you are not familiar with the controls of your Nano QX2 FPV quadcopter, take a few minutes to familiarize yourself with them before attempting your fi rst fl ight. Throttle Side View Side View... -
Page 12: Led Codes
Aileron Rear View Rear View Left Right Aileron left Aileron right LED Codes Equipment LED Color LED Status Operation Loss of transmitter signal Rapid Blink Bind Mode Blue Quadcopter Solid Stability Mode Solid Agility Mode Blink Low Battery Flight Mode Selection Refer to the Transmitter Setup section for transmitter switch selection and specifi... -
Page 13: Width
Hovering The Nano QX2 FPV quadcopter requires minor throttle adjustments to maintain its altitude in hover. Remember to keep these throttle adjustments as minimal as possible. Large adjustments could result in a loss of control and/or a possible crash. -
Page 14: Using The Micro Fpv Camera
Using the Micro FPV Camera Consult local laws and ordinances before operating FPV equipment. In some areas, FPV operation may be limited or prohibited. You are responsible for operating this product in a legal and responsible manner. 1. Power on your radio transmitter, then power on the aircraft. -
Page 15: Post-Flight Inspection And Maintenance Checklist
Propellers includes cracks, burrs, chips or scratches. Replace damaged parts before fl ying. Replacing the Propellers Use the directions below to replace any Blade tip angle Propeller rotation propeller that becomes damaged: Counter- 1. Check tip angle of the propeller... -
Page 16: Replacing The Motors
Replacing the Motors The motor rotation direction can be determined by the color of the wire leads. The clockwise motors have black and white leads. The counter-clockwise motors have red and blue leads. 1. Refer to the propeller rotation diagram in the Replacing the Pro- pellers section. - Page 17 Problem Possible Cause Solution Flight battery charge is low Completely recharge the fl ight battery Inadequate power to fl ight battery charger Use a different USB power source for the charger Replace the fl ight battery and follow the fl ight Flight battery is damaged Reduced fl...
-
Page 18: Exploded View
Exploded View... -
Page 19: Parts Listings
Parts Listings Part # Description Part # Description 1 BLH9103 4-in-1 Control Unit 7 BLH9007 Camera Mount 2 BLH9011 Camera Board 8 BLH9102 Prop Set 3 BLH2204 Clockwise Motor 500mAh 1S 3.7V 25C LiPo, 9 EFLB5001S25UM High Current UMX Connector 4 BLH2205 Counter-Clockwise Motor 1S USB Li-Po Charger,... - Page 20 Purchaser’s Remedy answer your questions and service you in the event that you may need any assistance. For questions or assistance, please Horizon’s sole obligation and purchaser’s sole and exclusive visit our website at www.horizonhobby.com, submit a Product remedy shall be that Horizon will, at its option, either (i) service, Support Inquiry, or call the toll free telephone number refer- or (ii) replace, any Product determined by Horizon to be defec- enced in the Warranty and Service Contact Information section...
-
Page 21: Warranty And Service Contact Information
Non-Warranty Service for service, you are agreeing to Horizon’s Terms and Conditions found on our website http://www.horizonhobby.com/content/_ Should your service not be covered by warranty, ser- service-center_render-service-center. vice will be completed and payment will be required without notification or estimate of the expense unless ATTENTION: Horizon service is limited to Product com- the expense exceeds 50% of the retail purchase cost. -
Page 22: Fcc Statement
FCC Statement This equipment has been tested and found to comply • Reorient or relocate the receiving antenna. with the limits for Part 15 of the FCC rules. These limits • Increase the separation between the equipment and are designed to provide reasonable protection against receiver. -
Page 23: Compliance Information For The European Union
Compliance Information for the European Union EU Compliance Statement: Horizon Hobby, LLC hereby declares that this product is in compliance with the essential requirements and other relevant provisions of the R&TTE and EMC Directives. A copy of the EU Declaration of Conformity is available online at: http://www.horizonhobby.com/content/support-render-compliance. - Page 24 ©2016 Horizon Hobby, LLC. Blade, E-fl ite, SAFE, the SAFE logo, DSM2, DSMX, Bind-N-Fly, the BNF logo, ModelMatch and the Horizon Hobby logo are trademarks or registered trademarks of Horizon Hobby, LLC. The Spektrum trademark is used with permission of Bachmann Industries, Inc.
Need help?
Do you have a question about the Nano QX2 FPV and is the answer not in the manual?
Questions and answers