Advertisement
Quick Star t Guide
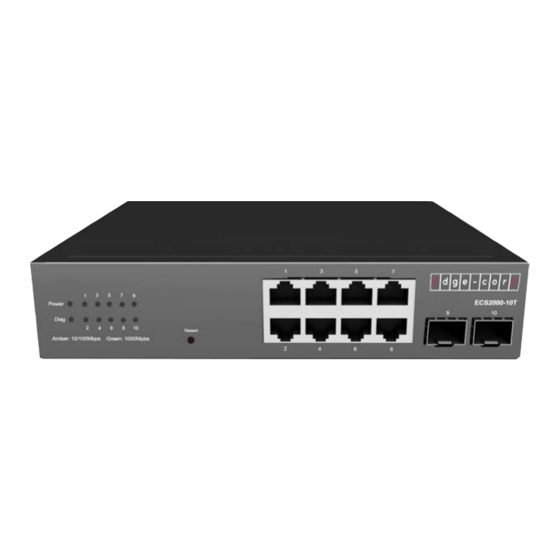
10-Port Layer 2 Gigabit Ethernet Switch
ECS2000-10T
1. Unpack the Switch
www.edge-core.com
The ECS2000-10T is a Gigabit Ethernet Layer 2 switch with 8 10/100/1000BASE-T
ports, and 2 Small Form Factor Pluggable (SFP) transceiver slots.
Note:
For detailed switch installation information, refer to the Installation Guide,
which is on the Documentation CD included with the switch.
Note:
For Safety and Regulatory information, refer to the Safety and Regulatory
Information document included with the switch.
Unpack the switch and check the package contents.
◆
ECS2000-10T L2 Gigabit Ethernet Switch
◆
Bracket Mounting Kit containing two brackets and four screws for attaching the
brackets to the switch
◆
Four adhesive foot pads
◆
Power cord — either US or Continental Europe
◆
Documentation — Quick Start Guide and Regulatory and Safety Information
◆
Documentation CD—includes Installation Guide and Management Guide.
– 1 –
E122014-AP-R01
150200001051A
Advertisement
Table of Contents

Subscribe to Our Youtube Channel
Related Manuals for Edge-Core ECS2000-10T


Summary of Contents for Edge-Core ECS2000-10T
- Page 1 Quick Star t Guide 10-Port Layer 2 Gigabit Ethernet Switch ECS2000-10T The ECS2000-10T is a Gigabit Ethernet Layer 2 switch with 8 10/100/1000BASE-T ports, and 2 Small Form Factor Pluggable (SFP) transceiver slots. Note: For detailed switch installation information, refer to the Installation Guide, which is on the Documentation CD included with the switch.
- Page 2 Quick Start Guide 2. Install the Switch The switch can be mounted in a standard 19-inch rack or on a desktop or shelf. Following your rack plan, mark the holes in the rack where the switch will be installed. Lift the switch into the rack and hold it in a position aligned with the marked holes.
- Page 3 Quick Start Guide 4. Connect the Power To supply AC power to the switch, first verify that the external AC power supply can provide 100 to 240 VAC, 50-60 Hz and 0.50 A minimun. To connect AC power, plug the power cord into a grounded, 3-pin, AC power source and then into the AC socket on the rear of the switch Caution: Use the AC power cord supplied with the switch.
- Page 4 Quick Start Guide 6. Connect to the Web The switch offers a user-friendly web-based management interface for the User Interface configuration of all the unit’s features. You can make initial configuration changes by connecting a PC directly to one the switch’s RJ-45 ports.
-
Page 5: Quick Start Guide
Quick Start Guide Hardware Specifications Item Specification Chassis Specifications Size (W x D x H) 19.64 x 11.63 x 3.66 cm (7.73 x 4.57 x 1.44 in.) Weight 1.55 kg (3.42 lb) Temperature Operating: 0° C to 50° C (32° F to 122° F) Storage: -40°...
Need help?
Do you have a question about the ECS2000-10T and is the answer not in the manual?
Questions and answers