Table of Contents
Advertisement
Quick Links
PROFESSIONAL WEATHER CENTER
WS-1510-IT
Instruction Manual
Table of Contents
Topic
Features
Setting up
Function keys
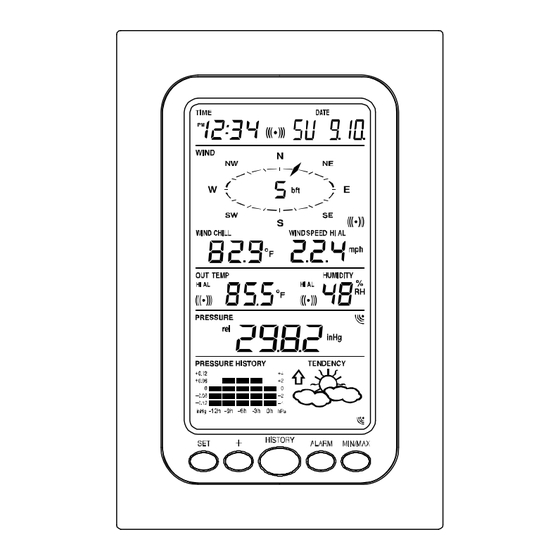
LCD Screen
Manual Setting
Time alarm setting
Weather alarm operations
Hysteresis
Weather forecast and weather tendency
Wind direction and wind speed measurement
Rainfall measurement
Viewing history data
Viewing the min/ max weather data
Switch On/ Off buzzer
Outdoor transmission 915 MHz reception
Positioning
Care and Maintenance
Specification
Warranty Info
FAQ
1
•
Time display (manual setting)
12/24 hour time display
•
•
Calendar display (weekday, date, month, year)
•
Time alarm function
Weather forecasting function with 3 weather icons and weather
•
tendency indicator
•
Dew point display in ºF/°C
Outdoor temperature display in ºF/°C
•
•
Outdoor Humidity display as RH%
Indoor temperature display in ºF/°C
•
Display MIN/MAX value of outdoor temperature, outdoor humidity,
•
dew point, wind chill and relative pressure with time and date of
recording
•
Low/High outdoor temperature and humidity alarm
•
Relative air pressure displayed in inHg or hPa
Air pressure tendency indicator for the past 12 hours (bar graph
•
format)
LCD contrast selectable
•
Low battery indicator
•
•
Wind direction displayed in 16 steps
Wind speed and gust displayed in mph, km/h, or m/s, and
•
Beaufort scale
•
Wind chill displayed in °F of °C
•
High alarm function for wind speed
Manual reset of outdoor temperature, outdoor humidity, dew point,
•
wind chill, pressure, wind speed, gust, and 24h rainfall
24h rainfall display in inch or mm
•
Total rainfall display in inch or mm
•
•
Storm warning alarm
Buzzer on/off selectable
•
•
Storage of 140 sets of history weather data recorded in 3-hour
intervals
Wireless transmission at 915 MHz
•
•
Transmission range up to 330 feet (100 meters)
Thermo-hygro Sensor
•
Remote transmission of the outdoor temperature
and humidity to the Weather Center at 915 MHz
Weather-resistant casing
•
•
Wall mounting case (to be mounted in a
sheltered place. Avoid direct rain and sunshine)
3
Page
2
4
7
9
10
13
14
16
17
19
19
19
20
24
25
25
27
28
29
30
PROFESSIONAL WEATHER CENTER
WS-1510-IT
Instruction Manual
Congratulations on purchasing this state-of-the-art Professional
Weather Center as an example of excellent design and innovative
technology. Featuring time, date, calendar, weather forecast, wind
direction and speed, rainfall, indoor temperature, outdoor temperature
and outdoor humidity, air pressure and various alarm settings for
different weather conditions, this Weather Center will provide you with
extensive weather information and forecast.
INSTANT TRANSMISSION is the
This product offers:
state-of-the-art new wireless
transmission technology,
exclusively designed and developed
by
LA CROSSE TECHNOLOGY.
INSTANT TRANSMISSION offers
you an immediate update (every 4.5
seconds!) (6.5 seconds for rain) of
all your outdoor data measured
from the transmitters: follow your
climatic variations in real-time!
FEATURES:
Weather Center
LCD
Function keys
2
Wind Sensor
•
Connected to the thermo-hygro
sensor by cable
Can be installed onto a mast or a
•
horizontal panel
Rain Sensor
Remote transmission of the rainfall
•
data to the Weather Center at 915
MHz
To be mounted onto a horizontal
•
panel
SETTING UP:
Wireless transmission
at 915 MHz - thermo-
hygro and rain sensor
to the Weather Center
Rain sensor
Cable connection between the wind
sensor and the thermo-hygro sensor
4
Stand
Hanging hole
Battery
compartment
Weather Center
Wind sensor
Advertisement
Table of Contents

Related Manuals for La Crosse Technology WS-1510-IT


Summary of Contents for La Crosse Technology WS-1510-IT
- Page 1 INSTANT TRANSMISSION is the This product offers: state-of-the-art new wireless transmission technology, exclusively designed and developed LA CROSSE TECHNOLOGY. INSTANT TRANSMISSION offers you an immediate update (every 4.5 seconds!) (6.5 seconds for rain) of all your outdoor data measured from the transmitters: follow your...
- Page 2 Note: When putting the Weather Center into operation, it is important to perform in close proximity (e.g. on a table) a complete wiring and set-up of the system. This step is important to test all components for correct function before placing and mounting them at their final destinations (See Positioning below).
-
Page 3: Lcd Screen
SET key • Press and hold to enter manual setting modes: LCD contrast, Manual time setting, 12/24 hour time display, Calendar setting, ºF/ ºC temperature unit, Wind speed unit, Rainfall unit, Pressure unit, Relative pressure reference setting, Weather tendency threshold setting, Storm warning threshold setting and Storm Alarm On/ Off setting •... - Page 4 Use the + or MIN/MAX key to set the month. Press the SET key to confirm the month and enter the date setting mode. The date digit will start flashing. Use the + or MIN/MAX key to set the date. Confirm all calendar settings with the SET key and enter the °F/°C TEMPERATURE UNIT SETTING.
- Page 5 The Weather Center can be set to alert when a specific weather condition is reached. The following Weather Alarm settings can be adjusted in the ALARM setting mode. • High outdoor temperature alarm • Low outdoor temperature alarm High outdoor humidity alarm •...
- Page 6 Center will be more accurate compared to use in areas where the weather is stagnant most of the time (for example mostly sunny). If the Weather Center is moved to another location significantly higher or lower than its initial standing point (for example from the ground floor to the upper floors of a house), discard the weather forecast for the next 48-60 hours, as the Weather Center may mistake the new location as being a possible change in air-pressure when really it is due to the...
- Page 7 Max outdoor temperature with the date and time of recording Min dew point temperature with the date and time of MIN icon recording Time and date of recording MIN dew point value MIN icon Max dew point temperature with the date and time of recording Min outdoor humidity with the date and time of recording Max outdoor humidity with the date and time of recording...
-
Page 8: Low Battery Indicator
La Crosse Technology Sensor Extension Cable When you require additional length to properly mount your sensor, you can use La Crosse Technology extension cable. The extension cable is 32 feet in length and comes with the appropriate connecter attached. Please visit your local retailer or www.greatbigoutlet.com to purchase. - Page 9 La Crosse Technology, Ltd or La Crosse Technology, Ltd’s authorized service center. La Crosse Technology, Ltd will repair or replace this product, at our option and at no charge as stipulated herein, with new or reconditioned parts or products if found to be defective during the limited warranty period specified above.
-
Page 10: Contrast Setting
USA address only. Your La Crosse Technology, Ltd warranty covers all defects in material and workmanship with the following specified exceptions: (1) damage caused by accident, unreasonable use or neglect (including the lack of reasonable and necessary maintenance);... -
Page 11: Troubleshooting Guide
SETTING THE HOUR MANUALLY: The Hour will be flashing. Use the PLUS button to increase the hour. Use the MIN/MAX button to decrease the hour. If using 12-hour Time Mode, be sure to set the hour for AM or PM. Press and release the SET button once to move to the next menu item. - Page 12 Accuracy Test: To test any La Crosse Technology rain gauge, follow these steps: Erase the Total rainfall or make note of this amount. Pour water into the gauge very slowly until it clicks exactly ten times Allow a minimum of ten minutes for this "rainfall"...
- Page 13 Press MIN/ MAX to view older records. Press MIN/MAX and PLUS key to view "Previous" and "Next" record respectively. The records are made at 3-hour intervals) Press the SET key to see items normally viewed in “mode 2”. - Forecast Icons Forecast Icon Shows Incorrect Conditions This feature indicates what the weather may be like 12 hours into the future and not what is happening right now.
Need help?
Do you have a question about the WS-1510-IT and is the answer not in the manual?
Questions and answers