Advertisement
Quick Links
FlexTech
Assembly Instructions
EP-550, EP-850 & EP-950
Inversion Tables
Pour télécharger et imprimer les instructions de
montage du dossier ComforTrak™ en français,
rendez-vous sur teeter-inversion.com
Para descargar e imprimir las instrucciones
de montaje de ComforTrak™ en español, visite
teeter-inversion.com
5
YEAR
R
Series
TM
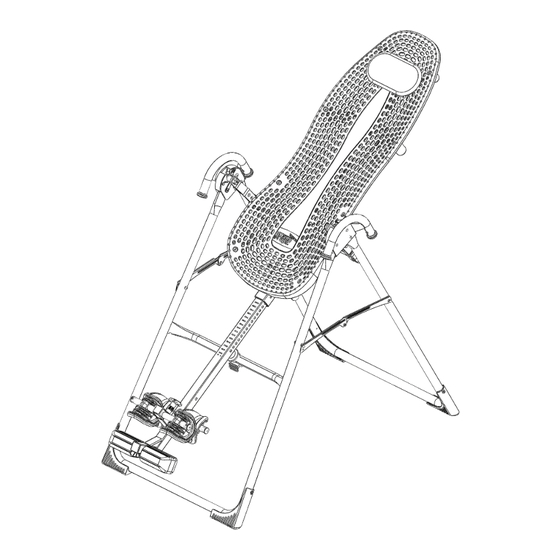
* Inversion Table images may
vary slightly from your model.
The EP-550 is shown here.
Advertisement

Subscribe to Our Youtube Channel
Related Manuals for Hang ups Teeter EP-550


Summary of Contents for Hang ups Teeter EP-550
-
Page 1: Assembly Instructions
Pour télécharger et imprimer les instructions de montage du dossier ComforTrak™ en français, rendez-vous sur teeter-inversion.com Para descargar e imprimir las instrucciones de montaje de ComforTrak™ en español, visite teeter-inversion.com YEAR * Inversion Table images may vary slightly from your model. The EP-550 is shown here. -
Page 2: Important Safety Instructions
BEFORE YOU BEGIN: Review all steps before beginning assembly and read all precautions before using the inversion table. Carefully adhere to the Assembly Instructions and Owner’s Manual to help ensure safety and product integrity. IMPORTANT SAFETY INSTRUCTIONS READ ALL INSTRUCTIONS BEFORE USING THE INVERSION TABLE. WARNING WARNING - To reduce the risk of injury to persons: •... - Page 3 BEFORE YOU BEGIN: Review all steps before beginning assembly and read all precautions before using the inversion table. Carefully adhere to the Assembly Instructions and Owner’s Manual to help ensure safety and product integrity. IMPORTANT SAFETY INSTRUCTIONS READ ALL INSTRUCTIONS BEFORE USING THE INVERSION TABLE. WARNING •...
- Page 4 ITEMS FOR ASSEMBLY (Page 1 of 2) The list below contains the components for the EP-550, EP-850 and EP-950 Models. Components that are specific to a model are listed. Tools required for assembly are included. ITEMS FOR ASSEMBLY ITEM NUMBER...
-
Page 5: Optional Accessories
F51067 3-Hole Roller Hinges (EP-550 & EP-850) use Tri-Grip Handle Assembly Hardware Kit (HK1021) TR1003 3-Hole Roller Hinges with Traction Handles (EP-950) F71002 A-Frame with Angle Tether (EP-550 & EP-850) Optional Accessories EP1100 A-Frame with EZ-Angle Tether (EP-950) FlexTech™ Table Bed Assembly... - Page 6 Hinge Plates A-Frame Self-Locking Hooks Main Shaft 3-Hole Roller Hinges Ankle Lock System Handles Ankle Comfort Dial ™ Height-Selector Locking Pin Stability Feet De-Rattler Knob * Inversion Table images may vary slightly from your model. The EP-550 is shown here.
- Page 7 Replace Labels and Owner’s Manual if Damaged, Illegible, or Removed. Teeter, 9902 162nd St. Ct. E., Puyallup, WA 98375 Toll Free (Phone): 800-847-0143 Web: www.teeter-inversion.com EP-1737 0911-3 * Inversion Table images may vary slightly from your model. The EP-550 is shown here.
- Page 8 BEFORE BEGINNING ASSEMBLY Unpack and Prepare Your Workspace • If possible, set up the product at or near the space in which you intend to use it to avoid moving it later. • Unpack all parts and support materials. Set aside packing materials and clear your work area. •...
- Page 9 STEP 1 A-Frame Assembly • On a level surface, carefully position the A-Frame so that it is standing upright and the FIGURE 1 Stability Feet are on the ground. • Gently push down on the Spreader Arms to ensure they are fully open and in the “locked” position (Figure 1).
- Page 10 STEP 2 Tri-Grip Handle Assembly (EP-550 Models) Based on your model, the assembly in this step will differ. For users with the EP-550, assemble the Tri-Grip Handles FIGURE 2 • Locate the Tri-Grip Handle Assembly Hardware Kit. • Determine the left or right Handles, marked with an embossed L / R on the inside of the black plastic part of each handle.
- Page 11 STEP 2 Over-EZ™ Handle Assembly (EP-850 Models) Based on your model, the assembly in this step will differ. For users with the EP-850 Model, assemble the Over-EZ™ Handles: FIGURE 4 • Locate the Over-EZ™ Handle Assembly Hardware Kit (HK1023 for EP-850 Models). •...
- Page 12 STEP 2 Over-EZ™ Handle Assembly (EP-950 Models) Based on your model, the assembly in this step will differ. For users with the EP-950 Model, assemble the Over-EZ™ Handles: FIGURE 6 • Locate the Over-EZ™ Handle Assembly Hardware Kit (HK1022 for EP-950 Models). •...
- Page 13 STEP 3 Table Bed Assembly • Locate the Table Bed Assembly Hardware Kit. FIGURE 7 • Place the Table Bed face down on the floor and push down on the Support Beam, so the two holes align evenly with the holes at the base of the Upper Support Arms (Figure 7). You may have to exert extra pressure to ensure that the Support Beam slides over the rubber spacers.
- Page 14 STEP 4 Roller Hinge Assembly FIGURE 10 FIGURE 9 WARNING Unlocked Locked NEVER disassemble the Roller Hinge Pivot Pin. Bracket Pin Pivot Pin Cam Lock Bracket • Familiarize yourself with the Roller Hinge and Cam Lock terms detailed above in Figure 9. FIGURE 11 •...
- Page 15 STEP 5 Attach the Table Bed to the A-Frame • Face the front of the A-Frame where the Crossbar is located (refer to Figure 13 to determine FIGURE 13 A-Frame Front). • Grasp both the Roller Hinges, right above the Cam Lock, and lift the Table Bed. Allow the top of the Table Bed to rotate toward the floor, so that the back of the Table Bed is now facing you and the top of the Table Bed is in front of the Crossbar (Figure 14).
- Page 16 • Test the inversion table by hand for smooth and steady rotation (Figure 20) and ensure that all fasteners are secure. • Tighten the De-Rattler Knob. FIGURE 20 For users with the EP-550 Sport model, follow the Conversion Bar Assembly & User Instructions enclosed in this packet.
- Page 17 A-Frame backwards so the Main Shaft is not resting upside down into the Table Bed and must be corrected. on the Crossbar and must be corrected. * Inversion Table images may vary slightly from your model. The EP-550 is shown here.
- Page 18 STEP 7 Attach the Accessories Attach the Angle Tether (OPTIONAL) FIGURE 21 • The tether will come pre-assembled to the A-Frame. • Unfold the adjustable tether and clip it to the U-Bar on the underside of the Table Bed (Figure 21). •...
- Page 19 BEFORE INVERTING Attach the Owner’s Manual FIGURE 23 The Owner’s Manual contains important information on how to use your Teeter Hang Ups Inversion Table, including how to personalize the user settings, properly secure and release the Ankle Lock System, and test and adjust the rotation control. •...
Need help?
Do you have a question about the EP-550 and is the answer not in the manual?
Questions and answers