
Related Manuals for Hang ups Teeter EP-950


Summary of Contents for Hang ups Teeter EP-950
- Page 1 ™ Inversion Table Assembly Instructions www.ActiveForever.com YEAR...
-
Page 2: Important Safety Instructions
BEFORE YOU BEGIN: Review all steps before beginning assembly and read all precautions before using the inversion table. Carefully adhere to the Assembly Instructions and Owner’s Manual to help ensure safety and product integrity. IMPORTANT SAFETY INSTRUCTIONS READ ALL INSTRUCTIONS BEFORE USING THE INVERSION TABLE. WARNING WARNING - To reduce the risk of injury to persons: •... -
Page 3: Items For Assembly
Items for Assembly You should have all of the items listed below. If you have any questions on assembly, contact Customer Service at 1-800-847-0143. ITEMS FOR ASSEMBLY ITEM NUMBER A-Frame EP-1100 EZ-Angle™ Tether Strap F5-1008 Attached to A-frame Main Shaft w/Ankle System NX-1630 Ergo Embrace Cups (4) EP-1054... -
Page 4: Before Beginning
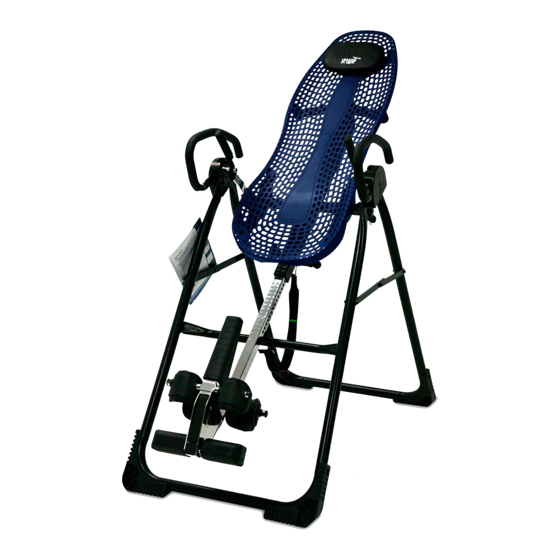
Before Beginning Before reading further, study the drawing below to familiarize yourself with the important components of your new Teeter Hang Ups inversion table. ® Head Pillow Table Bed Over EZ Handles Traction Handles Spreader Arms De-Rattler Knob Height-Selector Locking Pin Main Shaft EZ-Angle Tether Strap Crossbar... - Page 5 Step Figure 1 Assemble the A-Frame Base (EP-1100) and Install the Handles (GL-9518,GL-9522) and Shrouds (GL-9524) • Open the A-Frame and make sure the Spreader Arms are locked. Rest the A-Frame on the floor (Figure 1). The Crossbar is at the front. Right Left •...
- Page 6 Step 2 Figure 3 Attach the Upper Support Arms to the Table Bed (EP-1140) • Place the Table Bed face down on the floor and push down on the Support Beam, so the two holes align evenly with the holes at the base of the Upper Support Arms (Figure 3). You may have to exert extra pressure to ensure that the Support Beam slides over the rubber spacers.
- Page 7 Step 3 Figure 5 Install the Roller Hinges with Traction Handles (TR-1003) onto the Table Bed (EP-1140) • For ease-of-assembly, rest the Table Bed against the side of the A-Frame (Figure 5). • Open the Cam Locks on each side of the Table Bed (Figure 6). •...
- Page 8 Figure 9 Step 4 Attach the Table Bed (EP-1140) to the A-Frame (EP-1100) • Holding each side near the Roller Hinges, pick up the Table Bed and stand at the front of the A-Frame where the Crossbar is located. Lower each Pivot Pin into the A-Frame hinge plates one at a time (Figure 9). You may need to push outward on the A-Frame in order to slide the second Pivot Pin into the hinge.
- Page 9 Step 5 Figure 12 Insert the Main Shaft (NX-1630) into the Table Bed (EP-1140) • Loosen the De-Rattler Knob on the Main Shaft Housing. • With the height adjustment settings on the Main Shaft facing up, slide the end of the Main Shaft into the Main Shaft Housing on the Table Bed.
- Page 10 Step 7 Figure 15 Attach the Head Pillow • Attach the Head Pillow by securing the Velcro straps through the holes in the Table Bed - the position of the pillow ® can be adjusted depending on the user (Figure 15). Step 8 Figure 16 Before Use...
- Page 11 Adjustments / Maintenance / Storage Figure 17 Changing the Roller Hinge Setting • Stand with your legs on either side of the Main Shaft. • Reach under each Roller Hinge with your index fingers. Use your thumbs to release the locks over the Roller Hinges (Figure 17).
Need help?
Do you have a question about the EP-950 and is the answer not in the manual?
Questions and answers