dji LIGHTBRIDGE User Manual
Hide thumbs
Also See for LIGHTBRIDGE:
- Quick start manual (46 pages) ,
- User manual (25 pages) ,
- Quick start manual (30 pages)
Table of Contents
Advertisement
Quick Links
Advertisement
Table of Contents

Subscribe to Our Youtube Channel
Related Manuals for dji LIGHTBRIDGE


Summary of Contents for dji LIGHTBRIDGE
- Page 1 DJI LIGHTBRIDGE User Manual V1.0 2014.08 ©2014 DJI. All Rights Reserved.
-
Page 2: Disclaimer
DJI is a registered trademark of DJI. Names of product, brand, etc., appearing in this manual are trademarks or registered trademarks of their respective owner companies. This product and manual are copyrighted by DJI with all rights reserved. -
Page 3: Profile
The ground system can connect to two remote controls, one for aircraft and the other for gimbal control. A DJI flight control system with DBUS port is required as the built in receiver only supports the DJI DBUS protocol. -
Page 4: Caution
RF functions must be switched off. Do not create shorts or open circuits when soldering. Do not rotate gimbal if connected to camera HDMI port using DJI AV gimbal. This will cause gimbal or HDMI cable damage. Disconnect HDMI cable from the camera when powering on the DJI non-HD gimbal. Failure to do so might damage HDMI cable. - Page 5 Land slowly (≤1.5m/s) with the Phantom 2, as rapid landings can cause it to spin. Others We strongly recommend using as many DJI parts as possible. If you have problems you cannot resolve, please contact your dealer or DJI customer service. ©2014 DJI. All Rights Reserved.
-
Page 6: Table Of Contents
2.3.4 DIY Mode ................................... 24 3 Using DJI LIGHTBRIDGE .................................. 26 3.1 Master-Slave Mode.................................. 26 4 Using DJI LIGHTBRIDGE App ................................ 27 4.1 Downloading DJI LIGHTBRIDGE App ..........................27 4.2 Register and Login ................................. 27 4.3 DJI LIGHTBRIDGE App Usage ............................30 4.4 DJI LIGHTBRIDGE App Settings ............................ -
Page 7: In The Box
Connect to Air system GIMBAL port, one end for power, the other for CAN port. AV cable ×1 Connect camera’s AV output to AV input port. HDMI cable (D-D) ×1 Connection for camera’s HDMI output. ©2014 DJI. All Rights Reserved. - Page 8 Connect to ground system when charging. USB upgrade cable ×1 Connect to a PC when upgrading firmware. Optional Packet HDMI cable (D-D) ×1 Optional packet Ground system holder ×1 Smart phone holder ×1 Optional packet HDMI cable for Zenmuse ×1 ©2014 DJI. All Rights Reserved.
-
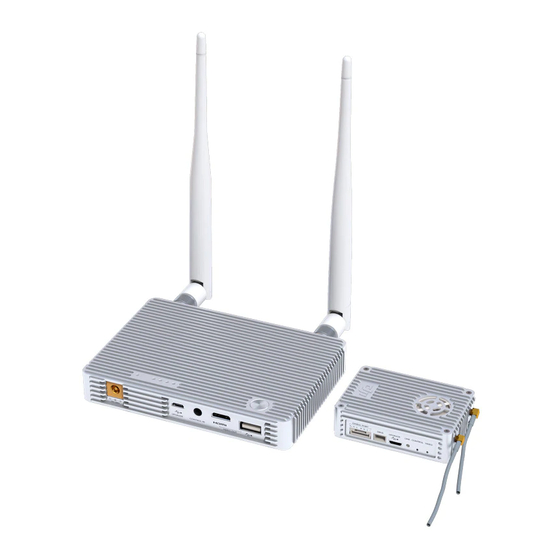
Page 9: Introduction
Front View Gimbal Port This port be connected to the G7 port on a DJI HD gimbal or to other ports for the functions listed below: Power supply: (V+,V-) On-board battery (3S~6S) power connection. Non-DJI HD gimbal users must use a seperate power cable or air system power CAN cable to connect air system and on-board battery. - Page 10 [ ] 1 HDMI In Port Connect to HDMI input device. Maximum input rate is 1920*1080@60fps. AV Port Connect to AV input, including: AV output from camera AV output from DJI AV gimbal control unit (GCU) ©2014 DJI. All Rights Reserved.
-
Page 11: Ground System
HDMI Out Port Connect to HDMI supported monitor for video viewing. Maximum output rate is 1080i60. USB Port Connect to smart device to view video and flight control system OSD using DJI LIGHTBRIDGE App. Top View [ ] 1 ©2014 DJI. All Rights Reserved. - Page 12 Power on: When battery is off, press power button once, then again and hold for 2 seconds to power on. Power off: When battery is off, press power button once, then again and hold for 2 seconds to power off. Show capacity: When battery is off, press power button once to display battery capacity. ©2014 DJI. All Rights Reserved.
-
Page 13: Installation
Point antennas downward when in use and avoid obstructions to ensure transmission quality. Use only DJI antennas and install them correctly. Other antennas are incompatible. Do not unplug the antennas unless it is absolutely necessary. Use tweezers to clamp on the metal part of the antennas when unplugging the antennas. -
Page 14: Remote Control Connection
Pay special attention to the below: Select AERO as TX model. Set all curves (pitch, throttle, expo, rates, etc.) to default. Set endpoints of all channels to default (100%) and all trims and sub-trims to zero. ©2014 DJI. All Rights Reserved. - Page 15 This inconsistency can be observed by viewing the “SERVO” in the “LINKAGE”, as shown below. Actual GUI may vary between models. SERVO -100 -100 +100 -100 -100 Check that actual “TRAVEL” value does not exceed 100. If it does, reconfigure as necessary. ©2014 DJI. All Rights Reserved.
-
Page 16: Video Output Connection
2.3.1 DJI HD Gimbal When using with DJI HD gimbal such as Z15-BMPCC, you can select either single or dual video source. By single video source mode, it means the air system relays either the gimbal camera video or the FPV camera video signal to the ground system. - Page 17 DJI HD gimbal video feed from the slave ground station. Air system connection: Connect Gimbal Port on air system to G7 port on DJI HD gimbal with supplied Gimbal cable (DJI HD gimbal). Connect HDMI /AV port to the FPV camera.
- Page 18 FPV camera video feed from the master ground station, while the gimbal operator receives DJI HD gimbal video feed from the slave ground station. Air system connection: Connect Gimbal Port on air system to G7 port on DJI HD gimbal with supplied Gimbal cable (DJI HD gimbal). ©2014 DJI. All Rights Reserved.
- Page 19 Connect mobile devices or HDMI monitor to the master and slave ground station. Launch DJI LIGHTBRIDGE App and configure the Master –Slave mode in “App Settings”. It is recommended to use “Master” ground system to receive FPV video signal and “Slave” ground system to receive gimbal video signal.
- Page 20 Air system connection: Connect Gimbal Port on air system to G7 port on DJI HD gimbal with supplied Gimbal cable (DJI HD gimbal). Connect DBUS port on air system to DBUS port (X2 port) on flight control system with DBUS cable.
-
Page 21: Dji Non-Hd Gimbal
Connect mobile devices or HDMI monitor to the master and slave ground station. Ground station displays DJI HD gimbal video signal. 2.3.2 DJI non-HD Gimbal When using with DJI non-HD gimbal such as Z15-GH3, connect AV output from DJI gimbal to AV input port on ©2014 DJI. All Rights Reserved. - Page 22 It is possible to control air craft and gimbal using single remote control, as long as proper channel mapping is completed in DJI LIGHTBRIDGE Assistant. It is also possible to control the gimbal independently with a 5.8GHz receiver, in this scenario, it is required to connect the 5.8GHz receiver to the AUX2 port on the DJI gimbal.
-
Page 23: Phantom 2 Mode
User needs to replace the standard Phantom remote control with PPM 2.4GHz remote control (e.g. Futaba series). It is also possible to use DJI 5.8GHz remote control to replace the standard Phantom remote control. In this scenario, it is not required to connect the DBUS cable with flight controller. -
Page 24: Diy Mode
Connect Gimbal Port to EXP port (6-pin port) on DJI Phantom 2 central board with Gimbal cable. To access the EXP port, you will need to remove the top of the DJI Phantom 2 case. See below example for details. - Page 25 On AV cameras, connect AV port to AV output with AV cable. On HDMI cameras, connect HDMI IN port to the HDMI out with HDMI cable. Connect Gimbal Port to onboard battery and CAN-bus port on DJI flight control system (CAN1 port for DJI A2 users) via the supplied air system power and CAN cable.
-
Page 26: Using Dji Lightbridge
Do not attempt to link slaves to the air system. This may compromise the communication between air system and master ground system. Ensure to set the slave as a slave in the DJI LIGHTBRIDGE app. ©2014 DJI. All Rights Reserved. -
Page 27: Using Dji Lightbridge App
Scan QR card for DJI LIGHTBRIDGE App download link. Install onto smart device. Search “DJI LIGHTBRIDGE” in Google Play. Install DJI LIGHTBRIDGE App onto smart Android device. Pay attention to notifications from DJI.com and Google Play to keep DJI LIGHTBRIDGE App updated. Supported Mobile Devices Optimus G Pro LG Electronics... - Page 28 Tap ‘Login’ to enter the login page. Enter registered email and password then tap to log in. Notes Log into your account when time you launch DJI LIGHTBRIDGE App for the first time. If you have forgotten your password, select “Forgot password” to begin retrieval. ©2014 DJI. All Rights Reserved.
- Page 29 ©2014 DJI. All Rights Reserved.
-
Page 30: Dji Lightbridge App Usage
4.3 DJI LIGHTBRIDGE App Usage DJI LIGHTBRIDGE App displays video and flight control system OSD information as shown below. [12] [13] [10] [11] Flight control system control mode. Flight status. Air system power voltage indicator. Video signal status. Remote control signal status. App sounds an alarm if the remote control signal is weak. -
Page 31: Dji Lightbridge App Settings
4.4 DJI LIGHTBRIDGE App Settings Setup the channels, transmission mode, master-slave mode, video source, HDMI, warning, signal diagnostic, etc. in the settings: Channel Settings Manually select the channel when the performance of auto-selected channel is not optimum. Shorter yellow bar indicates better channel signal quality. Once the channel is selected manually, it cannot auto switch, use this function cautiously. - Page 32 Master ground system can display video and relay control signal to the aircraft; slave ground system can only display video. Steps to setup: A) Tap “Master-Slave” option in DJI LIGHTBRIDGE App of the master ground system, make a note of the master ID;...
- Page 33 Single Video Only HDMI/AV video signal will be transmitted HDMI/AV to the ground system. Both DJI HD gimbal and HDMI/AV video signals are DJI HD gimbal transmitted to the ground system. But only DJI HD gimbal video will be displayed.
- Page 34 30 minutes, an alarm will sound and the system will power off. Signal Diagnostic If the maximum flight distance is significantly reduced, this could be caused by damaged antennas or a ©2014 DJI. All Rights Reserved.
-
Page 35: Using Ground System
Run signal diagnostics in the DJI LIGHTBRIDGE App to determine the cause. Remove one of the antennas, place ground system two meters away from air system and launch DJI LIGHTBRIDGE App. Enter “Signal Diagnostic” page to check the signal strength. Green bars indicates signal strength is normal, and readings should falls in the range of -20 to 40. -
Page 36: Assistant
Note Installer only supports Windows operating systems (Win XP, Win7, Win8 (32 or 64 bit)). 5.2 Using Assistant User can upgrade DJI LIGHTBRIDGE firmware, distribute the remote control channel and calibrate the remote control through LIGHTBRIDGE Assistant. Language swap Firmware upgrade... -
Page 37: Using Lightbridge Assistant
Go to “Channels” page to check both aircraft channels and gimbal channels. 5.2.2 Remote Control Channel Settings If you change the remote control, it is necessary to set the channels again through LIGHTBRIDGE Assistant, so that the remote link function can be use normally. Steps to set up the remote channel: Connect the Remote Control to PC, enter the main page. - Page 38 Eight channels on the left are for aircraft and eight channel on the left are for gimbal control. Calibration is required. Click “Calibration” and calibrate the remote control follow the instructions. After finish calibration, you can map the channel as you need. The following is the example for mapping gimbal SHUT channel. ©2014 DJI. All Rights Reserved.
-
Page 39: Firmware Upgrade
Wait until Assistant displays the “finished” message then click OK. Power cycle the ground system (or air system) after 5 seconds. Once complete, firmware is up to date. Firmware upgradable items Upgrade link Current firmware version *This image is for reference only. Please refer to the actual user interface. ©2014 DJI. All Rights Reserved. - Page 40 Connect to ground system for ground system main controller and ground system decoder upgrade, and connect to air system for air system main controller and air system encoder upgrade, Internet connection is required for LIGHTBRIDGE firmware upgrade. DO NOT power off until upgrade is finished.
-
Page 41: Specification
Hardware Functions Supported Antenna Connector MMCX Male (air system), SMA Male (ground system) Air System Operating Voltage 3S~6S Ground System Operating Voltage 3S~6S Air System Operating Amperage 700mA mA(@12V) Ground System Operating Amperage 600mA (@12V) ©2014 DJI. All Rights Reserved. -
Page 42: Appendix
Connect plug adapter to power adapter before attaching power adapter to ground system. Plug power adapter to power outlet to recharge. Power indicator lighting up green indicates charge in progress. Power indicator turning off indicates charge complete. ©2014 DJI. All Rights Reserved. -
Page 43: Supported Resolution
7.4 Supported Resolution Following resolutions is supported. Mode Format PAL25, NTSC30 HDMI 720p50, 720p60, 1080i50, 1080i60, 1080p25, 1080p30, 1080p50, 1080p60 DJI LIGHTBRIDGE supports above mentioned video format. The list below take GoPro Hero3+ as example: Camera Resolution HDMI Output Supported Remark √... -
Page 44: Supported Remote Control
T8FG T14SG FUTABA T10CHG T10CG DSX9 DSX11 DX6I SPEKTRUM DX18 DEVENTION DEVO-10 The above supported list is non-exhausted. Your device may be supported if it follows the same PPM signal standard as the devices above. ©2014 DJI. All Rights Reserved. -
Page 45: Faq
Q: Is it possible to use single FUTABA transmitter to simultaneously control aircraft and gimbal? A: Yes. You will need to assign the channels from aircraft and gimbal through DJI LIGHTBRIDGE App. Q: Is it possible to two different brands of transmitter to simultaneously control aircraft and gimbal? A: Yes. - Page 46 A: Blinking green indicator means linking is required. Check the follow to ensure linking is carried out correctly. Antennas are firmly attached on both air system and ground system. Launch DJI LIGHTBRIDGE App to check whether ground system is in master mode, if not, ©2014 DJI. All Rights Reserved.
- Page 47 Check the version of your DJI LIGHTBRIDGE App. Launch DJI LIGHTBRIDGE App, make a note on the USB connection status on the GUI. Unplug the USB cable on the ground system. And then plug it back in. The USB connection status should changes from “USB disconnected”...
-
Page 48: Fcc And Ic Statements
Antenna types not included in this list, having a gain greater than the maximum gain indicated for that type, are strictly prohibited for use with this device. ©2014 DJI. All Rights Reserved. - Page 49 When using the device, ensure that the antenna of the device is as least 20 cm away from all persons. Hereby, SZ DJI TECHNOLOGY CO. LTD declares that this device is in compliance with the essential requirements and other relevant provisions of Directive 1999/5/EC.
Need help?
Do you have a question about the LIGHTBRIDGE and is the answer not in the manual?
Questions and answers