dji LIGHTBRIDGE User Manual
Hide thumbs
Also See for LIGHTBRIDGE:
- User manual (49 pages) ,
- Quick start manual (46 pages) ,
- Quick start manual (46 pages)
Table of Contents
Advertisement
Quick Links
Download this manual
See also:
User Manual
Advertisement
Table of Contents

Related Manuals for dji LIGHTBRIDGE


Summary of Contents for dji LIGHTBRIDGE
- Page 1 DJI LIGHTBRIDGE LIGHTBRIDGE LIGHTBRIDGE LIGHTBRIDGE User Manual User Manual User Manual User Manual V1.0 V1.0 V1.0 V1.00 0 0 0 2014.0 2014.02.2 2014.0 2014.0 2.26 6 6 6...
-
Page 2: Disclaimer
Theground unit receives the information, demodulates and sends it to display on a monitor or a smart phone. To obtain a better experience, download the DJI LIGHTBRIDGE App via a smart phone for displaying the video image and flight controller OSD information. -
Page 3: Table Of Contents
Install Antennas....................................13 Usage ..........................................18 Link ........................................18 Download DJI LIGHTBRIDGE App............................18 Usage Procedure .................................... 18 DJI LIGHTBRIDGE App Usage ..............................20 Specification ......................................21 Appendix ........................................23 Re-link ........................................ 23 Recharge Ground Unit.................................. 23 FCC and IC Statements ..................................24... -
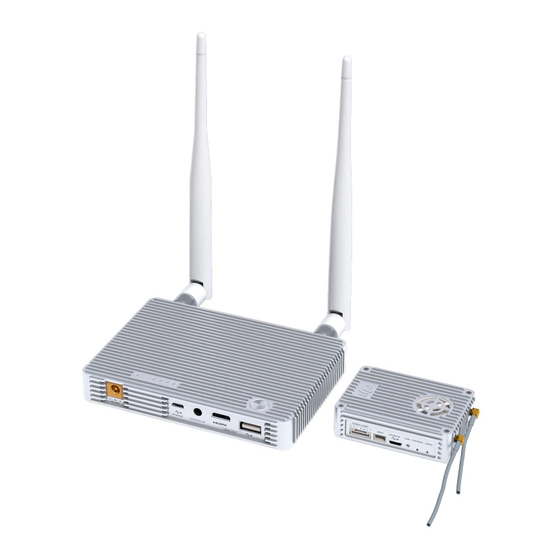
Page 4: In The Box
In the Box In the Box In the Box In the Box M M M M odules odules odules odules Air unit unit× × × × 1 1 1 1 Ground unit Ground unit×1 ×1 unit unit Ground Ground unit unit ×1 ×1... - Page 5 Micro- - - - USB Micro Micro USB cable cable cable cable ×1 ×1 ×1 ×1 Connect to a PC for firmware upgrade viathe DJI Assistant Software. Ground unit Ground unit cables cables Ground Ground unit unit cables cables Transmitter cable ×1 Transmitter cable ×1...
- Page 6 Charger ×1 Charger ×1 Charger Charger ×1 ×1 For charging the ground unit. Charger cable ×1 Charger cable ×1 Charger cable Charger cable ×1 ×1 Connect the charger to a wall socket. Choose an appropriate adapter for the wall socket. Battery charger cable Battery charger cable×1 Battery charger cable...
-
Page 7: Introduction
DVSB: (G-,+)For DJI high end gimbal DVSB video streaming input. DBUSport DBUS port DBUS DBUS port port Built-in receiver interface should be connected to DJI flight control system’s DBUS port usually locating at main controller labled X2. UPGRADE port UPGRADE port UPGRADE UPGRADE port... -
Page 8: Ground Unit
Indicator Indicator Indicator Indicator Description Description Instruction Instruction Description Description Instruction Instruction AV/HDMI signal is detected and proper Proper functioning. functioning. AV/HDMI signal is detected but transmission Power cycle is required. failed. Check camera No video source is detected. andconnection status. Top view Top view Top view... - Page 9 Connect to a HDMI supported monitor to view the video and OSD from the flight control system. USBP P P P ort Connect to a smart phone to view the video and OSD from the flight control system by using the DJI Lightbridge App.
- Page 10 V V V V IDEO IDEOI I I I ndicator ndicator IDEO IDEO ndicator ndicator Vedio transmission linkage indicator, used together with the air unit remote controller to reflect the connection status between the air unit and ground unit. I I I I ndicator ndicator D D D D escription escription...
- Page 11 Solid green Flashing green Power Button Power Button Power Power Button Button Power on: Power on:Press the button once and hold to the button for more than 2 seconds to power on. Power on: Power on: Power off: Power off: Press the button once and press the button again to power off..Power off: Power off: Show capacity:...
-
Page 12: Connection
HDMI input, connect the HDMI cable to the HDMI port on the camera.For AV input, connect the AV cable to the AV output port on the camera. When using the DJI gimbal, connect to the video output port on the GCU model. The illustration below use the DJI GCU as the example. -
Page 13: Ground Unit Connection
Flight Control System onnect to Flight Control System Currently the only flight system control that Lightbridge supported is DJI A2, refer to the user manual of DJI A2 to complete the following connection:。 Connect the DBUS cable to the DBUS port (X2 port) on the DJI A2 flight control system. - Page 14 C C C C aution aution aution aution Be sure to attach the antennas before power on the ground unit, otherwise it may cause damages to the device. Ensure to use the special antennas and install them by a professional trained. Any other types of antennas are forbidden.
- Page 15 Transmitter Transmitter Configuration Transmitter Transmitter Configuration Configuration Configuration Refer to your own remote controller for reference. The below configuration process is based on Futaba T8FG as the example: Switch off the RF option. The below procedure takes the Futaba T8FG as the example: Press and hold the [RTC] button to switch on the remote controller.
- Page 16 Connect HDMI supported monitor to HDMI OUT port in the ground unit for HDMI viewing. (Coming soon) Connect smart phone to USB port on ground unit using USB cable. Use the DJI Lightbridge One app to view video and OSD information from the flight control system in real time.。The below...
-
Page 18: Usage
U U U U sage sage sage sage L L L L ink Linking is completed when the Lightbridge is shipped. Start using the product according to the indicators. Download Download DJI Download Download DJI LIGHTBRIDGE LIGHTBRIDGE LIGHTBRIDGE LIGHTBRIDGE App Select one of these approaches to download the DJI LIGHTBRIDGE App. - Page 19 operation is completed. When the ground unit is receiving signals, both the antennas stop transmitting signals and start receiving signals. When the ground unit is transmitting signals, the antennas stop receiving signals and one of the antennas starts transmitting signals.
-
Page 20: Dji Lightbridge App Usage
App Usage Usage LIGHTBRIDGE LIGHTBRIDGE Usage Usage DJI LIGHTBRIDGE App can display OSD information feed by the flight control system. The OSD information is shown as below: IOC Status ON:Enabled OFF:Disabled Control mode of the flight control system Ground unit power capacity... -
Page 21: Specification
Specification Specification Specification Specification Performance Parameters Performance Parameters Performance Parameters Performance Parameters Transmission Distance(outdoor and Transmission Distance(outdoor and Transmission Distance(outdoor and Transmission Distance(outdoor and 1.2Km unobstructed unobstructed) ) ) ) unobstructed unobstructed EIRP EIRP 100mW EIRP EIRP Sensitivity ( 1%PER 1%PER )... - Page 22 P P P P hysical Parameters hysical Parameters hysical Parameters hysical Parameters Operating Temperature Operating Temperature -10~50 Operating Temperature Operating Temperature Air unit : 68cm(L)X48cm(W)X21cm(H) antennas ) Dimension ( Dimension (no Dimension ( Dimension ( no antennas antennas antennas Ground unit : 125cm(L)X90cm(W)X20cm(H) Air unit :...
-
Page 23: Appendix
A A A A ppendix ppendix ppendix ppendix Re-link Follow the below instruction to re-link the air unit and the ground unit when the initial linking is failed. 1. 1. 1. 1. Maintain a distance of 0.5m to 1m between the air unit and the ground unit, power on the air unit and then the ground unit. -
Page 24: Fcc And Ic Statements
FCC and IC Statements FCC and IC Statements FCC and IC Statements FCC and IC Statements This device and its antenna must not be located or operating in conjunction with any other antenna and transmitter. This device complies with part 15 of the FCC rules. Operation is subject to the following two conditions: (1) this device may not cause harmful interference, and (2) this device must accept any interference received, including interference that may cause undesired operation. - Page 25 When using the device, ensure that the antenna of the device is as least 20 cm away from all persons. Hereby, SZ DJI TECHNOLOGY CO. LTD declares that this device is in compliance with the essential requirementsand other relevant provisions of Directive 1999/5/EC.
Need help?
Do you have a question about the LIGHTBRIDGE and is the answer not in the manual?
Questions and answers