Table of Contents
Advertisement
Available languages
Available languages
Instructions For Use - Original Instructions / Instrucciones de uso / Mode d' emploi
READ THIS BOOK
LEA ESTE MANUAL
LISEZ CE MANUEL
This book has important information for the use and safe operation of this machine. Failure to read this book prior to oper-
ating or attempting any service or maintenance procedure to your Clarke machine could result in injury to you or to other
personnel; damage to the machine or to other property could occur as well. You must have training in the operation of this
machine before using it. If your operator(s) cannot read this manual, have it explained fully before attempting to operate this
machine.
All directions given in this book are as seen from the operator's position at the rear of the machine.
Form No. 56091128
7/2014 REV A
MA50 15B
Model: CLARKE380B
English (A2 - A10)
EN
Español (B2 - B10)
ES
Français (C2 - C10)
FR
Advertisement
Chapters
Table of Contents

Related Manuals for Clarke MA50 15B CLARKE380B


Summary of Contents for Clarke MA50 15B CLARKE380B
- Page 1 This book has important information for the use and safe operation of this machine. Failure to read this book prior to oper- ating or attempting any service or maintenance procedure to your Clarke machine could result in injury to you or to other personnel;...
-
Page 2: Table Of Contents
A - ENGLISH INSTRUCTIONS FOR USE TABLE OF CONTENTS Page Safety Precautions ..............A-2 Machine Components ..............A-3 Machine Set Up & Installation .......... A-4 – A-6 Machine Operation ..............A-6 After Each Use ................A-7 Battery Charging & Maintenance ........A8 – A-9 Technical Data ................A-9 Troubleshooting ...............A-10 Parts List ................D-2 –... -
Page 3: Machine Components
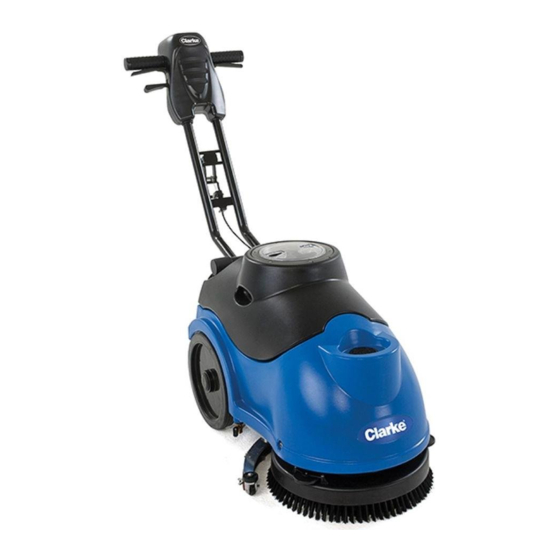
INSTRUCTIONS FOR USE ENGLISH - A MACHINE COMPONENTS Recovery Tank Lid Recovery Tank Solution Tank Recovery Tank Latch Vacuum Rubber Connectors Solution Inlet Solution Tank Drain Cap Recovery Tank Drain Cap Operating Triggers Handle Adjustment Lever Squeegee Raise/Lower Handle Battery Charger Battery Charge Indicators Solution Ball Valve Squeegee... -
Page 4: Battery Charging
A - ENGLISH INSTRUCTIONS FOR USE MACHINE SET UP & INSTALLATION UNCRATING MACHINE Be sure and check packing carton for any damage. Immediately report any damage to carrier. Check contents of package to ensure that the following items are included: Machine Batteries(x2) Squeegee assembly... -
Page 5: Squeegee Installation
INSTRUCTIONS FOR USE ENGLISH - A BRUSH/PAD DRIVER INSTALLATION AND DISASSEMBLY NOTE Only install manually. If automatically installed, it will wear brush hub. Make sure that the tanks are empty before removing the brush. Turn off the machine. Lay down the machine in the position shown in fi gure 2. Pull up lift lever (26) to raise the squeegee. (33). Mount the brush or pad driver onto the drive wheel hub and then rotate counterclockwise until it locks, as indicated in fi... -
Page 6: Machine Operation
A - ENGLISH INSTRUCTIONS FOR USE SOLUTION TANK FILLING NOTE The machine can be fi lled with a hose or bucket. Do not remove the Solution fi lter (21) while fi lling. Fill water into solution tank (3) from the inlet (20) through hose or bucket. Do not overfi... -
Page 7: After Each Use
INSTRUCTIONS FOR USE ENGLISH - A AFTER EACH USE After scrubbing, please proceed with below actions before storing the machine: Remove the brush / pad-holder. Empty the tanks as shown in the previous paragraph. Perform the daily maintenance procedures. (see Maintenance section) Store the machine in a clean and dry place, with the brush / pad-holder and the squeegee up. -
Page 8: Squeegee Cleaning
If the machine is not equipped with on-board battery charger, choose an external battery charger suitable for the type of batteries installed. WARNING ! Please use Clarke approved charger to charge the batteries. Place charger and machine in a well-ventilated area. Turn machine off.(47) Remove the recovery tank,(2) exposing battery compartment. -
Page 9: Technical Data
INSTRUCTIONS FOR USE ENGLISH - A BRUSH /PAD DRIVER CLEANING CAUTION ! It is advisable to wear protective gloves when cleaning the brush/pad because there may be sharp debris. Remove the brush/pad as shown in “Machine Use” section. Clean and wash the brush/pad with water and detergent. Check the brush bristles for integrity and wear. -
Page 10: Troubleshooting
A - ENGLISH INSTRUCTIONS FOR USE TROUBLESHOOTING Trouble Possible Cause Remedy The machine does not work, The battery connector is disconnected Connect The batteries are completely discharged Charge the batteries indicator light (51) do not turns on The power line disconnected from the power Connect The machine does not work, The batteries are discharged... - Page 12 B - ESPAÑOL INSTRUCCIONES DE USO ÍNDICE Página Precauciones de seguridad ............B-2 Componentes de la máquina .............B-3 Confi guración e instalación de la máquina ......B-4 – B-6 Funcionamiento de la máquina ..........B-6 Luego de cada uso ..............B-7 Carga y mantenimiento de batería .........B-8 – B-9 Información técnica ..............B-9 Resolución de problemas ............B-10 Lista de piezas ...............D-2 –...
- Page 13 INSTRUCCIONES DE USO ESPAÑOL - B COMPONENTES DE LA MÁQUINA Tapa del depósito de recuperación Depósito de recuperación Depósito de solución Pestillo del depósito de recuperación Conectores de aspiración de goma Entrada de solución Tapa del tubo de drenaje del depósito de solución Tapa del tubo de drenaje del depósito de recuperación Disparadores de funcionamiento Palanca de ajuste de la manija...
- Page 14 B - ESPAÑOL INSTRUCCIONES DE USO CONFIGURACIÓN E INSTALACIÓN DE LA MÁQUINA DESEMBALAJE DE LA MÁQUINA Asegúrese y verifi que que el paquete de cartón esté libre de daños. Informe inmediatamente cualquier daño al portador. Verifi que el contenido del paquete para asegurarse de que los siguientes elementos estén incluidos: Máquina Baterías (x2) Conjunto de la escobilla...
- Page 15 INSTRUCCIONES DE USO ESPAÑOL - B INSTALACIÓN Y DESMONTAJE DEL CEPILLO/PORTABAYETAS NOTA Sólo instale manualmente. Si se instala automáticamente, se desgastará el buje del cepillo. Asegúrese de que los depósitos estén vacíos antes de quitar el cepillo. Apague la máquina. Coloque la máquina en la posición mostrada en la fi...
- Page 16 B - ESPAÑOL INSTRUCCIONES DE USO LLENADO DEL DEPÓSITO DE SOLUCIÓN NOTA La máquina puede ser llenada con una manguera o un balde. No retire el fi ltro de la solución (21) durante el llenado. Llenar el agua en el depósito de solución (3) desde la entrada (20) a través de la manguera o balde. No llene en exceso el depósito de solución.
- Page 17 INSTRUCCIONES DE USO ESPAÑOL - B DESPUÉS DE CADA USO Después de fregar, por favor proceda con las acciones a continuación antes de guardar la máquina: Retire los cepillos o portabayetas. Vacíe los depósitos, como se muestra en el párrafo anterior. Lleve a cabo los procedimientos de mantenimiento diario.
- Page 18 Si la máquina no está equipada con un cargador de baterías incorporado, elija un cargador externo adecuado para el tipo de baterías instaladas. ¡ADVERTENCIA! Por favor, use un cargador aprobado por Clarke para cargar las baterías. Coloque el cargador y la máquina en una zona bien ventilada. Apague la máquina.(47) Retire el depósito de recuperación, (2) dejando expuesto el compartimento de la batería.
- Page 19 INSTRUCCIONES DE USO ESPAÑOL - B LIMPIEZA DEL CEPILLO/PORTABAYETAS ¡PRECAUCIÓN! Es recomendable el uso de guantes protectores cuando limpie el cepillo/almohadilla, porque puede haber residuos cortantes. Retire el cepillo / almohadilla, como se muestra en la sección “Utilización de la máquina”. Limpie y lave el cepillo / almohadilla con agua y detergente.
- Page 20 B - ESPAÑOL INSTRUCCIONES DE USO RESOLUCIÓN DE PROBLEMAS Problema Posible causa Remedio La máquina no funciona, el El conector de la batería está desconectado Conectar Las baterías están completamente descargadas Cargar las baterías indicador luminoso (51) no se El cable de alimentación está desconectado de Conectar enciende la alimentación...
- Page 22 C - FRANÇAIS MODE D‘ EMPLOI TABLE DES MATIÈRES Page Consignes de sécurité .............. C-2 Composants de la machine ............C-3 Montage et installation de la machine ......C-4 – C-6 Fonctionnement de la machine ..........C-6 Après chaque utilisation ............C-7 Mise en charge et maintenance de la batterie ....C-8 –...
-
Page 23: Composants De La Machine
MODE D‘ EMPLOI FRANÇAIS - C COMPOSANTS DE LA MACHINE/NOMENCLATURE Couvercle du réservoir de récupération Réservoir de récupération Réservoir de solution Loquet du réservoir de récupération Raccords en caoutchouc du système d’aspiration Orifi ce de remplissage de solution Bouchon de vidange du réservoir de solution Bouchon de vidange du réservoir de récupération Commandes de fonctionnement Levier de réglage de la poignée... -
Page 24: Montage Et Installation De La Machine
C - FRANÇAIS MODE D‘ EMPLOI MONTAGE ET INSTALLATION DE LA MACHINE DÉBALLAGE DE LA MACHINE Vérifi ez que l’emballage n’est pas abimé. Signalez immédiatement tout dommage au transporteur. Vérifi ez le contenu de l’emballage et assurez-vous que les éléments suivants sont bien présents : Machine Batteries (x2) Raclette... - Page 25 MODE D‘ EMPLOI FRANÇAIS - C INSTALLATION ET DÉMONTAGE DE LA BROSSE/DU PORTE-DISQUE NOTE Installez ces éléments manuellement uniquement. S’ils sont installés de façon automatique, ceci entraîne une usure du moyeu de la brosse. Vérifi ez que les réservoirs sont vides avant de démonter la brosse. Eteignez la machine.
-
Page 26: Fonctionnement De La Machine
C - FRANÇAIS MODE D‘ EMPLOI REMPLISSAGE DU RÉSERVOIR DE SOLUTION NOTE Le réservoir peut être rempli à l’aide d’un tuyau ou d’un seau. Ne pas enlever le fi ltre à solution (21) pendant le remplissage. Remplir d’eau le réservoir de solution (3) par l’orifi ce (20) à l’aide d’un tuyau ou d’un seau. veillez à... -
Page 27: Après Chaque Utilisation
MODE D‘ EMPLOI FRANÇAIS - C APRÈS CHAQUE UTILISATION Une fois le nettoyage terminé, effectuez les opérations suivantes avant de ranger la machine : Enlevez la brosse ou le porte-disque Videz les réservoirs en procédant comme indiqué au paragraphe précédent. Effectuez toutes les procédures d’entretien quotidien. - Page 28 Si la machine n’est pas équipée de chargeur de batterie embarqué, choisir un chargeur externe adapté au type de batterie installée. AVERTISSEMENT ! Utilisez un chargeur agréé Clarke pour recharger les batteries. Placez le chargeur et la machine dans un endroit bien aéré.
- Page 29 MODE D‘ EMPLOI FRANÇAIS - C NETTOYAGE DE LA BROSSE/DU DISQUE ATTENTION ! Il est recommandé de porter des gants de protection pour nettoyer la brosse ou le disque, ceux-ci pouvant avoir ramassé des débris tranchants. Enlevez la brosse ou le disque en procédant comme indiqué au chapitre « Utilisation de la machine ». Nettoyez la brosse / le disque à...
-
Page 30: Dépannage
C - FRANÇAIS MODE D‘ EMPLOI DÉPANNAGE Problème Cause possible Solution La machine ne fonctionne pas, le Le connecteur batterie est débranché Le brancher Les batteries sont complètement déchargées. Chargez les batteries voyant (51) ne s’allume pas Le cordon d’alimentation est débranché Le brancher La machine ne fonctionne pas, le Les batteries sont déchargées. - Page 32 PARTS LIST COMPLETE ASSEMBLY D - 2 MA50 15B - 56091128 7/2014...
- Page 33 PARTS LIST COMPLETE ASSEMBLY Item Ref. No. Description Item Ref. No. Description VF89100-CL 1 Kit, Solution Tank VF89052 Cover, Waterproof VF89018-CL 1 Label, Solution Tank VF89037 Plug, Rubber VF89200 Kit, Axle Wheel VF89035 Cover Nut, M6 VF14251 Bolt, M8x30, Hex Head VF89016 Label, Charge Display VF13514A...
- Page 34 PARTS LIST SOLUTION TANK ASSEMBLY D - 4 MA50 15B - 56091128 7/2014...
-
Page 35: Solution Tank Assembly
PARTS LIST SOLUTION TANK ASSEMBLY Item Ref. No. Qty Description 1 VF89101-CL 1 Solution Tank VF89102 Hose, Connect Vacuum VF89103 Spring, Press VF89104 Vacuum Hose VF89200 Kit, Wheel Axle VF89106 Plastic Plate, Hose Limit VF89107 Rubber Seal VF89115 Gasket VF89110 Cap, Drain VF85302 Rubber Bushing... - Page 36 PARTS LIST BRUSH DECK ASSEMBLY D - 6 MA50 15B - 56091128 7/2014...
- Page 37 PARTS LIST BRUSH DECK ASSEMBLY Item Ref. No. Qty Description VF89301 Plate, Motor Mount VF89302 Brush Motor Assembly VF89303 Screw, M6x14 VF89304 Bolt, Dirve Belt VF89305 O-Ring, Big VF89306 Sealing Cover, Vacuum VF89307 O-Ring, Small VF89309 Kit, Vacuum Motor VF89310 Bracket, Vac Motor VF13491 Ph Screw, M4x12...
- Page 38 PARTS LIST BRUSH SKIRT & BRUSH D - 8 MA50 15B - 56091128 7/2014...
- Page 39 PARTS LIST BRUSH SKIRT & BRUSH Item Ref. No. Qty Description VF89400 Brush Skirt Assembly VF89401 Brush Skirt VF89402 Wheel, Bumper VF89403 Cover, Wheel VF89404 Shaft VF14401 Screw, St4x10 VF89838 Elbow VF89830 Brush Assembly VF89817 Pad Driver Assembly 9 MF-VF002-4A 6 Screw, St6.5x25 VF89803 Brush Hub...
- Page 40 PARTS LIST HANDLE CONTROL ASSEMBLY D - 10 MA50 15B - 56091128 7/2014...
- Page 41 PARTS LIST HANDLE CONTROL ASSEMBLY Item Ref. No. Qty Description VF89601A 1 Handle Tube Assy 2 VF89607-CL 1 Kit, Front Control Housing 80405A Ph Screw, M5x12 VF89610 Trigger, Handle Adjustment VF89611 Cable, Handle Adjustment VF89612 Bushing, Guide Gear VF89613 Spring, Handle Gear VF89614 Gear, Handle Adjustment VF89615...
- Page 42 PARTS LIST RECOVERY TANK ASSEMBLY D - 12 MA50 15B - 56091128 7/2014...
-
Page 43: Recovery Tank Assembly
PARTS LIST RECOVERY TANK ASSEMBLY Item Ref. No. Qty Description VF89701 Recovery Tank VF89115 Gasket VF89110 Cap, Drain VF89810 Rubber Bushing, Tank VF89811 Rubber Bushing, Tank, Grey VF89828 Kit, Squeegee Suction VF89829 Kit, Squeegee Vaccum VF89716A 1 Kit, Recovery Tank Cover VF89813 Base, Outlet VF89712... - Page 44 PARTS LIST SQUEEGEE ASSEMBLY D - 14 MA50 15B - 56091128 7/2014...
-
Page 45: Squeegee Assembly
PARTS LIST SQUEEGEE ASSEMBLY Item Ref. No. Qty Description VF89815 Squeegee Bracket VF89807 Squeegee Blade, Front 2 VF89807-PU 1 Squeegee Blade, Front (Pu - Optional) VF89808 Squeegee Blade, Rear 3 VF89808-PU 1 Squeegee Blade, Rear (Pu - Optional) VF89504 Strap, Squeegee Front VF89505 Strap, Squeegee Rear VF89506... - Page 46 PARTS LIST ELECTRICAL Item Ref. No. Qty Description VF89026-1 1 Motor Wire VF89022-2 1 Main Power Wire VF89021 Battery Connect Wire VF89036-1 1 Power Wire VF89024 Charger Input Wire VF89620 Kit, 4-Leg Switch VF89025-3 1 Communication Wire D - 16 MA50 15B - 56091128 7/2014...
- Page 47 PARTS LIST WIRING DIAGRAM 7/2014 56091128 - MA50 15B D - 17...
- Page 48 14600 21st Avenue North Plymouth, MN 55447-3408 www.clarkeus.com Phone: 800-253-0367 Fax: 800-825-2753 ©2014 Nilfi sk-Advance, Inc. A Nilfi sk-Advance Brand...
Need help?
Do you have a question about the MA50 15B CLARKE380B and is the answer not in the manual?
Questions and answers
Approximatedly how many square feet of laminate tile floor can be cleaned before the solution tank needs to filled again. Can the MA50-15 Auto Scrubber model clean a well used community hall 5000 sq ft 4 nights per week. will it last.