Advertisement
Advertisement
Table of Contents

Related Manuals for Vestfrost FZ 166


Summary of Contents for Vestfrost FZ 166
- Page 1 FZ 166 / 184 / 220 / 235 F Instructions for use...
-
Page 2: Table Of Contents
Thank you for purchasing your new inform you of how collection and recycling freezer from Vestfrost. Please note that of such units take place in your area. these instructions apply to all freezers in the FZ range. Illustrations and fi ttings... -
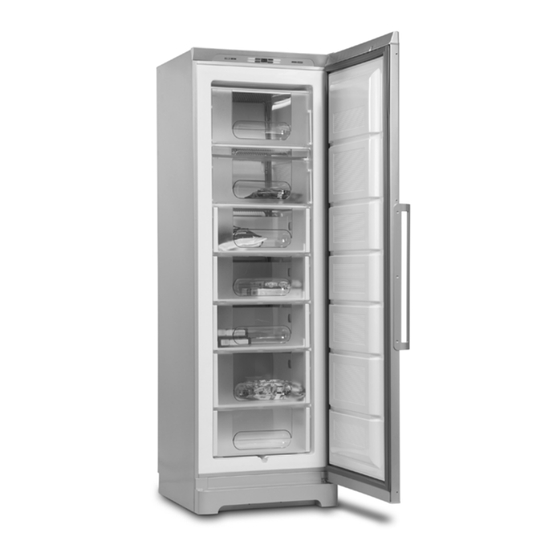
Page 3: Get To Know Your Freezer
Get to know your freezer Control panel Freezer shelf Freezing tray Sealing strip Freezer drawers Door handle Nameplate Defrost water drain Kick plate Adjustable feet fi g. 1... -
Page 4: Installation And Start-Up
Installation and start-up Placement For safety and operational reasons, the appliance must not be installed outdoors. The appliance should be placed on a level surface in a dry, well ventilated room (max. 75% relative air humidity). Never place the appliance close to sources of heat such as cookers or radiators, and avoid placing it in direct sunlight. - Page 5 The appliance viewed from Ventilation It is important that the appliance be above well ventilated and that air can circulate If the appliance is placed beside a wall, unhindered above, below and around it. The there must be suffi cient room for its door fi...
- Page 6 Setting up It is important that the appliance be absolutely level. To level the appliance, remove the kick plate beneath the door and screw the adjustable feet up or down (fi gs 8 and 9). Use a spirit level to check that the appliance is absolutely level.
-
Page 7: Reversing The Door
Reversing the door The door can be changed from right-hinged to left-hinged and vice versa as follows: 1. Lay the appliance on its back with the 2. Remove the upper hinge. 4. Lift off the door and lay it aside. door uppermost. -
Page 8: Electrical Connection
Electrical connection The appliance is intended for connection to alternating current. The required voltage (V) and frequency (Hz) are stated on the nameplate inside the appliance. Power must be connected via an independent wall socket outlet. If the mains lead has been damaged, it must be replaced with a corresponding type supplied by the manufacturer or an approved service centre. -
Page 9: Operation And Function
Operation and function Super Freeze Four-star freezer symbol On/off switch Control lamp Concealed door switch Display Freezer temperature Alarm on/off fi g. 12 Electronic controls The appliance is factory set to maintain On/off switch -18°C. Following any power failure, these settings are automatically recalled. -
Page 10: Super Freeze
Starting up Super Freeze Connect the appliance to the socket outlet. Before freezing large quantities of fresh Press the on/off switch food, it is recommended that the Super Freeze function be activated. The actual temperature in the freezer is To do so, press the Super Freeze button shown on the display. -
Page 11: Use
Freezer 2.5 kg. Keep packages dry to prevent them from freezing together. To ensure rapid The appliance is a four-star freezer freezing, make sure, as far as possible, approved for freezing down and storing that items placed in the freezer are not frozen items of food. -
Page 12: Defrosting
Defrosting Automatic defrosting Place a bowl of hot (but not boiling) water in the freezer. The freezer is defrosted automatically in To prevent the fl oor from becoming models utilising frost-free technology. wet during defrosting, check progress from time to time and lay towels Manual defrosting around the bowl on the fl... -
Page 13: Cleaning And Maintenance
Cleaning and maintenance Cleaning If the appliance is not to be used for any length of time, switch it off, empty it, clean Switch the appliance off by pressing the the cabinet and fi ttings, and leave the door on/off button before cleaning it inside. -
Page 14: Fault Fi Nding
Fault fi nding Fault Possible cause Remedy No control lamps The appliance is switched off. Press the on/off switch. are lit. Power failure; the fuse is blown; Check that power is connected. the appliance is not plugged in Reset the fuse. correctly. -
Page 15: Warranty, Spare Parts And Service
fi g. 17 installations, or repairs performed by others than service centres approved by Vestfrost, Note: Always use approved service centres and any other faults and damage that the when your appliance is to be repaired or... - Page 16 Vestfrost reserves the right to alter specifi cations without prior notice. 9120.81X-0000 06/04...
Need help?
Do you have a question about the FZ 166 and is the answer not in the manual?
Questions and answers