Table of Contents
Advertisement
Advertisement
Table of Contents

Related Manuals for Yamaha Harmony Director HD-200


Summary of Contents for Yamaha Harmony Director HD-200
- Page 1 Harmony Director HD-200 Owner’s Manual...
-
Page 2: Special Message Section
This product should be used only with the components supplied or; a When installing batteries, do not mix batteries with new, or with bat- cart, rack, or stand that is recommended by Yamaha. If a cart, etc., is teries of a different type. Batteries MUST be installed correctly. Mis-... - Page 3 Yamaha Corporation of America or its subsidiaries. harmful to the operation of other electronic devices. Compliance with FCC regulations does not guarantee that interference will * This applies only to products distributed by YAMAHA CORPORATION OF AMERICA. (class B) OBSERVERA! Apparaten kopplas inte ur växelströmskällan (nätet) så...
- Page 4 • Use the specified adaptor (PA-3HD, PA-3C or an equivalent recommended by power immediately and unplug the power cord from the AC outlet. Then have Yamaha) only. Using the wrong adaptor can result in damage to the instrument the instrument inspected by qualified Yamaha service personnel.
- Page 5 Yamaha service personnel replace the backup battery. Yamaha cannot be held responsible for damage caused by improper use or modifications to the instrument, or data that is lost or destroyed. Always turn the power off when the instrument is not in use.
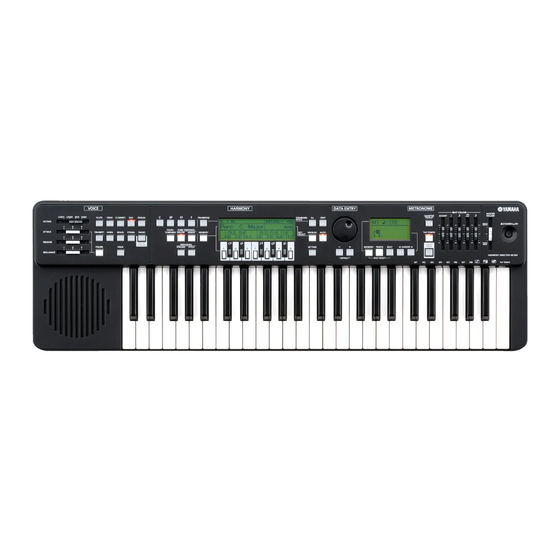
- Page 6 * Specifications and descriptions in this owner’s manual Accent are for information purposes only. Volume Lever Yamaha Corp. reserves the right to change or modify Volume Lever products or specifications at any time without prior Volume Lever notice. Since specifications, equipment or options may...
-
Page 7: Table Of Contents
Contents PRECAUTIONS Specifications Panel Controls and Jacks Basic operation Turning ON/OFF the power... . . 10 Setting Figure ......10 Master Volume Control . - Page 8 Panel Controls and Jacks Voice Button (➝page 10) Transpose Button (➝page 15) Figure Function Temperament (➝page 10) (➝page 12) Octave Lever Hold Button LCD Display (➝page 11) (➝page 11) C ( 0) 442.0Hz/ +8 Equal C Major Manua...
- Page 9 Data Entry Button Metronome (➝page 16) 4> Master Volume Data Entry Dial (➝page 10) STANDBY/ON Button (➝page 10) 4> External Input/Output Jacks (➝page 19)
-
Page 10: Basic Operation
Basic operation Turning ON/OFF the power Before turning on the power, connect the AC power adaptor to the DC 12V IN jack or set the batteries in the battery holder. Press the [STANDBY/ON] button to turn on the power. The previous pictures before turning off the power are displayed. Pressing the [STANDBY/ON] button again turns the power off. -
Page 11: Setting Hold
Setting Hold With this function, the notes can be sustained even when you release your fingers from the keyboard. Press the [HOLD] button to activate the hold mode. Then the HOLD indicator is lit. In the hold mode, played notes are sustained continuously. Also, pressing the [HOLD] button while pressing the keyboard activates the hold mode. -
Page 12: Temperaments
Temperaments Selecting Temperament Press the [EQUAL TEMPERED] button. Then the EQUAL TEMPERED indicator is lit and the “Equal” appears on the tem- C ( 0) 442.0Hz/ +8c Equal C Major perament display. Manual Press the [PURE TEMPERED MAJOR] button. Then the PURE TEMPERED MAJOR indicator is lit and “Pure (key C ( 0) 442.0Hz/ +8c... -
Page 13: Individual Pitch Settings For Each Of The 12 Notes Of The Octave
Individual Pitch Settings for Each of the 12 Notes of the Octave The pitch of 12 notes [C]~[B] can be set individually in 0.1 cents step. Press the [INDIVIDUAL PITCH] button to move the cursor to C ( 0) 442.0Hz/ +8c the note cent value display. -
Page 14: Setting The Key
The Individual Pitch Settings and Individual Volume Settings of the pure tempered major are copied to one of the user temperament “User1”~“User5” selected at that time. While pressing the [PURE TEMPERED MINOR] button, press the [MEMORY] button. The Individual Pitch Settings and Individual Volume Settings of the pure tempered minor are copied to one of the user temperament “User1”~“User5”... -
Page 15: Standard Pitch Setting
Standard Pitch Setting With this function, you can change the standard pitch. C ( 0) 442.0Hz/ +8c Press the [Hz] button to move the cursor to the Hz display of User1 C Major Auto standard pitch. Set the Hz value by using the data entry dial or data entry buttons [–], [+]. -
Page 16: Metronome Settings
Metronome Settings START/STOP Press the [START/STOP] button to start the metronome. Pressing the [START/STOP] button again stops the metronome. BEAT VOLUME There are the [ACCENT] volume lever, [ ] volume lever, [ ] volume lever, ] volume lever and [ ] volume lever. -
Page 17: Beat Setting
Beat Setting Press the [BEAT] button to move the cursor to the beat display. And then, move the cursor by using the cursor buttons [w], [s]. Set the numerator and denominator of beat by using the data entry dial or data entry buttons [–], [+]. -
Page 18: Setting
Setting With this function, you can change the setting. Foot Pedal:Volume Metro Sound:Peck Press the [SETTING] button to change the HARMONY display to Pattern:All SETTING display. Balance v1.OO Then the SETTING indicator is lit. Low: M-L: O Mid: M-H: High: Press the [NOTE SELECT] button to move the cursor, then change the setting by using the data entry dial or data entry buttons [–], [+]. -
Page 19: Input/Output Jacks, Contrast Knob
Input/Output Jacks, Contrast Knob DC 12V IN Jack This jack is for the AC power adaptor. Use the specified adaptor (PA-3HD, PA-3C or an equivalent recommended by Yamaha) only. Foot Pedal Jack This jack is for the foot pedal. (Standard Stereo Phone Jack) Use the volume type foot pedal (YAMAHA FC7). -
Page 20: Initializing
Initializing Hold down both of the data entry button [–] and [+], then press the [STANDBY/ON] button to turn on the power. Then the “Memory Initialized” appears on the display and all of HD-200 settings returned to their factory default values. - Page 21 Pitch ratio and Cent Values for the main pitches Pitch Pitch ratio Cent Value Comments Octave 1200.00 Pure 5 701.955 498.045 Major 3 386.314 Minor 3 315.641 Large Interval Whole Tone 203.910 Small Interval Whole Tone 10/9 182.404 Diatonic Scale Semi-tone 16/15 111.731 Difference between the 4...
- Page 22 Blank Chart Temperament No. User Temperament Name Note Name Individual Pitches Individual Volumes Temperament No. User Temperament Name Note Name Individual Pitches Individual Volumes Temperament No. User Temperament Name Note Name Individual Pitches Individual Volumes Temperament No. User Temperament Name Note Name Individual Pitches Individual Volumes...
- Page 23 Troubleshooting If you encounter any problems, first check the items listed below. If the solution provided below does not solve the problems, or you are experiencing a problem other than what is in the list, turn the power OFF, disconnect the AC power adaptor and contact the dealer from whom you purchased the instrument to have the instrument repaired.
- Page 24 WK19440 (0704-A) ©2007 Yamaha Corporation...
Need help?
Do you have a question about the Harmony Director HD-200 and is the answer not in the manual?
Questions and answers