Table of Contents
Advertisement
Quick Links
Advertisement
Table of Contents

Related Manuals for Yoder Smokers Backyard Smoker


Summary of Contents for Yoder Smokers Backyard Smoker
-
Page 1: Operation Instructions
Backyard Smoker OPERATION INSTRUCTIONS Version 1.0, SEPT 2013... - Page 2 Your serial number is located on the metal plate on your smoker’s door. Thank You for Choosing Yoder Smokers Model Serial Number...
-
Page 3: Table Of Contents
Contents Dangers, Warnings and Cautions..................3 Available Product Add-Ons....................4 Smoker Diagram........................6 Smoker Assembly......................7 • Smoker Arrival......................7 • Smoker Placement....................7 • Leveling the Smoker....................7 Operating the Smoker.......................7 • Initial Burn Off......................7 • Lighting Your Smoker.....................7 • Pre-Heating......................7 • Door Position......................7 Pre-Grill Checklist/Routine Maintenance................8 How to Build a Fire For Your Smoker................10 How to Use Your Smoker for Direct Grilling..............12 •... -
Page 4: Dangers, Warnings And Cautions
Dangers, Warnings and Cautions Failure to follow the “Dangers, Warnings and Cautions” contained in this manual may result in serious bodily injury, death or in a fire. • Read this manual completely before using your Yoder for the first time. • Do not use indoors! This smoker is for outdoor use only. • Do not leave pets, infants, or children unattended near a smoker in use. Keep the grill a minimum of 12 inches away from combustible surfaces. -
Page 5: Available Product Add-Ons
Available Product Add-Ons 2nd Level Slide-Out Shelf Adding the second shelf increases the cooking area in your smoker. Log Lighter The log lighter allows you to use propane to get the fire started. Charcoal Grate Adding a charcoal grate to your smoker allows you to convert the main cooking cham- ber into a direct grill. - Page 6 Smoker (cont) Part Number (cont) Loaded Wichita Log Lighter W41695 Charcoal Grate 41440 The Kingman Log Lighter W41695 Charcoal Grate 42587 Durango 20” Log Lighter W41695 Charcoal Grate 41440 2nd Level Slide-Out Shelf W41788 Durango 24” Log Lighter W41695 Charcoal Grate 42587 The Stockton Log Lighter...
-
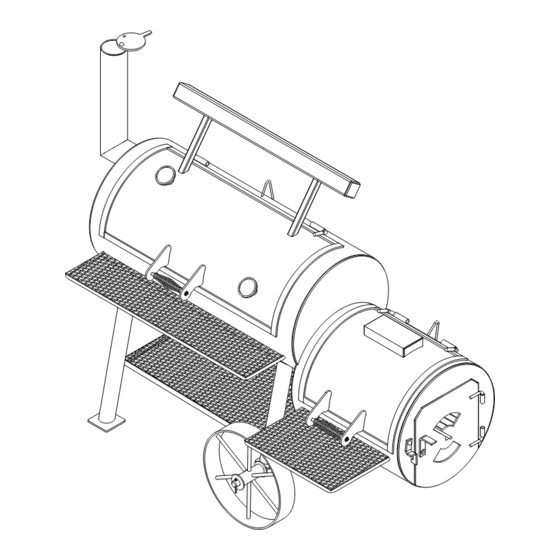
Page 7: Smoker Diagram
Smoker Diagram SECOND SHELF COOKING GRATE HEAT MANAGEMENT PLATE (optional) COOKING GRATE WOOD GRATE LOG LIGHTER (optional) NOTE: Loaded Wichita shown. Your smoker may vary slightly depending on model. -
Page 8: Smoker Assembly
If your cooker is ordered with options, you will find them pack- aged inside. Smoker Placement All Yoder smokers/grills should always be a minimum of 12 inches away from any com- bustible surface (wall, rail, etc.). Leveling the Smoker To level the smoker, stand in front of the cooking chamber door and place a level on the lower shelf to help you level the smoker. -
Page 9: Pre-Grill Checklist/Routine Maintenance
Pre-Grill Checklist/Routine Maintenance Perform the following services when the grill is cool 1. Open the cooking chamber door and remove the cooking grates. FIG 1 2. Remove the heat management plate if applicable. FIG 2... - Page 10 3. Inspect the bottom of the cooking chamber for any grease build up and clean as needed. See page 16 for more details. 4. Install the heat management plate. See FIG 2. 5. Install cooking grates and optional second shelf See FIG 1. 6.
-
Page 11: How To Build A Fire For Your Smoker
How to Build a Fire for Your Smoker Start with the firebox door, main damper and chimney damper in the open position. This will increase airflow and speed the fire building process. FULLY OPEN FULLY OPEN FIG 4 It is preferable to start with a charcoal base. Once you have a hot bed of charcoal, close the door and place two pieces of wood onto the coal base. - Page 12 As the wood reduces to coal, close both dampers to the halfway position to allow the pit temperature to begin to rise. HALF OPEN FIG 6 HALF OPEN Once the pit stabilizes at the desired temperature, add one piece of flavor wood. You are now ready to cook.
-
Page 13: How To Use Your Smoker For Direct Grilling
How to Use Your Smoker for Direct Grilling Using the Firebox for Direct Grilling Start with the firebox door, main damper and chimney damper in the open position. This will increase airflow and speed up the time it takes for the coals to be ready to cook on. -
Page 14: Using The Cooking Chamber For Direct Grilling
Once you have a hot bed of coals, close the damper to the halfway position. You are now ready to cook. HALF OPEN FIG 10 Using the Cooking Chamber for Direct Grilling This is an optional accessory for your smoker. If you have any questions about it, call us at 1-877-409-6337. - Page 15 Place the charcoal grate into the cooking chamber. Place your charcoal onto the char- coal grate and ignite the coals. We do not recommend using lighter fluid to ignite the charcoal. Note: The charcoal grate sits against the walls of the cooking chamber. CHARCOAL GRATE FIG 13 Be sure the main damper, chimney damper and main cooking chamber door are open.
- Page 16 After the coals are started, place cooking grates back into the cooking chamber. Once you have a hot bed of charcoal you are ready to cook. FIG 15...
-
Page 17: Grill Maintenance
Pre-Grill checklist (Page 8). Painted Surfaces Yoder smokers are painted with high heat silicone based paint. When cleaning the smoker, surfaces should be washed down with warm soapy water using a neutral detergent and rinsed with clean water. For more information about high heat paint that can be used for touch-up, contact service@yodersmokers.com. -
Page 18: Grease Management And Bucket
3. Use a citrus based cleaning solution to thoroughly clean the inside of the smoker. 4. Finally, visually inspect the painted surfaces and touch up any scratches with high heat flat black paint. Touchup paint can be purchased from Yoder Smokers. Call 1-877-409-6337. -
Page 19: Wood Flavor Guidelines
WOOD FLAVOR GUIDELINES WOOD FLAVOR BEST WITH Sweet, fruity smoke. Apple Beef, Pork, Ham, Poultry, Game Strongest of the fruit woods Black Walnut Strong smoke, slightly bitter like walnuts. Beef, Pork, Ham, Game Sweet fruity smoke that gives a Cherry Beef, Pork, Poultry, Fish, Game Birds rosy tint to the meats Bacon-Flavor, most commonly used... -
Page 20: Meat Temperature Guide
Meat Temperature Guide Internal Temperature Internal Description Doneness Beef, Lamb, Veal Steaks, Roasts and Chops (USDA Safe Minimum Cooking Temperature 145 Degrees F) Rare 120 to 130 Degrees F Center is bright red, pink towards the exterior portion, warm Medium Rare 130 to 140 Degrees F Center is pink, starting to brown towards the edges, warm Medium... -
Page 21: Warranty Information
Yoder Smokers shall not be liable under this, or any implied warranty for incidental, special, or conse- quential damages or any damage or defect to finish on the unit. In no event shall Yoder Smokers’ obliga- tion to customer exceed the purchase price of the unit. This warranty gives customer specific legal rights and customer may have other rights which vary from state to state. -
Page 22: Warranty Registration Form
Country* Phone Number Email Model* Serial Number* Send Warranty Registration and dated sales receipt to: Yoder Smokers Yoder Warranty Registration 1816 E Wasp Rd Hutchinson, KS 67501 Contact our customer service with any questions at 877.409.6337 or at info@yodersmokers. com...
Need help?
Do you have a question about the Backyard Smoker and is the answer not in the manual?
Questions and answers