Table of Contents
Advertisement
Available languages
Available languages
Quick Links
Camera Identification
T570 Auto-Focus
2
Camera
1
3
4
5
6
8
Consumer Imaging
EASTMAN KODAK COMPANY
Rochester, NY 14650
7
© Eastman Kodak Company, 2002
ENGLISH/FRANÇAIS
Unfold the front and back flaps of this manual for easy reference to the camera's parts.
Pt. No. 20228531
Unfold the front and back flaps of this manual for easy reference to the camera's parts.
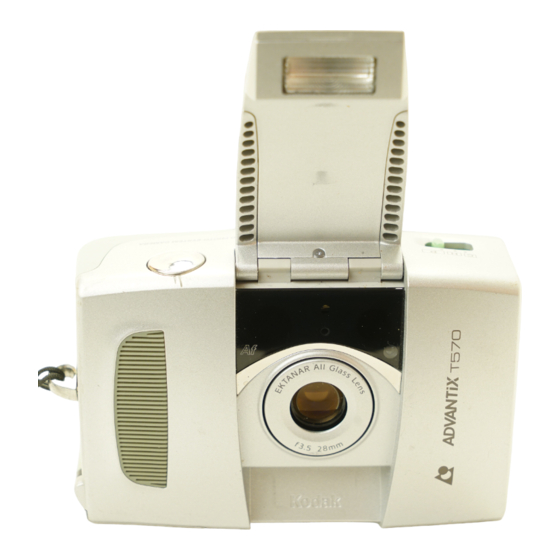
1 Shutter button
2 Lens cover/flash
3 Print-format switch
4 Self-timer lamp
5 Viewfinder
6 Meter-cell window
7 Lens
8 Strap post
Advertisement
Chapters
Table of Contents

Related Manuals for Kodak Auto-Focus Camera


Summary of Contents for Kodak Auto-Focus Camera
- Page 1 8 Strap post Consumer Imaging EASTMAN KODAK COMPANY Rochester, NY 14650 © Eastman Kodak Company, 2002 ENGLISH/FRANÇAIS Unfold the front and back flaps of this manual for easy reference to the camera’s parts. Pt. No. 20228531 Unfold the front and back flaps of this manual for easy reference to the camera’s parts.
- Page 2 Camera Identification This device complies with part 15 of the FCC Rules. Operation is subject to LCD Panel 22 Date/time display the following two conditions: (1) this device may not cause harmful interference, and (2) this device must accept any interference received, 23 Auto-flash 9 LCD panel indicator...
- Page 3 ABOUT THE ADVANCED PHOTO SYSTEM? Go to our web site at http://www.kodak.com or call: Kodak (Canada only) from 8:00 a.m. to 5:00 p.m. (Eastern time) Monday through Friday at 1 (800) 465-6325, ext. 36100; for the Toronto area, call (416) 766-8233, ext.
-
Page 4: Table Of Contents
CONTENTS CAMERA FEATURES AND BENEFITS ... 3 GETTING STARTED ... 5 Loading the battery ... 5 Date and time ... 5 Setting the date ... 5 Setting the time ... 6 Attaching the camera strap ... 7 CONTROL-BUTTON ACTUATOR ... 8 OTHER BATTERY INFORMATION ... -
Page 5: Camera Features And Benefits
Easy, Drop-in Loading • Easy, drop-in loading is fast and virtually error-free, eliminating blank rolls and double exposures. The camera uses KODAK ADVANTIX Film. The film cassette, unlike the traditional 35 mm cartridge, becomes the carrier and storage container for the... - Page 6 Film Status Indicator (FSI) • A highlighted indicator advances from one symbol to another to identify the status of the film inside the cassette. Look for this logo to be certain that the film you buy is made for this camera. Look for this logo to select a certified photofinisher for developing your film and to assure that you get all the features of the Advanced Photo System.
-
Page 7: Getting Started
GETTING STARTED Loading the battery This camera uses one 3 V lithium KODAK KCR2 (or equivalent) Battery that supplies power for all camera operations. 1. Open the battery door (19). • Before you remove the old battery, close the lens cover/ flash. -
Page 8: Setting The Time
2. Repeatedly press (13) until the MENU blinking “date format” of your choice appears on the LCD panel (9). • The blinking “E” indicates there is no film in the camera. 3. Press (14) to set the format. ENTER • If the camera is already at this format, you can bypass this step. -
Page 9: Attaching The Camera Strap
2. Repeatedly press (13) until the MENU time appears on the LCD panel (9). 3. Press (18) to actuate the setting SELECT for hour. 4. Repeatedly press and/or hold SELECT select the new number for hour. 5. Press (14) to set the hour and to ENTER actuate the setting for minutes. -
Page 10: Control-Button Actuator
CONTROL-BUTTON ACTUATOR You can use the knob on the clasp of the camera strap to actuate the small control buttons on the camera. OTHER BATTERY INFORMATION Low-battery indicator It’s time to replace the battery when — • the Battery symbol (34) “blinks” on the LCD panel (9) or •... -
Page 11: Power Shut-Off
• In the unlikely event that battery fluid leaks onto your skin, contact your local health care provider. In the U.S., contact Kodak Health, Safety and Environment Information at 1-716-722-5151. • In the unlikely event that battery fluid... -
Page 12: Loading The Film
LOADING THE FILM You can load film into the camera with the camera on or off. 1. Turn the camera upside down and move the Film-door switch (17) to open the Film door (15). • The safety interlocked film door opens only when the film chamber is empty or the film in the camera is completely rewound into the film cassette. -
Page 13: Taking Pictures
TAKING PICTURES You can take Classic (C), Group/ HDTV (H)*, and Panoramic (P) pictures on the same film cassette. Your photo- processing cost may be based on the format size(s) that you use to expose the film. 1. Completely lift up the Lens cover/ flash (2) to raise the flash and to turn on the camera. -
Page 14: Typical Print Sizes (Formats)
4. Partially press down the Shutter button (1). Typical print sizes (formats) Classic 3.5 x 5 in. or 4 x 6 in. (88.9 x 127 mm or 102 x 152 mm) NOTE: Your photofinisher generally provides 4 x 6, 4 x 7, and 4 x 11.5 in. (102 x 152, 102 x 178, and 102 x 292.7 mm) sizes. -
Page 15: Using The Focus Lock
Using the focus lock This camera automatically focuses on whatever is within the Auto Focus (AF) circle of the viewfinder eyepiece. To get a sharp picture, make sure the AF circle is on your main subject. If you want to take the picture with the subject positioned outside of the AF circle, use the focus lock as follows:... -
Page 16: Tips For Better Pictures
Tips for better pictures • Move close enough to your subject so it fills the viewfinder but not closer than 1.3 ft (0.4 m). • Take pictures at the subject’s level. Kneel down to take pictures of children and pets. •... -
Page 17: Flash/Camera-Ready Lamp Indicator
Flash/camera-ready lamp indicator When you partially press down the Shutter button (1) and the Flash/camera-ready lamp (10) glows green, the flash is fully charged and ready for you to take pictures. Auto flash In dim light, such as indoors or outdoors in heavy shade, or on dark overcast days, you need flash. -
Page 18: Infinity Focus
Infinity focus Capture sharp, distant scenery when you take pictures outdoors during the day or through windows. Selecting the flash and picture-taking options 1. Completely lift up the Lens cover/ flash (2) to raise the flash and to turn on the camera. 2. -
Page 19: Flash-To-Subject Distance
Flash-to-subject distance ISO film speed Flash-to-subject distance 1.3 to 9 ft (0.4 to 2.7 m) 1.3 to 13 ft (0.4 to 4.0 m) 1.3 to 18 ft (0.4 to 5.5 m) 1.3 to 26 ft (0.4 to 7.9 m) 1.3 to 36 ft (0.4 to 11 m) 1600 1.3 to 52 ft (0.4 to 15.8 m) USING THE SELF-TIMER... -
Page 20: Setting The Print Title And Language
SETTING THE PRINT TITLE AND LANGUAGE You can choose a print title from one of 10 pre-programmed titles and a language (6 options) before you take the picture. The title you select is recorded on the film’s magnetic data strip. At certified Advanced Photo System labs, the title is printed on the back of your photograph. -
Page 21: Title-Select List
Picture counter (35) indicates “0.” 2. Move the Film-door switch (17) to open the Film door (15). 3. Remove the film cassette from the camera and reload with new KODAK ADVANTIX Film. • The FSI on the fully-exposed film cassette... -
Page 22: Manual Rewind
Manual rewind If you do not want to take pictures on the entire film, you can manually start the automatic rewind. 1. Gently press the Film-rewind button (12) with the control-button actuator on the camera strap to start the automatic rewind. 2. -
Page 23: Troubleshooting
TROUBLESHOOTING What happened Probable cause Camera will Battery weak, dead, missing, not operate or improperly loaded Lens cover/flash closed Film does not Battery weak, dead, missing, advance or rewind or improperly loaded LCD panel is blank Battery weak, dead, missing, or improperly loaded Camera in sleep mode Lens cover/flash closed... - Page 24 What happened Probable cause Film-presence Loaded exposed ( ), partially indicator “blinks” on exposed ( ), or processed film ( ) LCD panel into the camera Film door does Film cassette loaded in not open film chamber Solution Load only new film ( ) into the camera Press the rewind button (see Manual rewind on...
-
Page 25: Specifications
3.5 – f /11 Shutter: Programmed, full-aperture shutter 1/4–1/500 seconds Power source: Main power: one 3 V lithium KODAK KCR2 (or equivalent) Battery Dimensions: 3.6 x 2.4 x 1.3 in (91.8 x 60.9 x 33.8 mm) Weight: 4.2 oz. (118 gm) without film or battery... - Page 26 Kodak, Advantix, Ektanar, Sensalite, and the Advanced Photo System symbol and logotype are trademarks.
- Page 27 Visitez nos sites Web à http://www.kodak.ca (Canada) ou http://www.kodak.com (États-Unis), ou encore appelez : Kodak (Canada seulement) du lundi au vendredi, de 8 h à 17 h (heure normale de l’Est) au numéro 1 800 465-6325, poste 36100. Dans la région de Toronto, composez le (416) 766-8233, poste 36100.
- Page 28 Description de l’appareil-photo Déclencheur Couvre-objectif/ flash Sélecteur du format de photo Témoin du retardateur Viseur Fenêtre du posemètre Objectif Oeillet de la courroie...
- Page 29 Panneau ACL 10 Témoin du flash/ appareil-photo prêt 11 Oculaire du viseur 12 Bouton de rembobinage MENU SAISIE ENTER 15 Couvercle du compartiment du film 16 Compartiment du film 17 Loquet du compartiment du film SÉLECTION SELECT 19 Couvercle du compartiment de la pile MODES...
- Page 30 Panneau ACL 22 Affichage date/heure 23 Indicateur de flash 24 Indicateur de 25 Indicateur de 26 Flèche de sélection 27 Sensibilité ISO du film 28 Indicateur de mise au 29 Indicateur de vue 30 Indicateur PM 31 Indicateur du 32 Indicateur de titre 33 Indicateur de présence 34 Symbole de la pile 35 Compteur de poses...
- Page 31 TABLE DES MATIÈRES FONCTIONS ET AVANTAGES DE L’APPAREIL ... 30 DÉMARRAGE ... 32 Installation de la pile ... 32 Date et heure ... 32 Réglage de la date ... 33 Réglage de l’heure ... 34 Fixation de la courroie ... 35 ACTIVATEUR DE BOUTON DE COMMANDE ...
-
Page 32: Fonctions Et Avantages De L'appareil
FONCTIONS ET AVANTAGES DE L’APPAREIL-PHOTO Trois formats de photo • Vous avez le choix de trois formats de photo différents sur une même cassette de film : classique (C), groupe/HDTV (H) ou panoramique (P). Le cadre apparaissant dans le viseur se modifie en fonction du format sélectionné. - Page 33 élimine les rouleaux vierges ou réexposés. L’appareil fonctionne avec des Films KODAK ADVANTIX. Contrairement aux cartouches de film classique 35 mm, la cassette de film joue un rôle de contenant de transport et d’entreposage une fois le film traité.
-
Page 34: Démarrage
DÉMARRAGE Installation de la pile Cet appareil-photo utilise une Pile au lithium KODAK KCR2 (ou l’équivalent) de 3 volts qui fournit l’alimentation nécessaire à toutes les fonctions de l’appareil. 1. Ouvrez le couvercle du compartiment de la pile (19). • Avant de retirer l’ancienne pile, fermez le couvre-objectif/flash. -
Page 35: Réglage De La Date
Réglage de la date Vous avez le choix de trois formats de date : mois/jour/année, jour/mois/année et année/mois/jour. 1. Soulevez complètement le couvre- objectif/flash (2) pour relever le flash et mettre l’appareil-photo sous tension. 2. Appuyez de façon répétée sur le bouton (13) jusqu’à... -
Page 36: Réglage De L'heure
4. Appuyez sur SÉLECTION SELECT pour actionner le réglage du mois. 5. Appuyez de façon répétée sur le bouton ) ou SÉLECTION SELECT maintenez-le abaissé pour sélectionner le numéro du mois. 6. Appuyez sur ) (14) pour SAISIE ENTER enregistrer le mois et passer au réglage du jour. -
Page 37: Fixation De La Courroie
5. Appuyez sur ) (14) pour SAISIE ENTER enregistrer l’heure et actionner le réglage des minutes. 6. Répétez les étapes 3 et 4 pour parachever le réglage de l’heure. • Par défaut, l’appareil-photo affiche la date, mais vous pouvez voir l’heure en appuyant sur MENU Fixation de la courroie... -
Page 38: Autres Renseignements Sur Les Piles
• Dans l’éventualité peu probable où le fluide de la pile entrerait en contact avec votre peau, communiquez avec le Centre d’information Kodak en santé, sécurité et environnement au (716) 722-5151 aux États-Unis. Si vous ne résidez pas aux États-Unis, communiquez avec le service de santé... -
Page 39: Arrêt Automatique
Fonctions automatiques d’économie d’énergie Arrêt automatique Cet appareil-photo se met automatiquement en mode veille après plus de 2 ½ minutes d’inactivité pour préserver l’énergie de la pile. Pour réactiver l’appareil-photo, il vous suffit d’appuyer sur n’importe quel bouton de commande, à l’exception du sélecteur du format de photo, ou de fermer et de rouvrir le couvre- objectif/flash (2). -
Page 40: Pour Prendre Des Photos
2. Insérez complètement la cassette de film dans le compartiment du film (16). • Assurez-vous que l’indicateur de l’état du film est positionné à (position 1) dans le cas d’une nouvelle cassette. • N’exercez pas de pression excessive pour insérer la cassette dans le compartiment du film. - Page 41 2. Cadrez votre sujet en regardant dans l’oculaire du viseur (11). Pour une photo nette, placez-vous à au moins 0,4 m (1,3 pi) de votre sujet. 3. Tournez le sélecteur du format de photo (3) pour choisir le format désiré (C, H ou P).
-
Page 42: Formats De Photo
Formats de photo Classique 88,9 mm x 127 mm ou 88,9 mm x 152 mm ou 102 mm x 152 mm 102 mm x 178 mm (3,5 po x 5 po ou (3,5 po x 6 po ou 4 po x 6 po) REMARQUE : Votre laboratoire de traitement photo offre généralement des photos de formats 4 po x 6 po, 4 po x 7 po et 4 po x 11,5 po (102 x 152, 102 x 178 et 102 x 292,7 mm). -
Page 43: Conseils Pour Prendre De Meilleures Photos
2. Enfoncez partiellement le déclencheur (1) et maintenez-le en position pour mémoriser la mise au point. 3. Toujours en maintenant le déclencheur partiellement enfoncé, déplacez l’appareil jusqu’à ce que votre sujet se trouve à l’endroit voulu dans l’oculaire du viseur (11). VISEUR 4. -
Page 44: Options De Flash Et De Prise De Vue
OPTIONS DE FLASH ET DE PRISE DE VUE Outre le mode flash automatique (mode par défaut), vous pouvez choisir les modes flash d’appoint, flash désactivé, mise au point à l’infini sans flash et vue nocturne avec flash. Appuyez de façon répétée sur le bouton (20) pour choisir le mode flash qui MODES convient le mieux à... -
Page 45: Flash D'appoint
Flash d’appoint À l’intérieur ou à l’extérieur, la lumière vive projetée sur des sujets éclairés à contre-jour peut créer des ombres marquées (en particulier sur les visages). Pour adoucir ces ombres et faire briller les yeux de vos sujets, il suffit d’utiliser le flash d’appoint. Flash désactivé... -
Page 46: Témoins Du Flash
4. Cadrez bien votre sujet dans l’oculaire du viseur (11). 5. Enfoncez partiellement le déclencheur (1). Lorsque le témoin du flash/appareil-photo prêt (10) passe au vert, appuyez complètement sur le déclencheur pour prendre la photo. La sélection des modes de flash, de mise au point et de vue nocturne à... -
Page 47: Utilisation Du Retardateur
UTILISATION DU RETARDATEUR Utilisez ce mode si vous souhaitez vous inclure dans la photo. 1. Utilisez l’écrou du trépied (21) pour fixer l’appareil-photo sur un trépied, ou placez l’appareil sur une surface stable. 2. Soulevez complètement le couvre- objectif/flash (2) pour relever le flash et mettre l’appareil-photo sous tension. -
Page 48: Réglage Du Titre Et De La Langue
RÉGLAGE DU TITRE ET DE LA LANGUE Avant de prendre une photo, vous pouvez sélectionner un titre de photo parmi les 10 titres préprogrammés ainsi que la langue d’usage (6 choix offerts). Le titre choisi est enregistré sur la bande magnétique de données du film, puis imprimé... -
Page 49: Liste De Titres
6. Appuyez sur ) pour en- SAISIE ENTER registrer la langue et terminer la sélection. • La langue et le titre de la photo demeurent sélectionnés une fois la photo prise. • Pour annuler le titre choisi pour les photos subséquentes, suivez les étapes 1 à... -
Page 50: Retrait Du Film
(17) pour ouvrir le couvercle du compartiment du film (15). 3. Retirez la cassette de film de l’appareil- photo, puis rechargez ce dernier avec une nouvelle cassette de Film KODAK ADVANTIX. • L’indicateur de l’état du film d’une cassette de film entièrement... -
Page 51: Entretien De Votre Appareil-Photo
ENTRETIEN DE VOTRE APPAREIL-PHOTO • Protégez votre appareil-photo de la poussière, de l’humidité, des chocs et de la chaleur excessive. ATTENTION : N’utilisez pas de solvants ni de produits rugueux ou abrasifs pour nettoyer le boîtier de l’appareil-photo. • Si l’objectif est sale, placez-le devant votre bouche, puis expirez légèrement pour former une légère buée;... -
Page 52: Dépannage
DÉPANNAGE Problème Cause probable L’appareil-photo La pile est faible, épuisée, ne fonctionne pas. manquante ou mal installée. Le couvre-objectif/flash est fermé. Le film n’avance pas ou La pile est faible, épuisée, ne se rembobine pas. manquante ou mal installée. Le panneau ACL La pile est faible, épuisée, est vierge. - Page 53 Problème Cause probable L’indicateur de la Le film chargé dans l’appareil est présence d’un film exposé ( ), partiellement clignote sur le exposé ( ) ou traité ( ) panneau ACL La porte du Une cassette de film est chargée compartiment du dans le compartiment du film.
-
Page 54: Caractéristiques
/3,5 à f /11 Obturateur : Programmé, pleine ouverture de Alimentation : Principale : 1 Pile au lithium KODAK KCR2 (ou l’équivalent) de 3 volts Dimensions : 91,8 mm x 60,9 mm x 33,8 mm (3,6 po x 2,4 po x 1,3 po)
Need help?
Do you have a question about the Auto-Focus Camera and is the answer not in the manual?
Questions and answers