Table of Contents
Advertisement
OWNER'S
MANUAL
Operating and Servicing
Instructions
www.hoover.com
P
P
OWER
ATH
®
Carpet Washer
Please visit Hoover.com
for video instructions
for this cleaner.
IMPORTANT: READ CAREFULLY BEFORE ASSEMBLY AND USE.
Questions or concerns? For assistance, please call Customer Service at
1-800-944-9200 Mon-Fri 8am-7pm EST before returning this product to the store.
THIS PRODUCT IS INTENDED FOR HOUSEHOLD USE ONLY.
IF USED COMMERCIALLY WARRANTY IS VOID.
©2014 Techtronic Floor Care Technology Limited. All rights reserved. #961151111 ID107941-R2
Advertisement
Table of Contents

Subscribe to Our Youtube Channel
Related Manuals for Hoover POWER PATH


Summary of Contents for Hoover POWER PATH
- Page 1 Instructions www.hoover.com OWER ® Carpet Washer Please visit Hoover.com for video instructions for this cleaner. IMPORTANT: READ CAREFULLY BEFORE ASSEMBLY AND USE. Questions or concerns? For assistance, please call Customer Service at 1-800-944-9200 Mon-Fri 8am-7pm EST before returning this product to the store.
-
Page 2: Table Of Contents
Warranty ............................16 If you need assistance: Visit our website at hoover.com for more information or for video instruction for this Hard Floor Cleaner. Follow the authorized dealer locator link to find the Hoover authorized dealer nearest you or call 1-800-944-9200 for an automated referral of ®... -
Page 3: Important Safeguards
• Use indoors only. • Do Not immerse. Use only on carpet moistened by cleaning process. • Use only HOOVER cleaning products intended for use with this machine. (See the ® “Cleaning Products” section of this manual.) •... -
Page 4: Grounding Instructions
GROUNDING INSTRUCTIONS This appliance must be grounded. If it should malfunction or breakdown, grounding provides a path of least resistance for electric current to reduce the risk of electric shock. This appliance is equipped with a cord having an equipment-grounding conductor (C) and grounding plug (A). -
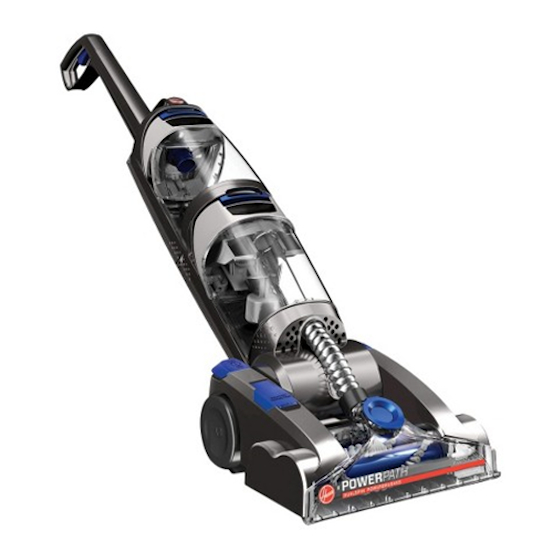
Page 5: Features
FEATURES FRONT BACK FEATURES 1. Handle Grip 7. Dirty Water Tank 2. Solution Trigger 8. ON/OFF Pedal 3. Carry Handle 9. Accessory Hose Connection Port 4. Clean Water/Solution Tank 10. Solution Tube Connection Port Release Latch 11. Nozzle 5. Clean Water/Solution Tank 12. -
Page 6: Cleaner Assembly
For furniture too heavy to move, place aluminum foil or wax cleaner as a dry vacuum cleaner. paper under legs. This will prevent wood finishes from staining 2. For upholstery, check cleaning code - Use your HOOVER ® carpet. Pin up furniture skirts and draperies. -
Page 7: General Operation
Do not clean over floor electrical outlets. WARNING To reduce the risk of fire and electric shock due to internal ® component damage, use only HOOVER cleaning fluid intended for use with the appliance. CARPET CLEANING 3.6 Plug cord into electrical outlet. Step on handle release pedal, to put unit in cleaning position. -
Page 8: Dirty Water Tank
“Automatic shut-off”) If the sound of the motor changes to a high pitch, this For best cleaning results, Hoover recommends to rinse the indicates the dirty water tank is full and must be emptied. carpet with water only. This will remove residual carpet cleaning solution from your carpets. -
Page 9: Tools
4. TOOLS CONNECT HOSE FOR TOOL USE CAUTION Always turn off appliance before connecting or disconnecting hose. How to Attach 4.1 Open Accessory Hose Suction Port (A). Insert hose end, aligning the indicator with the unlock arrows. Rotate clockwise to lock position (B). 4.2 Hold open the Accessory Hose Solution Port door (C). - Page 10 After Using Tool 4.6 Drain suction hose by turning cleaner ON and holding nozzle up for several minutes. Do not 10.Chevaucher les passages de ½ po (1,3 cm) afin press trigger. d’éviter les marques. CAUTION 11.Il est préférable d’alterner entre des passages humides et à...
- Page 11 CLEANING UPHOLSTERY Read “Before You Begin Cleaning” instructions. Be sure to check Hoover Cleaning Guide on page 6 and the cleaning code on your upholstery. Use your cleaner only on upholstery marked “W” or “W/S”. 1. Attach hose and solution tube as instructed.
-
Page 12: Maintenance
5. MAINTENANCE Familiarize yourself with these home maintenance tasks as proper use and care of your cleaner will ensure continued cleaning effectiveness. Any other servicing should be done by an authorized service representative. If appliance is not working as it should, has been dropped, damaged, left outdoors, or dropped into water, take it to a service center prior to continuing use. -
Page 13: Belt/Brushes
For replacement belts please order part number 440005535 or to locate a dealer nearest you, please call 1-800-944-9200 or visit our website at www. hoover.com How to Remove 5.5 Flip cleaner on its back to expose bottom of cleaner. 5.6 To remove belt cover, use Phillips screwdriver to remove the eight screws. -
Page 14: Troubleshooting
2. Check fuse or breaker in home. Replace fuse/reset breaker in home. 3. Needs service. 3. Take to service center. To find nearest location, visit our website at www.hoover.com or call 1-800-944- 9200. Cleaner won’t 1. Dirty Water Tank is not installed 1. -
Page 15: Service
(Depot) by: • Checking the Yellow Pages under “Vacuum Cleaners” or “Household”. • Visit our website at hoover.com (U.S. Customers) or hoover.ca (Canadian customers). Follow the service center link to find the service outlet nearest you. • For an automated referral of authorized service outlet locations call 1-800-944-9200. -
Page 16: Warranty
God, nature, vandalism or other acts beyond the control of Hoover ® owner’s acts or omissions, use outside the country in which the product was initially purchased and resales of the product by the original owner.
Need help?
Do you have a question about the POWER PATH and is the answer not in the manual?
Questions and answers