Table of Contents
Advertisement
Advertisement
Table of Contents
Troubleshooting

Subscribe to Our Youtube Channel
Related Manuals for BLADEZ Sport DKS200


Summary of Contents for BLADEZ Sport DKS200
-
Page 2: Safety Notice
PREFACE…………………………………………………………….. 3 SAFETY NOTICE…………………………………………………… 2.1 Before Driving 2.2 While Driving EMI …………………………………………………………………… 7 ASSEMBLY AND DISASSEMBLY………………………………… 9 PARTS INTRODUCTION…………………………………………... Parts Description OPERATION………………………………………………………… 6.1 Control Panel 6.2 How to Operate Your Vehicle 6.3 Setting the Free Wheel and Drive Mode CHARGING AND BATTERY………………………………………. 7.1 Charging the Battery 7.2 Charging Cord and Plug 7.3 Battery... - Page 3 This owner’s manual includes operation instructions for all aspects of the vehicle, assembly, and how to deal with possible accidents. This owner’s manual is written solely for Bladez B*Mobile, DKS200 - SPORT. The symbols used in this manual are explained below.
-
Page 4: Before Driving
S A F E T Y N OT I C E 2.1 Before Driving The user should be familiar with all functions and features to operate this vehicle before driving. Always keep safety in mind. It may be beneficial when learning the operation of your vehicle to have an assistant such as a family member or a care professional present. -
Page 5: While Driving
S A F E T Y N OT I C E Do not use this vehicle to carry or haul goods The maximum weight that can be carried is 250 lbs (including goods). Refer to section “10-SPECIFICATIONS” on page 26 “WEIGHT CAPACITY” Maximum loading weight for the basket is 8.8 lbs. - Page 6 S A F E T Y N OT I C E Do not drive over large drop offs. Refer to section “10-SPECIFICATIONS” on page 26 “MAX. GROUND CLEARANCE” Do not cross wide gutters as it may cause your wheels to get stuck. Slow down when driving on roads with drops offs.
-
Page 7: Electromagnetic Interference (Emi) From Radio Wave Sources
Caution: It is very important that you read this information regarding the possible effects of electromagnetic interference on your electric Bladez B*Mobile Vehicle. ELECTROMAGNETIC INTERFERENCE (EMI) FROM RADIO WAVE... - Page 8 3 . E L E C T RO M AG N E T I C I N T E R F E R E N C E 3. Long-range transmitters and transceivers, such as commercial broadcast transmitter (radio and TV broadcast antenna towers) and amateur (HAM) radios. Note: Other types of hand-held devices, such as cordless phones, laptop computers, AM/FM radios, TV sets, CD players, and cassette players, and small appliances, such as electric shavers and hair dryers, are not likely to cause EMI problems to your...
-
Page 9: Assembly And Disassembly
4 . A S S E M B LY A N D D I S A S S E M B LY Once the scooter has been removed from the box, follow these directions to assemble your scooter. This unit can also be disassembled for easy transportation and storage. 1. - Page 10 Adjusting the Seat Height 1. Remove the seat height adjustment pin and loosen the seat stabilizer knob. (As shown by arrows) 2. Select the desired height adjustment and insert seat height adjustment pin and tighten the seat height stabilizer knob. 4.
- Page 11 Note Disassembling your vehicle makes it easy to transport. It can also be useful to store the vehicle when not be use. When the unit is not in use, batteries should be charged every three months to keep them on full charge and prevent damage. Assembling the Rear Wheel/Motor Assembly to Front Deck Assembly Tilt rear wheel/motor assembly on the rear bumper with side frame stems pointing straight up.
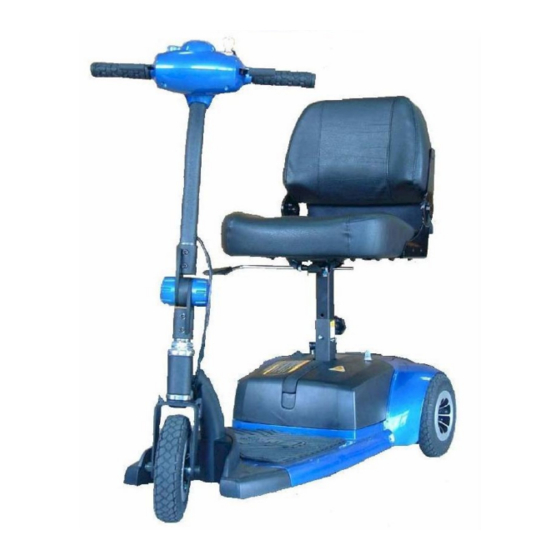
- Page 12 PA R T S I N T RO D U C T I O N PARTS DESCRIPTION, DK S200 1. Speed Dial 2. Speed Control Lever 3. Rubber Handlebar 4. Tiller 5. Tiller Angle Adjustment Knob 6. Head Tube 7. Fork 8.
-
Page 13: Operation
O P E R AT I O N 6.1 CONTROL PANEL 1. Speed Dial 2. Horn Button 3. Handlebar 4. Power Key Switch 5. Speed Control Levers 6. Battery Indicator 6.2 HOW TO OPERATE YOUR VEHICLE Power Key Switch Turn the key to power “ON” or “OFF” OFF: Power is turned off ON: Power is turned on Speed Dial... - Page 14 6 . O P E R AT I O N Horn Button The horn will sound when the button is pressed. WARNING When going down an incline, NEVER set to free wheel mode. In such cases, the electromagnetic brake will not activate. °...
- Page 15 6 . O P E R AT I O N Battery Indicator The needle points out the remaining power. Right side in green range: full power. Left-side in red range: low power recharge unit. The remaining power indicated by the battery indicator will vary by the driving time and the way the vehicle is driven.
- Page 16 6 . O P E R AT I O N Starting and Driving 1. Make sure the seat is properly installed. 2. Make sure the tiller has been properly secured. 3. Turn the power key switch to “ON”. 4. Check battery indicator to see if there is sufficient power for your trip. 5.
- Page 17 6 . O P E R AT I O N Stopping 1. Release the speed lever completely. The vehicle will activate the electromagnetic brake and stop. 2. Turn the power key switch to “OFF”, and remove key from the vehicle. ATTENTION The stopping distance will vary with your speed.
-
Page 18: C H A Rg I N G A N D B At T E Ry
7 . C H A RG I N G A N D B AT T E RY 7.1 CHARGING THE BATTERY Be sure to follow all procedures below. 1. Turn the power key switch to “OFF”. 2. Open the charger socket cap and insert plug connected to the remote charger. -
Page 19: Charging Cord And Plug
Park the vehicle near the electric outlet and slowly pull out the charging cord. If the charging cord is broken, DO NOT charge the vehicle until a new charger cord is obtained from an authorized Bladez Health Products Corporation Service Center. 7.3 BATTERY The batteries used on your vehicle are sealed lead acid batteries, maintenance-free, so it is not necessary to change the batteries liquid or refill the liquid. - Page 20 4. Remove the two (2) batteries and wipe with clean dry cloth. If the battery terminals are covered by residue, clean them by using warm water. SUGGESTION If necessary, contact your authorized Bladez Health Products Corporation Service Center for cleansing and replacing of the battery. SUGGESTION 1.
-
Page 21: Inspection And Maintenance
Are there any cracks or other damage to the tires? Tires Check the tires tread depth. Are there any abnormal noises? Other Is there oil leakage from transmission box? ATTENTION Go to authorized Bladez Health Products Corporation Service Center for inspection and maintenance if you find anything wrong. -
Page 22: Regular Checking Record
8 . I N S P E C T I O N A N D M A I N T E NA N C E 8.2 REGULAR CHECKING RECORD To make sure your vehicle remains in good condition, go to your authorized Bladez Health Products Corporation Service Center regularly for maintenance and record it every six months after purchasing. -
Page 23: Fuse And Tires
SUGGESTION Contact your authorized Bladez Health Products Corporation Service Center for inspecting or replacing the fuse, since the control panel shroud has to be removed first for replacement of the fuse. - Page 24 Do not use water, oil or other chemical solutions to clean your vehicle. To prevent damaging the electronic components and PC board, do not spray the vehicle with water. Take the vehicle to an authorized Bladez Health Products Corporation Service Center for repairs and adjustments. Improper adjustments may lead to accidents or vehicle malfunction.
-
Page 25: Troubleshooting
If the vehicle hasn’t been charged regularly, the batteries may be completely discharged. Charge the batteries and recheck. If batteries do not recharge, contact your authorized Bladez Health Products Corporation Service Center for replacement batteries. - Page 26 1 0 . S P E C I F I C AT I O N S DKS200 Model name B*Mobile – Sport Overall Height (without seat) 35” Overall Length 38” Overall Width 20” Motor Output DC 24V 270W Battery 12V×12AH×2PCs...
-
Page 27: Warranty Policy
11.2.1 Contents and Duration of Warranty Contents of Warranty 1. For one year from the date of purchase, Bladez Health Products Corporation will replace at our option, free of charge, any part or electronic component found to be defective due to workmanship and/or material upon the examination by an authorized Bladez Health Products Corporation Service Center. - Page 28 3. Tampering by changing or adding components to the vehicle which is not approved by Bladez Health Product Corporation. 4. Damage caused by not using Bladez Health Products Corporation genuine parts, or any parts not recommended by Bladez Health Products Corporation.
- Page 29 4. Keep a record of vehicle inspection and maintenance in this Owner’s Manual. 11.2.4 Warranty effectiveness The product registration form must be completely filled out and stamped by the Bladez Health Products Corporation dealer where it was purchased. 11.2.5 Warranty rights are non-Transferable Bladez Health Products Corporation warranty is non-transferable.
Need help?
Do you have a question about the Sport DKS200 and is the answer not in the manual?
Questions and answers