Table of Contents
Advertisement
Advertisement
Table of Contents

Related Manuals for Ferguson FT-8300 HD


Summary of Contents for Ferguson FT-8300 HD
- Page 1 User manual FT-8300 HD English...
- Page 2 WARNING !!! On the USB Memory Function for FT-8300 HD model, user can make recording or playing function using by external USB devices such as USB Flash Memory Disk or external USB HDD(Hard Disk). However, below condition should be remarked before applying.
-
Page 3: Table Of Contents
SAFETY INSTRUCTIONS ....................4 SOFTWARE FOR DOWNLOADING..................4 USER MANUAL .......................4 SYMBOLS USED ON THE RECEIVER ..................5 GENERAL INFORMATION ....................6 1. Main Features .......................6 2. Unpacking......................6 3. General Operation of STB ..................6 INSTALLATION OF STB.....................7 1. Front Panel......................7 2. Rear Panel......................7 3. CI Module(CAM) and smart card ................8 REMOTE CONTROLLE .......................9 Quick Installation...................... -
Page 4: Safety Instructions
Telstar has used all the available means to ensure the latest information regarding its products. Ferguson does not give a warranty regarding the contents of this User Manual and waives any implied warranties regarding market value or fitness for specific purposes. The information contained herein provide guidelines allowing the operation and maintenance of the receiver. -
Page 5: Symbols Used On The Receiver
SYMBOLS USED ON THE RECEIVER The Digital Video Broadcasting logo. This logo tells you that this receiver is compliant with the DVB standards. The caution risk of electrical shock - do not open symbol This symbol tells you that you are not allowed to open the receiver. Only authorized (service) technicians are allowed to open the box. -
Page 6: General Information
GENERAL INFORMATION This digital terrestrial receiver is a highly cost-effective digital terrestrial receiver integrated. It provides big channels storage with fast searching. The receiver is definitely one of the best choices to deliver your digital life. 1. Main Features Fully conforms to MPEG4, MPEG2 and DVB-T standard. Using a CAM, it can decrypt the conditional access service. -
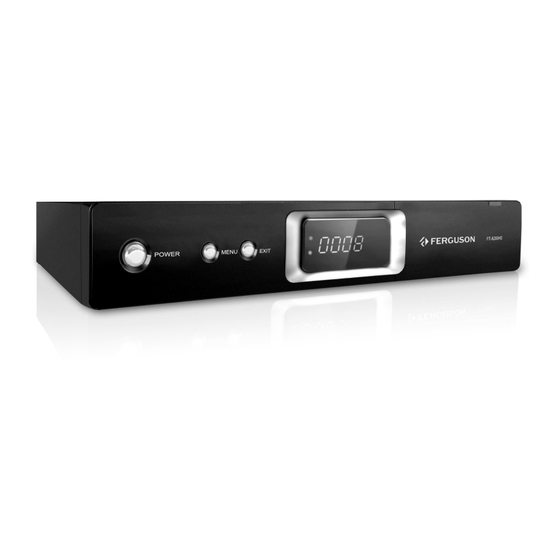
Page 7: Installation Of Stb
INSTALLATION OF STB 1. Front Panel 【POWER】Press to switch between ON and OFF modes. 【MENU】Display the main menu on TV 【EXIT】Return to the previous menu. 【OK】Confirm user’s selection or display the programs list on TV screen. 【VOL-】Left move key or increases volume 【VOL+】Right move key or decreases volume 【CH-】Move cursor or channel down 【CH+】Move cursor or channel up... -
Page 8: Ci Module(Cam) And Smart Card
3. CI Module(CAM) and smart card Inserting a CI Module (with Smart card) CI Module looks like a PC Card (called PCMCIA)for laptops. There are different kinds of CI Modules, suitable for different coding systems. 1.Turn off your set-top-box first. 2.Insert the Smart card into the Common Interface (CI) module. -
Page 9: Remote Controlle
REMOTE CONTROLLE Due to standardization fact most of Ferguson units is using the same remote control unit. That is why NOT all keys are being used by this STB model!! POWER Turns the Receiver ON/OFF. TV/RADIO Switches between TV and Radio modes. -
Page 10: Quick Installation
Quick Installation Step 1: Check the cable connections Prior to powering up the receiver, ensure that all cables are correctly connected. Ensure that the unit is connected to A/V equipment and the power socket. Step 2: Insert the CAM (with smart card) released by your service provider. Insert the CAM into the slot according to the arrow direction drawn. -
Page 11: The Mainmenu Information
THE MAINMENU INFORMATION After connecting the STB and switch on the power; the subject unit comes into work. If the signal is ready and there are programs saved in the unit, the TV will show the channel which when you turn off last time. -
Page 12: Delete All Programs
1.3 Delete All Programs This operation will irreversibly delete all programs from receiver. 1.4 Reset System Setting This operation removes any changes made by the user. The receiver will return to its factory settings. Upon completion of this operation receiver will automatically be rebooted. 1.5 Firmware Update Via USB Warning: Do not turn off the power during the update. -
Page 13: Subtitle Setting
2.3 Subtitle Setting User can choose below options of Subtitle control: Subtitle: Off, Normal or Hard of Hearing. Language choose: Primary language and Second language. You can press to choose the item, then to press<OK>to save settings. Press <MENU> to escape from current OSD menu. Press <EXIT>... -
Page 14: Osd Setting
2.6 OSD Setting User can choose below options of OSD set control: OSD language: select a preferred language available. Banner display: determines how long the info bar is displaying. transparency: allows you change level transparency. The default value is 10% 2.7 PVR Setting Timeshift duration: Default Timeshift duration, it depends on the free space of HDD, Max 1/2/3/4/6/8 Hours. -
Page 15: Favorite Edit
3.2 Favorite Edit On this menu four options are available <RED> causes cyclical change your favorites list <GREEN> to add channel to a select group of favorites <YELLOW> works only in the right column - used to remove the channel from a favorite group. <BLUE>... -
Page 16: Schedule
4.2 Schedule In the EPG OSD, Press < Green> key to list the reserved programs schedule. You can delete or modify the reserved schedule in the list. You can use direct button OPT to see this list. <PLAY>: A reservation program to play <REC>: A reservation program to record <RED>: Delete the reservation program the cursor is on. -
Page 17: System Information
6. System Information 6.1 SW/HW Information This OSD information shows the receiver’s basic information such as manufacture, software and hardware version. 6.2 Common Interface Shows CAM status information. Note: The displayed information about common interface differs depending on the type of CI and smart card. -
Page 18: Recording Info
The Time Shifting mode enables the user to "pause and control live TV". From the moment the receiver Ferguson is in Time Shifting mode, it will continuously record the source from terrestrial into its buffer. The buffer is created automatically on the external USB memory. -
Page 19: Play Timeshift
8.2 Play Timeshift Press the <PAUSE/PLAY> key again to play the program that from the point which paused last time. 8.3 Change Timeshift speed Press <REW> or <FF> to change Timeshift speed. Each time you press the <REW>/<FF>, the rewind/forward speed increases in the following sequence: ×1/2, ×2,×4,×8,×16,×32. 8.4 Stop Timeshift Method 1:Press <STOP>... -
Page 20: Glossary
GLOSSARY Pay-TV television Premium Television refers subscription-based CA - Conditional Access - Encryption system television services, provided digital cable or used to secure content and grant access only to satellite, but also by digital terrestrial methods. subscribers. SCPC - Single channel per carrier - refers to CAM - conditional access module - is an using a single signal at a given frequency and electronic device, usually incorporating a slot... -
Page 21: Specifications
Specifications Input Frequency 170~230MHz 470~860MHz RF Input level -25~-82dBµV Tuner IF Bandwidth 7MHz and 8MHz Modulation QPSK,16QAM,64QAM Decoder Format MPEG-4/2 MP@ML/HL Output Format Max. 1920 X 1080, 4:3 Video and 16:9 Output Port CVBS, HDMI, Dual SCART , YPbPr Decoder Format MPEG-1 (layer1&2), AC-3...
Need help?
Do you have a question about the FT-8300 HD and is the answer not in the manual?
Questions and answers