
Related Manuals for Pentair PENTEK RO-2550


Summary of Contents for Pentair PENTEK RO-2550
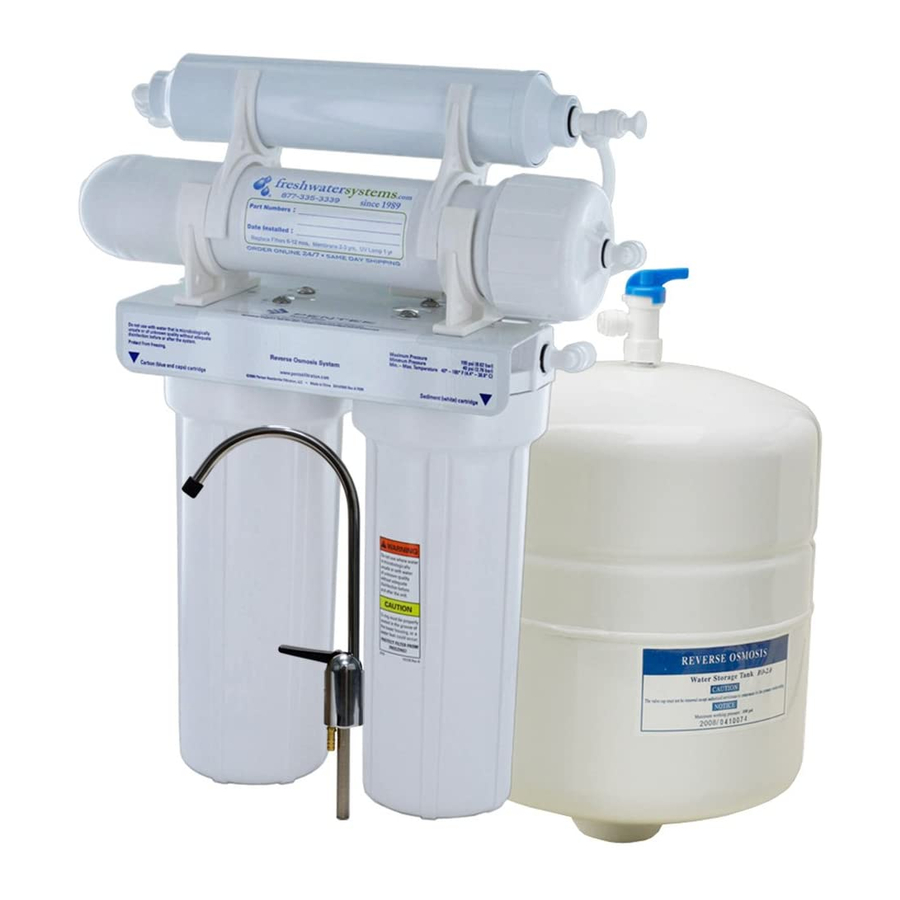
- Page 1 PENTEK RO-2550 4-STAGE REVERSE OSMOSIS ® WATER FILTRATION SYSTEM INSTALLATION AND OPERATION MANUAL ©2014 Pentair Residential Filtration, LLC www.pentairaqua.com...
-
Page 2: Specifications
IMPORTANT: Before installing this reverse osmosis system, make certain your water supply complies with the following operating specifications. Failure to do so may reduce the effectiveness of the system and will void the warranty. SPECIFICATIONS Thin Film Membrane: TFM-50 Feed Water Pressure: 40 to 100 psi (2.75–6.9 bar) Temperature Range: 40–100°F (4.4–37.7°C) - Page 3 PRECAUTIONS GENERAL NOTE: • T o make sure no chlorine is present in the water that reaches Do not use with water that is microbiologically WARNING: the membrane, you may want to use a chlorine test kit to unsafe or of unknown quality without adequate check the brine/reject water that flows from the membrane to disinfection before or after the system.
-
Page 4: Selecting The Faucet Location
2. Selecting the Faucet Location The drinking water faucet should be positioned with function, convenience and appearance in mind. An adequate flat area is required to allow faucet base to rest securely. The faucet fits through a 1 ⁄ -inch hole. Most sinks have pre-drilled 1 ⁄... - Page 5 for corrosion. Corroded pipes should be replaced before continuing with installation. (A) Attach the drain clamp to a vertical section of the drainpipe, about 6 inches above the trap. Make sure the opening on the drain clamp is facing towards the drinking water faucet (see diagram on previous page).
-
Page 6: Installing The Membrane
(A) To prevent leaks, apply 3 or more wraps of plumber tape to threads on tank. 1/4" Tube Thread the tank valve onto the top of the tank opening. Turn tank so handle is in line with tubing. The tank/valve connection will leak if not properly sealed. plumber tape CAUTION: Apply will normally seal the threaded connection. -
Page 7: System Start-Up
(B) For constant water flow, lift the faucet handle to lock it in the open position. 12. System Start-up NOTE: The reverse osmosis membrane is treated with a food grade sanitizing agent that may cause an undesirable taste. Although it is not harmful, it should be flushed from the system. -
Page 8: Optional Installation
OPTIONAL INSTALLATION Connecting your Reverse Osmosis System to Refrigerator Icemaker / Water Dispenser If you are connecting this unit to your refrigerator/icemaker with initial RO installation, wait to turn on the icemaker until CAUTION: the post-polishing filter has been flushed according to Step 12. Use plastic tubing and fittings. -
Page 9: Replacing The Pre-Filter And Post-Filter Cartridges
REPLACING THE PRE-FILTER AND POST-FILTER CARTRIDGES 1st Stage Pre-Filter and 2nd Stage Pre-Filter Cartridges: the housings. Make sure The cartridge should be replaced every six months. If your cartridge slips over standpipe in the bottom of the housing. water contains a high amount of sediment, it may be necessary NOTE: Be sure to install cartridges in proper housings (see diagram to change the 1st stage cartridge more frequently. -
Page 10: Replacing The 3Rd Stage Reverse Osmosis Membrane
REPLACING THE 3RD STAGE REVERSE OSMOSIS MEMBRANE About the Reverse Osmosis Membrane important that the O-ring be properly seated in the groove below the threads of the housing or a water When used under operating conditions specified on page 1 of leak could occur. -
Page 11: Troubleshooting Guide
TROUBLESHOOTING GUIDE Leaks between bottom of housing and cap Gradual return of taste and odor 1. Ensure sump is tightly screwed to cap. If it still leaks close Gradual return of unpleasant taste and odor over a period the cold water supply and tank valves. of time may indicate that your filter cartridges and/or RO membrane need to be replaced. -
Page 12: Performance Data
PERFORMANCE DATA Important Notice: Read this performance data and compare the capabilities of this system with your actual water treatment needs. It is recommended that before installing a water treatment system, you have your water supply tested to determine your actual water treatment needs. -
Page 13: Parts Guide
PARTS GUIDE 11 555583-43 3rd Stage RO Membrane TFM-50 244796 Drain Clamp 12 555574-43 4th Stage Post-filter GS-10RO-B with 244797 Inlet Supply Adapter fittings 244959 Faucet 13 150539 SW-1 Wrench 153049 Housing 14 150640 RO Housing Wrench 244794 1/4-inch Tubing 15 143495 Silicone 244795... - Page 14 Buyer Seller Date 14 • Pentek RO-2550 Installation and Operating Instructions ®...
- Page 15 Pentek RO-2550 Installation and Operating Instructions • 15 ®...
- Page 16 All Pentair trademarks and logos are owned by Pentair, Inc. or its affiliates. All other registered and unregistered trademarks and logos are the property of their respective owners. Because we are continuously improving our products and services, Pentair reserves the right to change specifications without prior notice.
Need help?
Do you have a question about the PENTEK RO-2550 and is the answer not in the manual?
Questions and answers