Unitech PA970 User Manual
Portable terminal
Hide thumbs
Also See for PA970:
- Operation manual (169 pages) ,
- User manual (48 pages) ,
- Quick start manual (4 pages)

Related Manuals for Unitech PA970


Summary of Contents for Unitech PA970
- Page 1 P P P P P A9 70 P 70 P or or or or or table T 70 P table T table T erminal erminal A9 70 P table T erminal erminal 70 P table T erminal User's Manual User's Manual User's Manual User's Manual User's Manual...
-
Page 2: Table Of Contents
Unitech PA970 & Accessories ......Tour of the Unitech PA970 ...... - Page 3 PA970 User's Manual Chapter 4. - Communication ......18 Introduction ....... . 18 Connecting .
- Page 4 In the above situation, plug the PA970 to the RS232 or USB cable, or place the unit into the Unitech PA970 Cradle (with 12V/2A AC-DC adapter, part number 1010-601478), and recharge the unit for 16 hours in order to fully charge its backup battery.
-
Page 5: Chapter 1. Introduction
Introduction Thank you for purchasing the Unitech PA970. Your PA970 is a rugged, compact, and lightweight palm-size mobile computer. It utilizes the Win- dows CE.NET operating system, and incorporates an integral bar code scanning laser device, color LCD with touch screen, keypad, built -in GSM/GPRS, 802.11b, and SD Card Bluetooth® communi- cation capability. -
Page 6: Unitech Pa970 & Accessories
PA970 User's Manual Unitech PA970 & Accessories After opening the PA970 box, please make sure the following items are present: User Guide CD PA970 Main Unit Battery Pack Quick Reference Guide Stylus... -
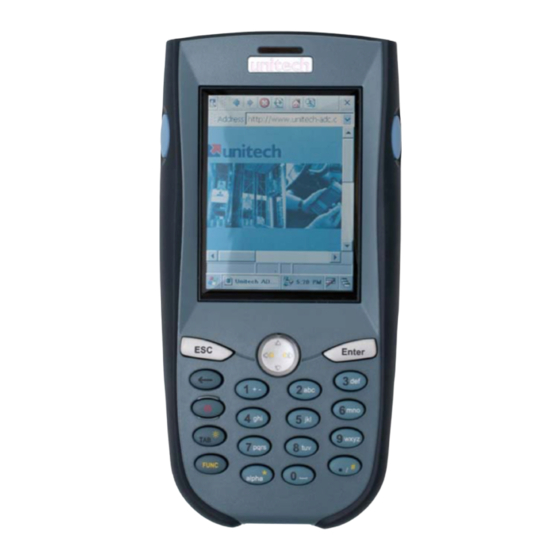
Page 7: Tour Of The Unitech Pa970
PA970 User's Manual Tour of the Unitech PA970 Stylus Scanner Touch Trigger Screen Bar Code Laser Scanner Cursor Button On/Off Key Keypad Cold Start (inside SD Card Compartment) IrDA Port SD Card Compartment Reset Hole GPRS (inside) WEAN (inside) Hand Strap... -
Page 8: First Steps With The Unitech Pa970
PA970 User's Manual First Steps with the Unitech PA970 There are three ways to provide power to the PA970: • Rechargeable Lithium-Ion battery pack • RS232/Charging cable or USB/Charging cable • Docking Station Data you enter may not be properly stored until the built-in backup battery has been adequately Note: charged. -
Page 9: Supplying Power To The Pa970
It may take up to 16 hours to fully charge the empty backup battery. The first time charge should be for at least 16 hours to insure a proper charge. CAUTION: Operating the PA970 for the first time without the AC adapter, and without fully charging the backup battery may result in loss of data stored in RAM memory. -
Page 10: Using The Stylus
Use very light pressure. Protective Screen Film The PA970 screen ships with a protective plastic film. You may remove this if desired by peeling from one corner. The screen will be more susceptible to scratching without the film, but will be more readable, and the touchscreen will work better. -
Page 11: Setting The Time Zone First
PA970 User's Manual Setting Time Zone, Date, and Time After Calibrating the PA970, the “Date/Time Properties” dialog box will appear. Follow the steps below to set the date and time. Setting the Time Zone first Follow the steps below to set up your time zone. -
Page 12: Flash Memory
Flash Memory is a re-writable location in which to store up to 64 MB of programs and data files. The benefit of this feature is that files and programs saved in Flash Memory are unaffected by the PA970’s power status. -
Page 13: Chapter 2. - Using The Keypad And Scanner
PA970 User's Manual Chapter 2. Using the Keypad and Scanner Keypad The PA970 keypad contains 19 keys, including: • Esape key • Cursor key • Enter key • Backspace key • ON/OFF key • Tab key • Function key •... -
Page 14: Alpha Key
Press the Cursor-UP to select a character. Useful Hotkeys The PA970 provides eight combination hot keys to activate specified screen setting functions or programs. These hotkeys are useful for calibrating the touch screen, toggling the backlight, and adjusting screen contrast when the menu-driven operation is disabled. Below is the list of hotkeys. -
Page 15: Software Keyboard (Windows Ce Keyboard)
PA970 User's Manual Software Keyboard (Windows CE Keyboard) Since the PA970’s keypad allows input of numeric characters only, the Windows CE Software provides a touch screen keyboard for input of other characters. The Windows based keyboard replicates the layout of a standard PC keyboard. -
Page 16: Using The Laser Scanner
Reading software must be enabled in order to operate the scanner. This can be a user- loaded application or a pre-loaded utility such as Scanner Setting.exe. Laser Scanner The PA970 has an integrated laser scanner, which reads all major bar code labels with excellent performance. Right... -
Page 17: Chapter 3. Power System
Charging the Main and Backup Battery for the First Time Note: Before using the PA970 for the first time, charge the unit for 16 hours to fully charge the empty backup battery. Operating the PA970 for the first time without the AC adapter, and without fully charging the backup battery may result in loss of data stored in RAM memory. -
Page 18: Power Status Indication
Battery Very Low No icon: When displayed means there is no external power supply to the PA970 but its battery power status is good. “Backup Battery Low” icon: When displayed indicates the backup battery is low and needs to be charged. -
Page 19: Checking Main And Backup Battery Status
How to Save Battery Power Automatic shut-down of the PA970 The PA970 will enter Idle Mode when there is no task, or all tasks are waiting for input. In default setting, the PA970 will automatically go to sleep if it remains idle for longer than 3 minutes and when there is no external charging power applied. -
Page 20: Backlight Setting
15 and 30 seconds, and 1, 2, 5, 10, 15, and 30 minutes. Automatically turn on the backlight when any key is pressed: This function is activated by the PA970’s keypad rather than the Windows CE keyboard. Warm Boot / Cold Boot Warm Boot •... -
Page 21: Charging Considerations
• To perform a coldboot, press the coldboot button inside the SD Card compartment. WARNING: Cold Boot will cause the PA970 to return to its original factory settings. Charging Considerations It is important to consider the environment temperature whenever you are charging the Lithium-Ion battery pack. -
Page 22: Chapter 4. Communication
Chapter 4. Communication Introduction The Unitech PA970 allows users to link to a host computer via RS-232,USB, IrDA, or RF connection for data communication. This chapter provides an overview of the communication methods of the PA970. The following subchapters cover these topics: •... -
Page 23: Activesync
Because you will be restarting your computer during installation, save your work and quit all programs before you begin. • To set up your communication settings, a PA970 serial cable is required to connect the PA970 to your host computer. •... - Page 24 Microsoft ActiveSync and restarted your computer, you’ll see the following screen: • Plug the PA970 into a RS232 or USB communication port on your desktop computer with the PA970’s communication cable (see page 18). • Turn the PA970 on. Click the Next button.
- Page 25 • Click the Next button and follow the instructions to set up a partnership between the PA970 and your desktop computer. This partnership allows you to synchronize information between the two computers.
-
Page 26: Using The Mobile Devices Window
Open the Explorer window by double-clicking your device icon in the Mobile Devices window. Use this window, which is the root window to the PA970, to copy and move files between the PA970 and your desktop computer, as described in the “Synchronization” section (starting page 24). -
Page 27: Changing Communications Settings
PA970 User's Manual Changing Communications Settings If Microsoft ActiveSync fails to detect the PA970 during installation, set up communications manually instead. Make sure the following conditions are met: • Verify that the correct communications port is selected for your desktop computer and that it is free. -
Page 28: Synchronization
Plug the RS232 cable or USB cable between the PC and the PA970. • Execute “Repllog.exe” from the PA970’s Windows directory (if ActiveSync is setup to sync using the IrDA port on both PC and PA970). To turn on IrDA: 1. -
Page 29: What Gets Synchronized
For details on synchronizing specific items, refer to Microsoft ActiveSync Help. Files All files created on the PA970 are stored in the My Document / PA970 My Documents folder (assuming the assigned Device Name is PA970). View those files by double-clicking the short-cut PA970 My Documents icon on your desktop computer. -
Page 30: Installing And Removing Software
PA970 User's Manual Installing and Removing Software Any program created for your PA970 can be installed as long as there is sufficient memory or storage space. First install the software on your desktop computer and then connect the PA970 to your desktop computer. -
Page 31: Sending Mail Remotely
PA970. You’ll also need to set up the remote connection on the PA970 using the Connections program. For wireless connections, you’ll require an RF card for the PA970. You’ll also need to set up the remote connection on the PA970 via the Network setting. -
Page 32: Receiving Messages
• To change InBox delivery options for remote mail: in InBox on your PA970, tap Service and then tap the service name. Then tap Service again and tap Properties. You’ll need to download a full message before you can view its attachments. -
Page 33: Wireless Communication
PA970 User's Manual Wireless Communication Your PA970 is equipped with Bluetooth, 802.11b, and GPRS modules for wireless communication. Bluetooth Setup Select the BTPowerON program from Wireless Connection on your PA970’s Startup Bar. Select BTPowerON and tap OK. Bluetooth ActiveSync Select BTActiveSync from Communication on Startup bar. - Page 34 PIN code. This PIN Code can be any series of letters and numbers, and will be the same code you enter on your PA970 when prompted. When prompted by your PA970, enter the same code that you’d entered on your PC. Once this is successfully entered, your synchronization is complete.
-
Page 35: Power On 802.11B
PA970 User's Manual Power on 802.11b Select RFPowerON and tap OK. Select RF LAN Card Power ON and tap OK. Select AP in the Wireless Information program. Set Wireless properties. -
Page 36: Power On Gprs
PA970 User's Manual Power on GPRS Note: Power off the terminal before installing the SIM card. Install the SIM card before you power on the GPRS. After removing the battery cover and battery pack you will find the SIM card slot located inside the terminal beside the built-in Wireless. -
Page 37: Obtaining An Ip Address Via Dhcp Server
OK button. Specifying an IP Address If there is no DHCP server in your LAN environ- ment, specify the individual IP address on each PA970 with the following steps: • Tap the radio button Specify IP Address • Input the proper IP address, Subnet Mask, and Default Gateway •... -
Page 38: How To Set Ssid
• Select SSID, Click OK Cisco 350 Site Survey Tool: The Unitech PA970 includes the Cisco 350 Site Survey Tool pre-loaded. To access the Site Survey Tool: 1. Open My Computer (or use File Explorer) Open the Cisco file folder 3. -
Page 39: Chapter 5. Bar Code Input Program
PA970 User's Manual Chapter 5. Bar Code Input Program Scan2Key The Scan2Key application can route input from a scanner port to keypad buffer, so that all input from the scanner will be treated as if they were input from the keypad. -
Page 40: Bar Code Symbologies
PA970 User's Manual Bar Code Symbologies: Set customization symbologies for each symbology including: / . x l l u n i l a t l , t n... -
Page 41: Appendix A: Technical Specifications
PA970 User's Manual Appendix A: Technical Specifications CPU / Memory Intel StrongARM 206MHz 32 CPU Built-in real-time clock 32MB for OS and application programs Flash ROM 64MB Built-in (Flash Memory Manager included) SDRAM 64MB Input / Output Input Devices Touch screen, stylus, keypad, full alphanumeric software... - Page 42 PA970 User's Manual Laser Depth of Field W idth of F ield in I nches / C entimeters 25.0 in . / 63.5 cm 20.0 in . / 50.8 cm 15.0 in . / 38.1 cm 10.0 in . / 25.4 cm 5.0 in .
- Page 43 PA970 User's Manual Power Power Options Lithium-Ion @7.4V, 1800mAH Main Battery Pack (Battery pack can be recharged 500 cycles or more) External AC/DC adapter @12VDC/2A with regulator Power Consumption Standby mode: 100mA Suspend mode: 5mA Battery Charge 3 hours with external AC/DC adapter...
-
Page 44: Docking Station
PA970 User's Manual Docking Station Interface 1 EIA RS232C IDC type connector via PC/computer, 1 USB port Power Input 16 pin connector for charging and communication with host computer AC/DC adapter @ 12 VDC/2A with regulator Quick charging typically takes 3 hours... -
Page 45: Appendix B: Troubleshooting Guide
PA970 User's Manual Appendix B: Troubleshooting Guide Problem Solution Battery needs recharging or replacement Terminal does not power on Insure that the battery is installed correctly Adjust “Power Properties” Terminal turns itself off Battery needs recharging Adjust “Power Properties” - especially if peripherals are used... -
Page 46: Fcc Statement
Declaration of Conformity with Regard to the R&TTE 1999/5/EC and EMC 89/336/EEC directives. Laser Information The Unitech PA970 is certified in the U.S. to conform to the requirements of DHHS/CDRH 21CFR Subchapter J and to the requirements of IEC 825-1. Class II and Class 2 products are not consid- ered to be hazardous. - Page 47 PA970 User's Manual Unitech America 3700 Industry Avenue, #103 Lakewood, CA 90712 800-490-9550 toll free www.ute.com...