FingerTec Kadex User Manual
Standard rfid card door access control & time attendance system
Hide thumbs
Also See for Kadex:
- Installation manual (3 pages) ,
- Installation diagram (2 pages) ,
- User manual (32 pages)
Table of Contents
Advertisement
Quick Links
Download this manual
See also:
Installation Manual
Advertisement
Table of Contents

Related Manuals for FingerTec Kadex


Summary of Contents for FingerTec Kadex
-
Page 1: User Guide
13-01-01 support@finger tec.com Kadex Standard RFID Card Door Access Control & Time Attendance System User Guide... - Page 2 CONTENTS CHAPTER 6 • DATA CHAPTER 1 • Deleting Transaction Logs GETTING STARTED Deleting All Data Viewing the User Guide in the Internet Managing User Privilege Terminal Included Accessories Resetting to Factory Settings Included Printed Materials Activating Terminal CHAPTER 7 • USB Registering Terminal Understanding the Need for USB Flash Disk Type of USB...
-
Page 3: Getting Started
The User Guide is available in the package when you purchase the terminal. The User Guide is also available online at fingertec.com and user.fingertec.com. Choose the lan- guage that you prefer for your online User Guide. Terminal Included Accessories 13-01-01... -
Page 4: Included Printed Materials
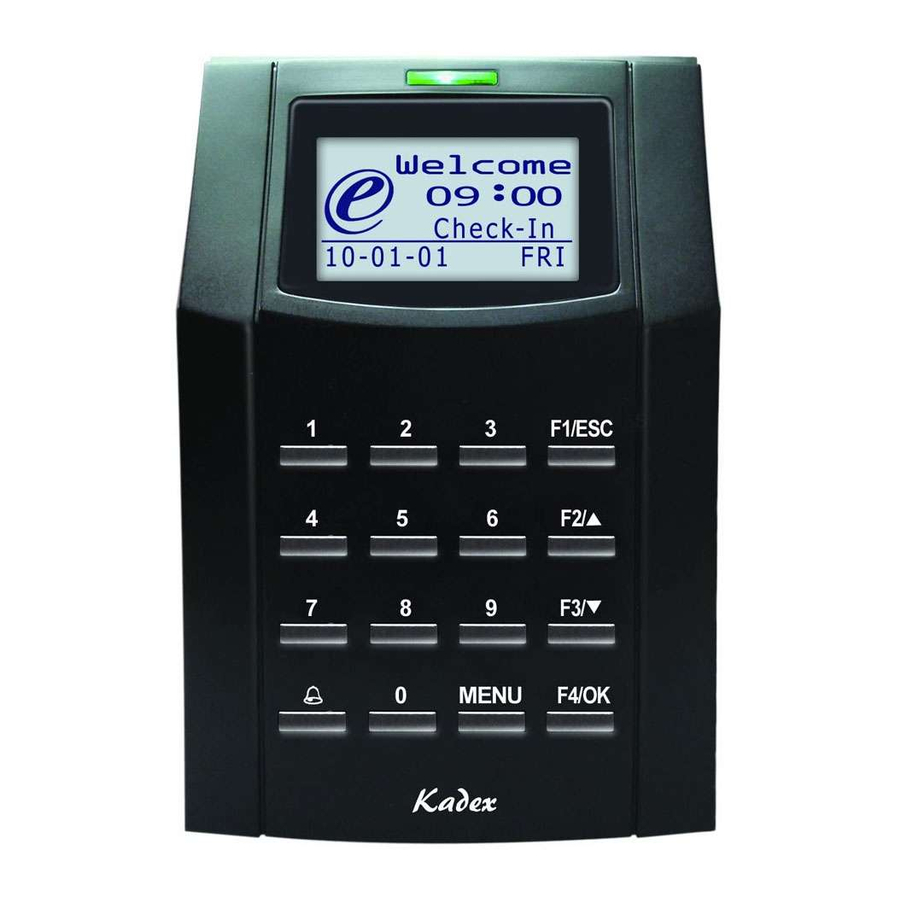
• Warranty Card Activating Terminal Every FingerTec access control model comes bundled with a unique license key. To start using the terminal with Ingress, you must connect the terminal to Ingress and perform online activation. Ingress reads the serial number of your terminal and sends it for verification at the FingerTec server via Internet. - Page 5 2 • BASICS Introduction to Products The terminal for time attendance and door access system supports RFID card ID, 5-digit password or combination of both. It works with security alarm system to alert users in cases of break in and when the duress function in the terminal is used. The terminal can integrate with a fire alarm system to unlock all doors when the fire alarm is triggered.
-
Page 6: Power On/Off Button
Mini UPS: Mini UPS 12V can also be used to provide power supply to turn on the ter- minals. Refer to accessory.fingertec.com for more information about accessories. Date/Time The terminals displays the date and time at the home screen. Choose the date and time format based on your preference. -
Page 7: Security Features
Security Features Security features help protect the information in the terminal from being accessed by unauthorized individuals. ADMIN AFFIRM Register an administrator into the system by enrolling or a password to a user ID. Press Menu > User Manage > Enroll Admin > Choose enrollment method > Perform enrol- ment and Save. -
Page 8: Connection - Syncing Terminals
3 • CONNECTION – SYNCING TERMINALS Installations FingerTec terminals offer several connections for power and communications. Installa- tions of FingerTec time attendance terminals are simple. MOUNT ON WALL Back Plate 4 feet / 1.2 meter (recommended) Attached the back plate on the wall securely and attach the terminal to the back plate when mounting it on the wall. - Page 9 Communications Connection points for power and communication are available on top of the terminals. Refer to the following diagrams for the terminals you require. ALM+ ALM- BEEP GLED For NC RLED or NO door INWD0 Wiegand lock system INWD1 3rd party controller Power BEL+...
-
Page 10: Usb Port
For NC (normally closed) door lock system USB PORT Linking with USB flash disk for remote data ALM+ EM lock transfer. (NC) ALM- Emergency break glass (NC) Key switch (NC) Release button Door FRONT sensor BEL+ Doorbell BEL- TCP/IP PORT +12V Connect with CAT 5 cable DC12V Power Supply... -
Page 11: Power Supply Port
To start using the terminal with Ingress, you must connect the terminal to Ingress and perform online activation. Ingress reads the serial number of your terminal and sends it for verification at the FingerTec server via Inter- net. -
Page 12: Determining Terminal Number
Connecting the Terminals to Ingress DETERMINING TERMINAL NUMBER Identify the number of your terminals to differentiate them between one another. In- gress can connect up to 999 units of terminal. Press Menu > Options > Comm Opt > Dev Num > Select the number. USING TCP/IP IP address is important, as it is a unique address of the terminal in LAN. -
Page 13: Using Usb To Download/Upload Data
To determine the type of USB flash disks compatible with the terminal, please refer to this link at fingertec.com/newsletter/HL_74.html using USB Press Menu > PenDrive Mgmt > Choose the operation that you want to carry out via USB flash disk. -
Page 14: Enrolling User
4 • USER Enrolling User The terminals can enroll passwords and card information. This chapter covers all pos- sible user enrollments in the terminals. Caution: Enrollment of supervisor or administrator is important to ensure the terminals data safety. Prior to enrolling a new user, a supervisor has to be enrolled first by using any of the methods mentioned below. -
Page 15: Adding User Information
Go to Chapter 8: Access Options to learn more about Grouping and Group Definition. Adding User Information User information can be added into FingerTec terminals through the software software. After the information is updated, sync software with the terminal to display the informa- tion. -
Page 16: General Settings
5 • SYSTEM General Settings ADJUSTING DATE/TIME The function of the terminal is to record time attendance and door access activities of employees. Precision in time and date cannot be compromised for the system to work efficiently. Adjust Date/Time according to your time zone. Press Menu > Options > Sys- tem Opt >... -
Page 17: Defining Work Codes
> OK Update Firmware FingerTec offer updates for the terminals regularly through software in a PC. Always con- sult your local reseller before you update firmware of the terminal or alternatively you can contact us at support@fingertec.com. Save the latest firmware in a USB flash disk before attempting this operation. - Page 18 The serial number of the terminal is im- portant to activate the software and to liaise with FingerTec Worldwide in support is- sues. The Serial number is pasted on the back of the terminal but in case the sticker is damaged, this is where you can retrieve the serial number.
- Page 19 View MAC: This feature is a security feature of the products. Linking Software to the terminal requires the correct MAC address. Without availability of MAC address, the software will not be activated correctly. All products are supplied with the correct MAC address to ease communication.
-
Page 20: Deleting Transaction Logs
6 • DATA Every time an enrollment is performed or a veri- DESCRIPTION CODE fication is done, a transaction log is created and stored inside the terminal. The data contains Terminal ID created terminal ID, date, time, userID and trans- Date (ddmmyy) 050210 action activity. -
Page 21: Understanding The Need For Usb Flash Disk
There are various types of USB available in the market. The terminal can only work with USB flash disks that support minimum Linux Kernel 2.4.x, working fine with Imation, Transcend and Pen Drive (minimum support Linux Kernel 2.4.x) To determine the type of USB compatible by FingerTec terminal, please refer to this link fingertec.com/news- letter/HL_74.html... -
Page 22: Access Options
TIME ZONE The period where a user is allowed access is called TIME ZONE or time period (TP). In total there are 50 time zones available in FingerTec models. Each Time Zone has 7 time slots for Monday until Sunday. -
Page 23: Access Combination
GROUPING When a group of users are having an almost similar time zone assignment, they can be grouped together. For example, Time Zone 2 and Time Zone 3 are suitable for one group where users in this group checks in at 8:00 until 12:00 has a, break time from 12:00 to 14:00 , continue from 14:00 to 18:00, and no one is allowed access during weekends. -
Page 24: Turning Off Alarm
To use the Access Combo, users from all the three time zones must be present for verification and the time period of the three groups must be valid in order to gain access. As shown in these time zones, 13:00 is the overlapping time where all of them can gain access. -
Page 25: Duress Options
This function offers various verification type(s) for every group that can be set according to time. Description of verification types available in FingerTec fingerprint terminal is explained in Chapter 4: User. Press Menu > Options > Access Options > Group VerType >... -
Page 26: Deleting Rfid Card
9 • RFID CARD FUNCTION The terminals are versatile and it can accept card verifications. This chapter covers the Radio Frequency Identification or better known as RFID system. The terminals accept RFID card with specifications of 64-bit, 125kHz. Enrollment of RFID Card RFID can be enrolled alone or with password. -
Page 27: Registering Hid Card
10 • HID CARD FUNCTION The terminals accept HID cards with specifications of 1325, 26-bit, 125kHz. The Prox II cards support 26-bit and it comes with unique programming information into its con- tents, which include card reading bits, card number range, facility code, site code, etc. HID cards also applies encryption to the contents o the card to maintain high level of security and to eliminate duplications. -
Page 28: Who Should Do The Auto Test
Auto Test page and only the administrator is allowed to perform the test. Before running any tests, kindly contact your reseller for advice or you could email support@fingertec.com. Run All Tests At Once The Auto Test contains 6 tests and to run all of them at once, Press Menu > Options >... -
Page 29: Troubleshooting
When this message appears, it means that the settings for the terminals and the comput- ers are not properly done. Find out which method you are using to connect. FingerTec offers LAN, RS232, RS485 and USB communication methods. Refer to Chapter 3: Connec- tion - Syncing Terminal to further understand the topic. -
Page 30: Other Resources
All rights reserved. No part of this book may be reproduced or transmitted in any form or by any means, electronic or mechanical, including photocopying, recording, or by any information storage and retrieval system, without written permission from FingerTec Worldwide Sdn Bhd. Every precaution has been made to supply complete and accurate information. - Page 31 © 2013 FingerTec Worldwide Sdn. Bhd. All rights reserved. • 062013...
Need help?
Do you have a question about the Kadex and is the answer not in the manual?
Questions and answers