Table of Contents
Advertisement
Advertisement
Table of Contents

Related Manuals for a2b Kuo+


Summary of Contents for a2b Kuo+
- Page 1 Owner’s manual Kuo+...
-
Page 3: Table Of Contents
Contents Introduction Important information Unpacking Your A2B Kuo+ Assembly and adjustments Getting to know your A2B Kuo+ Battery use, storage and disposal Pre-ride checks Maintenance 10.0 Safe and responsible riding 11.0 Cleaning the vehicle 12.0 Troubleshooting 13.0 Technical data 14.0 Warranty and safety notes 15.0... -
Page 4: Introduction
• This owner’s manual makes no representation about the safe use of the A2B Kuo+ under all conditions. See your A2B dealer for all service, repairs or maintenance and for referral to suitable classes, clinics and books on cycling. -
Page 5: Important Information
If you have any questions or are not sure about any instructions in this owner´s manual ask your A2B dealer. Read and understand the following warnings and cautions. If your A2B Kuo+ is used by others, please show this section to them so that they are aware of these important warnings to reduce the risk of an accident. -
Page 6: Unpacking
Your A2B Kuo+ should be fully assembled and the battery charged 7. The battery and charger should be tested when received. If the by your A2B dealer at the time of delivery. However, if you need to battery or charger is damaged in any way, a claim should be filed unpack your bike, follow these instructions: with the carrier. -
Page 7: Your A2B Kuo
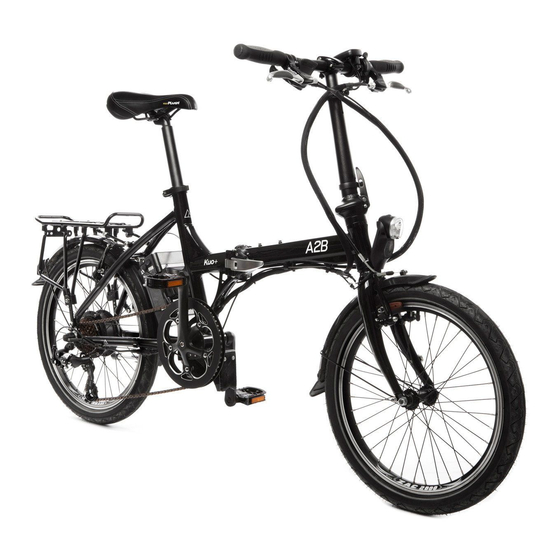
4.0 Your A2B Kuo+ 4.1 Components 1. Seat 2. Seat post 3. Seat post clamp 4. Main frame folding mechanism 5. Left side brake lever 6. Display 7. Gear shifter 8. Right side brake lever 9. State of charge indicator 10. - Page 8 Read, understand and follow the instructions that accompany the products you purchase for your A2B Kuo+. Before installing any component or accessory, including a different size tyre, make sure that it is compatible with your A2B Kuo+ by checking with your A2B dealer. ALWAYS: Follow the component manufacturer’s instructions if...
-
Page 9: Assembly And Adjustments
Your A2B Kuo+ should be fully assembled and the battery charged 1. Ensure that the seat post quick release lock is in the open by your A2B dealer at the time of delivery. However, if you need to position (image A). - Page 10 The pedals on the A2B Kuo+ arrive fully fitted and functional Can you comfortably operate the brakes? If not, take your A2B Kuo+ to your A2B dealer and ask them to adjust the angle of the To fold the pedals: brake levers.
- Page 11 To determine the correct height of the seat for the rider desired height is achieved. 1. Straddle the assembled A2B Kuo+ with your feet shoulder width 2. After adjustment, check to ensure the apart and fl at on the ground.
-
Page 12: Getting To Know Your A2B Kuo
Owner`s manual 6.0 Getting to know your A2B Kuo+ Do you fully understand how to use your A2B Kuo+? If not, before 7. Test the brakes at slow speed. Left lever actuates the rear brake your first ride, ask your A2B dealer to explain any functions or and the right lever actuates the front brake for the UK, Australia features that you do not understand. - Page 13 This is a safety feature. motor control connectors Your A2B Kuo+ allows for gradual application of power, and allows for adjustment of power between OFF and FULL. This feature enables you to adjust the speed at which you are most comfortable by the amount of torque or pressure that you apply to the pedals.
- Page 14 To shift gears, you are using your A2B. When the battery is below 20% it should pedal at a steady pace and click through the gears until you find be charged as soon as possible.
- Page 15 6.4 Power Control Module (Display) 6.4.2. Location of displayed information The A2B Kuo+ uses the display for controlling the amount of Assist Mode powered assistance the motor provides. State of charge as percentage The Display on your A2B Kuo+ is mounted on the left side of the Km/h, MPH, Cycles, Voltage, Tem- handlebar.
- Page 16 6.4..4 Changing Power modes: time the screen will show the discharge cycles; push down again then it will show the voltage of battery. The electrical system of the A2B Kuo+ is offering you six power modes. One more time press down...
- Page 17 Choose a level of assistance on the display and begin pedalling. The electrical system of your A2B allows for application of power Left side of your display at your according to the pedal assist settings chosen. The are five support handlebar you will find the Thumb levels (see also changing support modes) .
- Page 18 If you have any questions, or if you feel anything about your A2B pressure printed on the tyre sidewall). Kuo+ is not as it should be, ask your A2B dealer before you ride • Have your A2B Kuo+ serviced periodically to ensure that the again.
-
Page 19: Battery Use, Storage And Disposal
7.0 Battery use, storage and disposal 7.1 Using the battery hub motor. Use only the battery supplied with your A2B Kuo+ or a battery provided by A2B as a replacement for the battery supplied. For the proper use, maintenance and storage... - Page 20 Owner`s manual 1. Check the Voltage on the charger to ensure that it is set to your 10. Your battery is now ready for use. local line voltage (220-230V for Europe or 110V for the USA). 2. Plug the charger into the wall outlet. Never pull the cord to unplug the power cable as this will 3.
- Page 21 2. Slide the battery in until fully locked in place. 3. Now lock the battery in place using the supplied key before attempting to ride your A2B Kuo+. Failure to lock the battery will result in the battery falling off the bike and causing permanent...
- Page 22 7.5 Battery disposal battery is emptied before you store the bike. To maximise battery life A2B recommends to recharge the battery whenever the state of charge is below 20%. DO NOT dispose of the battery as household waste. Dispose of or...
-
Page 23: Pre-Ride Checks
Brake shoes are subject to normal wear. To ensure the brake system works correctly brake shoes should never be worn down to If you lend your A2B Kuo+ to someone else, make sure you also lend their limit. Ask your A2B dealer to check and replace brake shoes. - Page 24 Owner`s manual Folding Method The folding mechanism 1. Ensure that both pedals are folded as described under 3.4. 2. Open the lever to allow the handle bars to be pushed down (C & D) 3. Now rotate the safety catch (E) so that you can pull down the stem folding lever (F).
-
Page 25: Maintenance
9.4 Drive chain If you are uncertain about any aspect of the assembly and Your A2B Kuo+ has a high quality chain that needs to be cleaned and adjustment of your A2B Kuo+, ask your A2B dealer or a qualified lubricated regularly with bicycle industry approved synthetic lubricant. - Page 26 If you are unsure about this brake set-up and adjustment procedure, please take your A2B Kuo+ to your A2B dealer or any If you are unsure about this brake set-up and adjustment pro- qualified bicycle mechanic, and ask for assistance in adjusting the cedure, please take your bike to your A2B dealer or any qualified brakes.
-
Page 27: Safe And Responsible Riding
Be extra careful in wet conditions In wet conditions it might take double or triple the distance you need to stop your A2B Kuo+. Ride slower, anticipate your stops and apply the brakes earlier. Wet roads are slippery – take corners carefully. - Page 28 • You have read this manual, reviewed the warnings and the A2B Kuo+ functions and operating procedures with your child before If you don’t understand any aspect of the use and care of your A2B letting them ride it. Kuo+, ask your A2B dealer.
-
Page 29: Cleaning The Vehicle
Rubber and plastic parts could be After longer rides, thoroughly clean the damaged by aggressive or penetrating A2B and preserve with a commercially cleaning agents or solvents. available anti-corrosion agent. After cleaning and before beginning your ride, always test your brakes! -
Page 30: Troubleshooting
Owner`s manual 12.0 Troubleshooting No power? Here are a few suggested solutions. If they do not solve your problem, ask an A2B specialist dealer. Problem Possible cause(s) Solution The A2B will not switch on. 1. The battery is dead. Recharge the battery. See sections 7.2 and 7.3. -
Page 31: Technical Data
13.0 Technical Data General performance specification Battery Management System (BMS) • Curb weight without battery – 17 kg (37.5 lbs) • Controls and stops over-charging • Curb weight with battery – 19 kg (42 lbs) • Controls maximum charge current • Maximum permitted with load 120 kg (264 lbs) • Controls over-discharge amperage (30 A max) • Maximum Speed on flat level ground, motor power only, no wind,... -
Page 32: Warranty And Safety Notes
2.2 Hero Eco grants this warranty in addition to your legal claims with years as of the purchase date of the A2B to you; for the lithium ion regard to goods that are defective or do not satisfy the warranty battery, two years from the purchase date of the A2B for Europe conditions in other respect. -
Page 33: Disposal
A2B@heroeco.com 4.3 Provision 4.2, however, does not prevent claims with regard to 3.2 Hero Eco will ask you to take the A2B together with your proof foreseeable losses or damage to objects in your possession. of purchase to an authorised A2B specialist dealer. At its own 4.4 This provision in no way includes or limits the liability of Hero... -
Page 34: Owner Registration
Battery serial number: To fully protect your A2B against theft, buy a high quality bicycle lock and chain. Secure your A2B to a stationary object every time it is left unattended and also lock your front and rear wheel and motor to the frame. - Page 35 A2B Global Head Office Hero Eco Ltd 80 Coleman Street London EC2R 5BJ Germany Hero Eco Ltd Reichenberger Strasse 124 10999 Berlin Hero Eco Inc. 207 9th St. San Francisco, CA 94103 www.wearea2b.com Edition 1.1 July 2014 © Hero Eco Ltd.
- Page 36 Owner`s manual weareA2B.com 660001443000...
Need help?
Do you have a question about the Kuo+ and is the answer not in the manual?
Questions and answers