Table of Contents
Advertisement
Advertisement
Table of Contents

Related Manuals for a2b Hybrid/24


Summary of Contents for a2b Hybrid/24
- Page 1 Hybrid/24 owner’s manual...
-
Page 3: Table Of Contents
Content 1.0 Introduction p. 2 2.0 Important Information p. 3 3.0 Your A2B p. 4 4.0 Understanding your A2B p. 10 5.0 Battery use, storage and disposal p. 19 6.0 Important Pre-ride Safety Information p. 25 7.0 Maintenance p. 28 8.0 Cleaning your A2B... - Page 4 Owners manual 1.0 Introduction Welcome and congratulations on buying your new A2B Hybrid*, the electric bike that’s taking transport in a whole new direction. Your bike will give you the freedom to go your own way. It’s the new revolutionary way to get to work, pop to the shops or just get some fresh air.
-
Page 5: Important Information
This indicates a potentially hazardous situation which, if not avoided, could result in a serious injury, property damage or damage to equipment or inadvertent system failure. Provides helpful or other important related information. If you have any questions or are not sure about any instructions in this owner manual ask your A2B dealer. -
Page 6: Your A2B
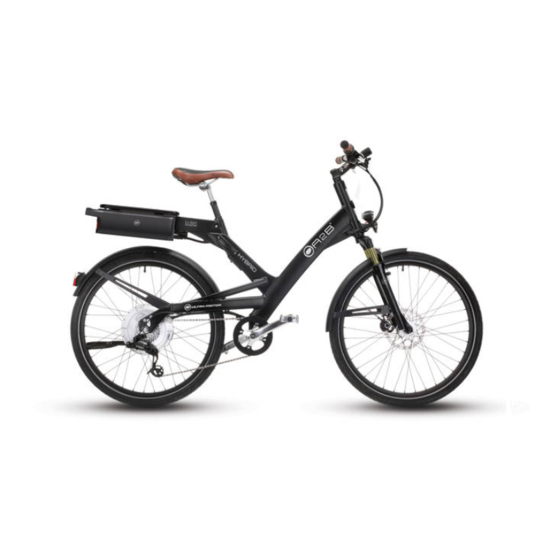
Owners manual 3.0 Your A2B Saddle (seat) 3.1 Components Seat post Seat post quick release Front mud guard Front wheel tyre Front wheel rim Front disc brake and rotor Pedal, crank arm and chain ring Drive chain 10. Motor 11. Kickstand 12. - Page 7 Owners manual A. Right brake lever 3.1 Components (operates rear brake) B. Left brake lever (operates front brake) C. Gear shifter D. Right pedal E. Left pedal...
- Page 8 Can you comfortably operate the brakes? If not, take your A2B different tyre, make sure that it is compatible with your A2B by to an A2B dealer and ask them to adjust the angle of the brake checking with your A2B dealer.
- Page 9 3.4 Seat height adjustment securely tightened when it takes a significant amount of force The seat height may require adjustment. Ask your A2B dealer to position it in the closed position. The appropriate amount of to adjust it before you ride, however to adjust the seat yourself...
- Page 10 3. Once aligned, tighten the serious or fatal injury. bolts consistently to 15 Nm. Ensure there is no play in the steering and that the steering is working smoothly. Should you need further advice to adjust the headset, please contact your A2B dealer.
- Page 11 Owners manual 3.7 Display adjustment 1. Loosen bolt E on the rear side of the display using an ap- propriate allen key. 2. Position the display to the desired angle. 3. Tighten the bolt E to 6 Nm.
-
Page 12: Understanding Your A2B
Owners manual 4.0 Understanding your A2B After having read this section, if you are still unsure, please ask an A2B dealer to explain any functions or features that you do not understand before your first ride. 4.1 A2B Overview 6. Apply motor power by pedalling the A2B. - Page 13 4.3 Display and electronic key Turning ON/OFF the electrical system with the electronic key Your A2B is protected by an electronic key (E-key). The system needs to be activated before your ride. 1. Hold the E-Key directly above the display.
- Page 14 Owners manual 4.4 Display - functions Functions and menu description A. Knob button (turn and push function) B. Battery state of charge indicator C. Speed indicator D. Assist level indicator E. Speed unit (km/h or mph) indicator Consider the E-key as a car or door key. We recommend that you attach the E-key to your other keys you carry with you.
- Page 15 Owners manual 4.5 Assist level pre-selection You have the choice between 3 different assist level modes. Which assist level mode is actually selected is shown on the display at the right upper side. Select the assist level: Push the knob button toa enter the menue. Turn the knob (counterclockwise) to change between the different assist modes.
- Page 16 Owners manual miles 4.6 Setup (change between km & miles). setup Push the knob button to enter the menue. Turn the knob untill (6) appears. Now push the knob setup for 2 seconds to enter the setup menu. You can now change between km and miles by pushing the knob (7)again for...
- Page 17 Owners manual Error messages will automatically be reset if the error If you leave your A2B inactive for 10 minutes, the system will ceases to occur. Please contact your dealer in case of a switch off (including lights) and will go into sleep-mode.
- Page 18 Owners manual 4.10 Gears more effort required. Your A2B has a rear derailleur controlled by the gear shifter on Never pedal backward the right side of the handlebar. while shifting gears. The To shift gears, pedal at chain could derail and...
- Page 19 1. The luggage carrier is attached to the rack tube of your A2B by your luggage. by 4 x T25x18 torx flat head screws. If you are frequently using...
- Page 20 If you have any questions, or if you feel anything about your • Fully charge your battery before each ride A2B is not as it should be, ask your A2B dealer before you ride • Check tyre pressure regularly and inflate to the pressure of again.
-
Page 21: Battery Use, Storage And Disposal
Use only the battery sup- Use only the battery charger supplied with this battery. Use plied with your A2B or a of any other battery charger will void the warranty and may battery provided by A2B... - Page 22 5.2 Charging the battery Your A2B dealer should provide a fully charged battery upon delivery of your A2B, should this not be the case, please ensure that prior to its first use, you charge the battery supplied with your A2B for at least 12 hours.
- Page 23 Owners manual 5. LED Indications: • The Power LED will illuminate RED when the charger is plugged into a wall outlet and the ON/OFF switch is in the ON position. • The Indicator LED will illuminate AMBER while the charger is charging the battery. •...
- Page 24 80% of its capacity over at least 500 discharge/ recharge cycles. As capacity diminishes, you will notice a gradual drop-off in maximum range capability. When range falls to an unacceptable level, contact your A2B dealer for a replacement battery.
- Page 25 Owners manual 5.4 Attaching and connecting the battery to your A2B 4. Carefully align the battery to the battery rails under the Prior to its first use, charge the battery supplied with your A2B for at least 12 hours. luggage carrier and attach the battery by pushing the battery 1.
- Page 26 Owners manual 5.5 Battery Storage 5.6 Battery Disposal Disconnect the battery from the bike and store the battery in a DO NOT dispose of the battery as household cool (10º-21ºC, 50º-70ºF), dry place. Avoid exposure to direct waste. sunlight. Dispose of, or recycle according to local authority charging instructions for storage Hours guidelines or contact our Customer Services...
-
Page 27: Important Pre-Ride Safety Information
ALWAYS wear an approved bicycle helmet. If you lend the A2B. You need to make sure that: your A2B to someone else – make sure you also lend them an • The A2B is properly fitted to the child. approved helmet. - Page 28 Have your A2B checked by an A2B dealer at LEAST once a and the left brake lever year. Your safety depends on the roadworthiness of your A2B.
- Page 29 The 4 allen screws A for the and will require significantly more energy (electric and human) handle bar clamp have to be to propel your A2B. Low tyre pressure will significantly reduce tightened with 5 Nm torque. the range under electric power. The recommended tyre pres- sure for the front wheel and rear wheel is 2.8 bar (40 psi).
- Page 30 Owners manual 7.0 Maintenance 7.2 Hub bearings Check the hub bearing Have your A2B checked by an A2B dealer at least once a year. adjustment periodically by lifting the wheel off the ground and 7.1 Wheels spinning it and try to move the...
- Page 31 Damaged or worn tyres should be replaced immediately. Take as necessary. your A2B to an A2B dealer or a qualified bicycle mechanic to Should your brake Pads appear to be worn down or your repair and/or replace your tyres if necessary.
- Page 32 Your A2B has a quick release front (only) hub for easy wheel removal and installation. Please follow the instructions provided for the quick release mechanism to ensure proper use. Failure to properly install this quick release front hub may result in the front wheel falling off while you are riding.
- Page 33 If you are unsure about this brake set-up and is parallel to the centreline of the adjustment procedure, please take your A2B to your A2B hub. dealer and ask for assistance in adjusting the brakes.
- Page 34 5. Loosen and remove the torque arm retention bolt from the left hand side drop out. 6. Remove the torque arm from the A2B by sliding it off the axle. 7. Remove the rear wheel by sliding it out of the frame while...
- Page 35 DO NOT ride your A2B if you are not confident that the brakes are working properly. D. Ensure correct replacement of the chain on the front and rear chain rings.
-
Page 36: Cleaning Your A2B
- Afterwards, dry off with a the salt. polishing cloth or chamois. - At the end of each ride, wash the A2B with cold water. - Do not wipe off dust or dirt - Thoroughly dry the A2B. with a dry cloth, to avoid... -
Page 37: Trouble Shooting
Owners manual 9.0 Trouble Shooting No power? Here are some solutions. If they do not solve your problem ask an A2B dealer for help. Possible cause(s) Problem Solution 1. Dead battery A2B does not turn on Recharge battery. See 5.2 and 5.3 •... -
Page 38: Technical Information
Owners manual 10.0 Technical Information General performance specification Battery management system (BMS) • Overall Dimensions 17” – 1720 mm x 650 mm x 1000 mm • Controls and stops over-charging • Overall Dimensions 20” – 1745 mm x 650 mm x 1070 mm •... -
Page 39: Warranty & Security Details
A2B to You; For the motor system (motor and controller), 2.3 This Warranty does not apply to any defect in the Goods arising from: two years from the date of delivery of the A2B to You; For the lithium 2.3.1 fair wear and tear;... - Page 40 4.2.5 any waste of time. 3.2 Hero Eco will ask You to return the A2B together with proof 4.3 However, clause 4.2 shall not prevent claims for foreseeable loss of purchase to an authorised A2B Dealer and once Hero Eco has of, or damage to, Your physical property.
-
Page 41: Owner Registration
Motor serial number: To fully protect your A2B against theft, buy a high quality bicycle lock and chain. Secure your A2B to a stationary object every time it is left unattended and also lock your front and rear wheel and motor to the frame. Use your E-key as an anti-theft device. - Page 42 Owners manual Hero Eco Ltd 80 Coleman Street London EC2R 5BJ www.wearea2b.com EN Edition 1.0 © Hero Eco Ltd. All rights reserved, March 2013...
- Page 43 Owners manual...
- Page 44 www.wearea2b.com...
Need help?
Do you have a question about the Hybrid/24 and is the answer not in the manual?
Questions and answers